


Packard Bell EasyNote S Disassembly Manual
12
6. Gently lift off the top cover.
7. Disconnect all cables from the main board: LCD switch cable (at the top near the LCD cable),
modem cable and speaker and subwoofer cables.
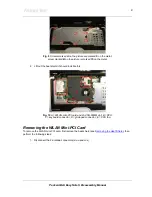
8. Remove the modem (see
Removing the Modem
).
9. Remove the 2 long screws and 2 short screws of the metal hard disk drive bay.
10. Push the DC jack out of it holder (right top side). You do not need to disconnect the DC jack
from the main board!
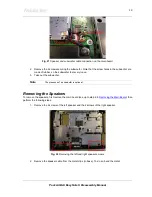
11. Remove the subwoofer (see
Removing the Subwoofer
).
12. Remove the 2 hex bolts on the main board; Next to the holes of the hex bolts you should see a
symbol like an ellipse with a square across.
Fig. 17
Symbol on main board indicating hex bolts.
13. Remove the 4 screws on the main board; There is an enc symbol near their holes.
14. Slide out the main board.
Note
You have to pull the backside forward quite extensively to release the VGA port.
Note
You can pull the left side of the casing outwards to allow more space for the PCMCIA eject
button and the audio connector to come out. The presence of PCMCIA is optional.
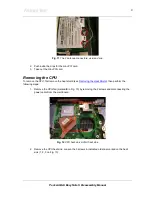
Removing the Modem
To remove the modem, first remove the main board (see up to step 6 in
Removing the Main Board
) then
perform the following steps:
1. Remove the screw securing the modem.
Fig. 18
Removing the modem screw.