Pacific Zuma Скачать руководство пользователя страница 4

Zuma Assembly and Maintenance Guide

page 4

Table of Contents

4

Adjustments ................................................................................................... 29

Cable Adjustments ................................................................................................................... 29

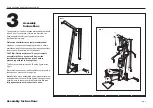
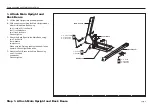
Main Cable Adjustment ............................................................................................................ 29

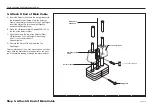
Selector Stem Adjustments ...................................................................................................... 30

   Forward Angle Adjustment .................................................................................................... 30

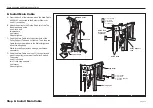
   Backward Angle Adjustment ................................................................................................. 31

   Side-to-Side Vertical Adjustment ........................................................................................... 32

Maintenance ............................................................................................................................ 32

Warranty Card and Specifications .............................................................................. Back cover

Содержание Zuma

Страница 1: ...Assembly and Maintenance Guide Zuma Strength Training Fitness Equipment...

Страница 2: ...moving parts Always check the unit and its cables before each use Make sure that all fasteners and cables are secure and in good working condition Do not use outdoors Personal Safety During Assembly...

Страница 3: ...6 Assembly Tips 6 Assembly Instructions 7 Open Box 1 8 1 Attach Main Upright and Back Beam 9 2 Attach Top Beam 10 3 Install Guide Rods 11 4 Secure Guide Rods 12 5 Attach U End of Main Cable 13 Open B...

Страница 4: ...Contents 4 Adjustments 29 Cable Adjustments 29 Main Cable Adjustment 29 Selector Stem Adjustments 30 Forward Angle Adjustment 30 Backward Angle Adjustment 31 Side to Side Vertical Adjustment 32 Mainte...

Страница 5: ...at require assembly Ask for assistance during the assembly process Review the Installation Requirements found on the next page When instructed to open a box carefully unpack the pieces and lay them on...

Страница 6: ...in the same direction For aesthetic purposes insert all the bolts in the same direction unless specified in text or illustrations to do otherwise Leave room for adjustments Tighten fasteners such as...

Страница 7: ...he assembly steps sequentially the process will take time but is fairly easy CAUTION Obtain assistance Do not attempt to assemble the Zuma by yourself Review the Installation Requirements on page 6 be...

Страница 8: ...Zuma Assembly and Maintenance Guide page 8 1 2 3 4 5 6 Open Box 1 Open Box 1 Use tie cutters to open the box The illustration shows how the Zuma will look after you complete this section...

Страница 9: ...A Lift the Main Upright into a vertical position B With one person holding the Main Upright steady attach it to the Main Base using two inch by 3 inch bolts four inch washers two inch locknuts Wrench...

Страница 10: ...ts 2 Attach Top Beam A Place the Top Beam on the Main Upright Ensure the beam extends out as shown B Attach the Top Beam to the Main Upright from the side using two 3 inch bolts four washers two lockn...

Страница 11: ...ine B Place one Guide Rod Spacer and one Weight Cushion on each Guide Rod and allow it to slide down to the top of the Main Base C Add the fifteen 10 lb weights Note the tab location for the weight de...

Страница 12: ...ds 2 1 bolts Guide Rods 2 B Guide Rod Bracket 4 Secure Guide Rods A Position the Guide Rods under the Guide Rod Bracket B Attach the Guide Rods to the bracket using two 1 inch bolts Insert the bolts t...

Страница 13: ...several holes above the Top Cap Weight Insert the Weight Pin into the weight stack to suspend the Selector Stem B Place the U Bracket of Main Cable 40509 102 on the top of the Selector Stem C Align th...

Страница 14: ...Zuma Assembly and Maintenance Guide page 14 1 2 3 4 5 6 Open Box 2 Open Box 2 Use tie cutters to open the box The illustration shows how the Zuma will look after you complete this section...

Страница 15: ...pright Assembly A Attach the Seat Upright Assembly to the Main Upright using two 4 inch bolts four washers two locknuts Wrench tighten B Attach the Leg Extension Arm to the Seat Upright Assembly using...

Страница 16: ...ach Press Arm Top Beam Press Arm 1 7 bolt 2 washers 1 locknut A 7 Attach Press Arm A Attach the Press Arm to the Top Beam with the label facing out using one 7 inch bolt two inch washers one inch lock...

Страница 17: ...to the Selector Stem over one 4 inch pulley B Attach the pulley to the Guide Rod Arm of the Top Beam as shown using one 2 inch bolt two washers one locknut Wrench tighten C Feed the Main Cable into t...

Страница 18: ...locknut Finger tighten G Attach one 3 inch pulley in the top window of the Main Upright using one 2 inch bolt two inch step spacers one locknut Finger tighten H Feed the Cable over the top of the pull...

Страница 19: ...up through the back window in the Top Beam L Attach one 3 inch pulley over the Cable and in the back window of the Top Beam using one 2 inch bolt two inch step spacers one locknut Make sure the Cable...

Страница 20: ...pright Assembly A Attach the Foot Plate and one 3 inch pulley to the Seat Upright Assembly through the top hole using one 4 inch bolt two washers one cable retainer one inch barrel spacer one locknut...

Страница 21: ...g Extension Arm window using one 2 inch bolt two inch step spacers one locknut Wrench tighten G Insert a bolt under the pulley in the Leg Extension Arm to serve as a cable retainer using one 2 inch bo...

Страница 22: ...y Plates on the Main Cable where it enters the Pulley Support Tube C Wrap the Lower Cable over one 3 inch pulley and attach the pulley to the Floating Pulley Plates in the appropriate hole using one 2...

Страница 23: ...om the back to the front B Place one 3 inch pulley in the window of the Main Upright under the Cable then attach the pulley using one 2 inch bolt two inch step spacers one locknut Make sure the Ab Cab...

Страница 24: ...er Pad Rod Holder faces toward the front C Slide a large Foam Roller completely on one end of the Roller Pad Rod then secure it in place by pounding one mushroom cap in the end using the rubber mallet...

Страница 25: ...in place by pounding one mushroom cap in the end using the rubber mallet J Insert the Roller Pad Rod through the hole in the Main Upright above the previously installed Seat Pad K Slide a small Foam...

Страница 26: ...r one locknut Place the thin hat washer so it cups upward Wrench tighten still allowing movement C Cover the end of the bolt with the black rubber cap Consider using the mallet to pound on the cap D R...

Страница 27: ...Bar when it s not in use Alternatively you can install the Tricep Straps to the Main Cable using the spring clip allowing exercisers to work out a different muscle group B Attach the Curl Bar to the...

Страница 28: ...the decals to the front surface of the weight plates in the tab location as indicated Remove the front decal protector This completes box 2 and the assembly of your Pacific Fitness Zuma Now that you...

Страница 29: ...ly on the top weight of the weight stack The Cable rubs the inside edges of the pulleys Excess slack exists in the Cable CAUTION Take the time to perform the Cable adjustments outlined here If the Cab...

Страница 30: ...f the weight plates no adjustments are needed If the stem contacts the inside of the plates observe the position of the Selector Stem and then follow the appropriate instructions If the Selector Stem...

Страница 31: ...at and contacts the inside of the Weight Stack during use adjust it by following these steps CAUTION This adjustment requires two people A Completely disassemble the Top Cap Weight Selector Stem and U...

Страница 32: ...ople A Pull the Selector Stem and Top Cap Weight up to expose at least five Selector Stem holes B Insert the Weight Pin near the base of the Selector Stem to hold it in place C To center the Selector...

Страница 33: ...CONSEQUENTIAL DAMAGES SUCH AS INCONVENIENCE COMMERCIAL LOSS LOST PROFITS OR DAMAGE TO OTHER PROPERTY Some states do not allow the exclusion or limitation of incidental or consequential damages so the...

Страница 34: ...s of Precor Incorporated Specifications subject to change without notice Copyright 2001 Precor Incorporated Precor web site www precor com Precor Incorporated 20031 142nd Avenue NE P O Box 7202 Woodin...

Отзывы: