PACIFIC CYCLE Hello Kitty KT1037WM Скачать руководство пользователя страница 7

5

4.

 Plug the handlebar connector 

into the motor connector.

1.

 Remove the locknut with the nut 

wrench from the front axle. 

2.

 Slide a washer onto the front 

axle. Place an inner bushing (tab 

wheel on the axle and slide the inner 
bushing inside the wheel. Place the 
outer bushing onto the axle and 
slide inside the wheel. Then place 
another washer onto the axle.

4.

 Align the 3 tabs on the wheel 

cover with the slots in the outer 
bushing and snap into place.

5. 

Repeat for the other side.

1.

 Plug the wire connector into the 

battery connector.

(ZZLTISPUN[OL/HUKSLIHY*VU[PU\LK

(ZZLTISPUN[OL-YVU[>OLLSZ

*VUULJ[PUN[OL=LOPJSL)H[[LY`
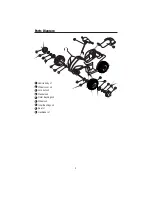
MOTOR CONNECTOR

WHEEL COVER

WHEEL

INNER BUSHING

WASHER

WASHER

LOCK NUT

OUTER BUSHING

HANDLEBAR CONNECTOR

3.

 Attach a locknut onto the axle and 

tighten snugly with the nut wrench. 
DO NOT OVERTIGHTEN.

Содержание Hello Kitty KT1037WM

Страница 1: ...is product to the store If any parts are missing or damaged please contact one of our customer service representatives by phone at 8 or by e mail at cXVWRPHUVHUYLFH NLGWUD WR V FRP 3DFLILF FOH QF DPPH...

Страница 2: ...ls 5 Connecting the Vehicle Battery 5 Attaching the Seat 6 Use 7 Charging the Battery 7 9 Using the Controls 10 Rules of Safe Riding 11 Maintenance 12 General 12 Battery 12 13 Re charge Interval and T...

Страница 3: ...PT T JVTIPULK LPNO PZ RNZ SIZ 3 7 9 0 065 9 8 09 E J K LM N O 3 653 Recharge battery according to directions see pages 7 9 and maintain battery see pages 12 14 69 6 6 9 03 73 9 33 9505 5 4 3 05 9 065...

Страница 4: ...x1 Wheels x2 Inner Bushings x2 Washers x6 2SFV for replacement Handlebar x1 Outer Bushings x2 Charger x1 Nut wrench x1 Seat x1 Wheel covers x2 6 OLY VVSZ ULLKLK MVY HZZLTIS Phillips screwdriver Adjus...

Страница 5: ...3 7HY Z PHNYHT 1 2 Z _ 3 _ 4 Z 5 _ 6 Z _ 7 _ 8 9 k...

Страница 6: ...column and the handlebar connector on the handle opening in the vehicle 2 Fit the end of the steering column through the hole in the 3 E it snaps into place on the vehicle body PUSH DOWN k q z N z K...

Страница 7: ...the wheel Then place another washer onto the axle 4 Align the 3 tabs on the wheel cover with the slots in the outer bushing and snap into place 5 Repeat for the other side 1 Plug the wire connector i...

Страница 8: ...s 4 Plug the charger connector into the battery as shown 5 Re attach the seat SCREW WASHER WASHER NUT 2 Use a Philips screwdriver and an Adjustable wrench to secure the seat to the vehicle body 1 Use...

Страница 9: ...should only be done by an adult CAUTION You must charge the 6 volt battery for a FULL 8 10 hours prior to use NEVER charge the battery longer than 20 hours K O z the battery longer than 20 hours Neve...

Страница 10: ...79 5 09 5 3 90 6 2 zq qN E E zq qN E occur q z zq qN E z z HZO OHUKZ HM LY OHUKSPUN q shock zq qN battery 6 volt battery is heavy and contains lead acid electrolyte cause serious injury supply cord an...

Страница 11: ...LK TVU OZ HUK W 4 04 4 0 0 2 3 K N N N O page 14 OHYNL VS H LY 7YPVY V PYZ ZL VU PU LK 653 5 3 5 9 5 9 9 9 See page 12 13 for battery maintenance ZPUN OL VS X HK 79 5 051 90 5 5 9 3 03 5 5 09 3 7 9 0...

Страница 12: ...10 ZPUN OL VU YVSZ 1 Power Switch N button to stop POWER SWITCH...

Страница 13: ...3 96 5 E 5L LY KYP L ULHY H LY V UV KYP L KV U H Z LLW ZSVWL or slip V UV KYP L W H Z LLW ZSVWL V UV KYP L ULHY KYVW VMMZ Z JO HZ Z LWZ VY KLJRZ could tip over 2LLW OHUKZ OHPY HUK JSV OLZ H H MYVT TV...

Страница 14: ...12 4HPU LUHUJL LULYHS 4HPU LUHUJL H LY Note locknuts q z Z serious injury or death E E z q E K E K or handles E K battery and keep the battery dry 9505...

Страница 15: ...an 20 hours See pages 7 9 for charging instructions k could occur temperatures are over 24 C 75 F or under 24 C 10 F Do not place the battery It is best to leave the battery in the battery compartment...

Страница 16: ...er 6 Replace the battery with a 6 volt quad battery and reconnect the connectors 7 Replace the battery bracket 8 Replace the seat Do not overload the vehicle Do not tow anything behind the vehicle Do...

Страница 17: ...0 3 H LY JVUULJ VY VY PYLZ HYL SVVZL E E 76 0 3 H LY PZ KLHK k N 76 0 3 SLJ YPJ Z Z LT PZ KHTHNLK Z 76 0 3 4V VY PZ KHTHNLK 76 0 3 OLLS U Z HYL SVVZL Q 796 3 4 OL VS X HK KVLZ UV Y U LY SVUN 76 0 3 H...

Страница 18: ...S X HK PZ V LYSVHKLK O 76 0 3 YP PUN PU OHYZO JVUKP PVUZ E Q 796 3 4 VS X HK ULLKZ H W ZO V NV MVY HYK 76 0 3 7VVY JVU HJ VM PYLZ VY JVUULJ VYZ E around the motor and reconnect if necessary 76 0 3 LHK...

Страница 19: ...JVUULJ VY PZ SVVZL E 76 0 3 OHYNLY PZ UV WS NNLK PU 76 0 3 OHYNLY PZ UV VYRPUN Q 796 3 4 H LY I aaLZ VY N YNSLZ OLU JOHYNPUN also normal Q 796 3 4 OHYNLY MLLSZ HYT OLU YLJOHYNPUN IH LY This is normal...

Страница 20: ...18 6UL LHY 3PTP LK HYYHU P_ 4VU O 3PTP LK HYYHU VU H LY K OO _ OO _ N L _ O HYYHU 3PTP H PVUZ X z X 3PTP H PVU VM HTHNLZ 3PTP H PVU VM HYYHU PLZ HUK V OLY HYYHU LYTZ K z X...

Отзывы: