


Pacific Accessory Corporation
®
| Santa Ana, California 92705 | Ph. 866-931-8021 | [email protected]
©2013 Pacific Accessory Corporation
www.pac-audio.com
Rev. 012014
Pacific Accessory Corporation
SWI-CP5
Universal Steering Wheel Control Retention Interface
TM
Steering Wheel Control Interface
Page 4
Page 5
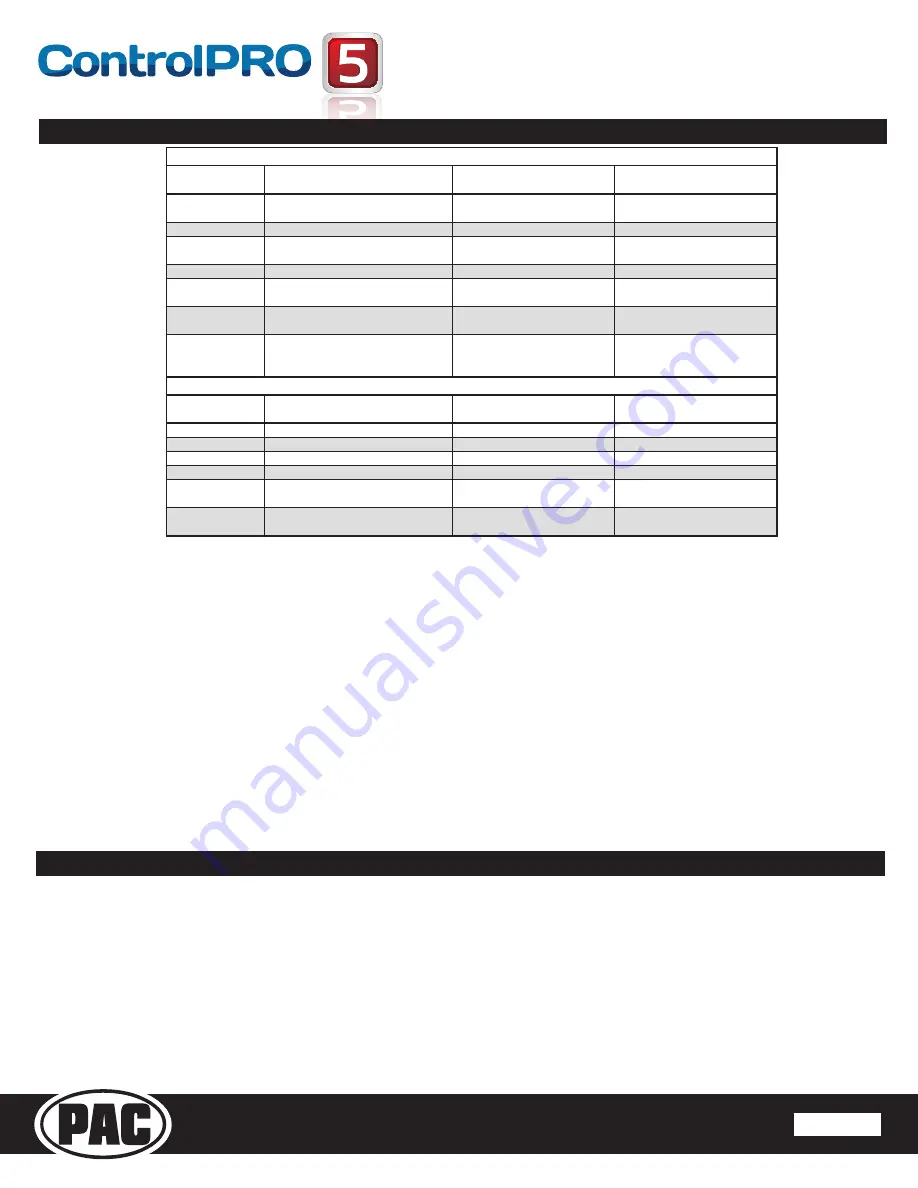
Troubleshooting and FAQ
Color
During
Normal
Operation
During
Manual
Programming
Mode
During
Optional
Programming
Solid
Red
Accessory
on
Waiting
on
short
press
button
release
Waiting
on
short
press
button
release
Solid
Green
N/A
Waiting
on
button
to
be
pressed
Waiting
on
button
to
be
pressed
Solid
Amber
Update
required
‐
Please
call
tech
support
N/A
N/A
Flashing
Green
Button
is
being
pressed
N/A
N/A
Flashing
Red/Amber
Error
‐
Dipswitch
setting
on
vehicle
switches
set
to
unknown
config
Long
Press
Button
detected
Long
Press
Button
detected
Flashing
Green/Red
Error
‐
Dipswitch
setting
on
radio
switches
set
to
unknown
config
N/A
N/A
Flashing
Green/Amber/Red
Error
‐
Button
not
pressed
long
enough
or
value
of
button
is
too
close
to
rest
value
N/A
N/A
Chime
During
Normal
Operation
During
Manual
Programming
Mode
During
Optional
Programming
Ascending
Chimes
N/A
Programming
Start
Programming
Start
Descending
Chimes
N/A
Programming
End
Programming
End
Short
Chime
N/A
Short
Press
SWC
Value
Stored
Short
Press
Release
Long
Chime
N/A
Long
Press
SWC
Value
Stored
Long
Press
Release
High
PitchDouble
Chime
N/A
Function
Skipped
Function
Skipped
Low
Pitch
Double
Chime
Programming
Error/Incorrect
Dipswitch
Setting
N/A
N/A
LED
Legend
Chime
Legend
Product Updates (Firmware)
The SWI-CP5 can be updated with new firmware as it becomes available using the device specific application or a USB flash drive. If using the
application to update, please follow the procedures outlined there to update your interface. If using a USB flash drive, follow the procedure below.
1. Visit www/pac-audio.com/firmware to download the firmware file
2. Place the firmware file(s) on the root directory of a USB flash drive (formatted to FAT32, it is best that this update be the only thing on the
flash drive)
3. Connect the flash drive to the supplied USB adapter
4. Disconnect the main harness from the SWI-CP5
5. Connect the supplied USB adapter (with the USB drive connected) to the SWI-CP5
6. Connect the main harness to the SWI-CP5
7. LED will flash green while updating.
8. Interface will chime when update is complete
Q. Where can I find the wiring info to connect the SWI-CP5 to my vehicle?
A. The wiring info can be found within our Android, Apple or PC application.
Q. Where can I find info on setting the dipswitches on the side of the module?
A. The dipswitch settings can be found within our Android, Apple or PC application.
Q. The module’s LED is flashing a pattern and the module is emitting two low tones every few seconds.
A. Please reference the LED and chime legend above for your specific case.
Q. What all can I connect to the Red/White (Accessory Output) wire on the module?
A. The interface’s accessory output (Red/White) is only rated at 1 Amp. If you require more current capacity an external relay must be used.
Q. Is there a way to perform a master reset to the module?
A. The interface can be reset, when not connected via USB, by pressing and holding the programming button on the side of the interface for
seven seconds until the LED turns amber and a familiar tone is heard.
Q. I have connected all of the wires and set the dipswitches as instructed. I am having an issue where some or all of the buttons are not
functioning correctly or at all.
A. Verify that all of the ground wires (Radio, CP5, and Steering wheel circuit) are connected at the same place. In some vehicles the factory
ground may not be a sufficient ground for all of these wires. In this case please make all ground connections to chassis ground.
Q. I’m using the application and I don’t see my radio listed (Advent, Boyo, Dual, Lightning Audio, Rockford Fosgate or Visteon).
A. When installing any of these brands you will need to select Pioneer as your radio.


