


Orbital Sander
7
bench-mounted use.
It must not be
clamped into a vice or fastened to a work-
bench, for example.
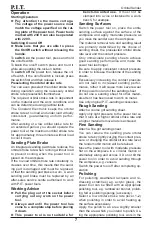
Sanding Surfaces
Switch the power tool on, place the entire
sanding surface against the surface of the
workpiece and apply moderate pressure as
you move the sander over the workpiece.
The material removal rate and sanding result
are primarily determined by the choice of
sanding sheet, the preselected orbital stroke
rate level and the contact pressure.
Only immaculate sanding sheets achieve
good sanding performance and make the
power tool last longer.
Be sure to apply consistent contact pressure
in order to increase the lifetime of the sanding
sheets.
Excessively increasing the contact pressure
will not lead to increased sanding perfor-
mance, rather it will cause more severe wear
of the power tool and of the sanding sheet.
Do not use a sanding sheet for other materi-
als after it has been used to work on metal.
Use only original P.I.T.-sanding accessories.
Rough Sanding
Attach a coarse grit sanding sheet.
Apply only light pressure to the power tool so
that it runs at a higher orbital stroke rate and
a higher material removal rate is achieved.
Fine Sanding
Attach a fi ne grit sanding sheet.
You can reduce the sanding plate orbital
stroke rate by lightly varying the contact pres-
sure or changing the orbital stroke rate level;
the random orbit motion will be retained.
Move the power tool with moderate pressure
flat on the workpiece in a circular motion or
alternately along and across it. Do not tilt the
power tool in order to avoid sanding through
the workpiece, e.g. veneers.
Switch the power tool off after completing op-
eration.
Polishing
For polishing weathered lacquers and re-
dressing scratches (e.g. acrylic glass), the
power tool can be fitted with an appropriate
polishing tool, e.g. lambswool bonnet, polish-
ing felt or polishing sponge (accessory).
Select a low orbital stroke rate (level 1–2)
when polishing in order to avoid heating up
the surface excessively.
Apply the polish to an area slightly smaller
than the area which you intend to polish. Us-
ing the appropriate polishing tool, work in the
Operation
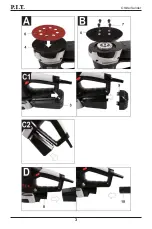
Starting Operation
►
Pay attention to the mains voltage.
The voltage of the power source must
match the voltage specifi ed on the rat-
ing plate of the power tool. Power tools
marked with 230 V can also be operated
with 220 V.
Switching On and Off
►
Make sure that you are able to press
the On/Off switch without releasing the
handle.
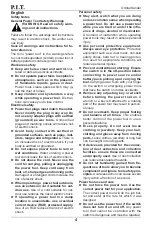
To
switch on
the power tool, press and hold
the on/off switch.
To
lock
the on/off switch press and hold it
while also pushing the lock-on button.
To
switch off
the power tool, release the on/
off switch. If the on/off switch is locked, press
the switch fi rst and then release it.
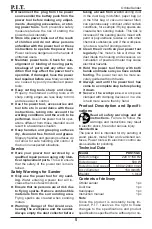
Preselecting the orbital stroke rate
You can even preselect the orbital stroke rate
during operation using the necessary orbital
stroke rate preselection thumbwheel.
The required orbital stroke rate is dependent
on the material and the work conditions and
can be determined using practical tests.
The Constant Electronic keeps the orbital
stroke rate at no load and under load virtually
consistent, guaranteeing uniform perfor-
mance.
After working at a low orbital stoke rate for
an extended period, you should operate the
power tool at the maximum orbital stroke rate
for approximately three minutes without load
to cool it down.
Sanding Plate Brake
An integrated sanding pad brake reduces the
orbital stroke rate when running without load
to prevent scoring when the power tool is
placed on the workpiece.
If the no-load orbital stroke rate constantly in-
creases over time, this means that the sand-
ing pad is damaged and must be replaced,
or that the sanding pad brake is worn. A worn
sanding pad brake must be replaced by an
after-sales service centre authorised to work
with P.I.T. power tools.
Working Advice
►
Pull the plug out of the socket before
carrying out any work on the power
tool.
►
Always wait until the power tool has
come to a complete stop before placing
it down.
►
This power tool is not suitable for
Содержание PDS150-C
Страница 2: ...Orbital Sander 1...
Страница 3: ...Orbital Sander 2...
Страница 4: ...Orbital Sander 3...
Страница 11: ...10...
Страница 12: ...11 18...
Страница 13: ...12 PDS150 C 220 50 500 6000 12000...
Страница 14: ...13 PDS150 C 150 mm 6 1 9 1 1 1 1 P I T 1 2 3 4 5 6 7 8 9 10 A B 150 125 P I T 2...
Страница 15: ...14 C1 C2 D 230 220 3 P I T P I T...
Страница 16: ...15 2 2 2 1 2 OnePower 12 I 3 P I T P I T 10 50 80...
Страница 17: ...16 4 3 2 2 5...
Страница 18: ...17...


