background image

9

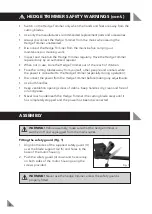
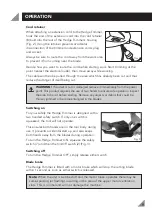
Cord retainer

When attaching an extension cord to the Hedge Trimmer,
hook the end of the extension cord into the cord retainer
(8) built into the rear of the Hedge Trimmer's housing
(Fig. 2). Using the retainer prevents accidental
disconnection of the trimmer and extension cords plug
and socket.

Always be sure to route the cord away from the work area
to prevent it from coming near the blade. 

Decide how you want to route the cord before starting work. Start trimming at the
point nearest the electrical outlet, then move away while working.

The cable will then be pulled through the area which has already been cut and thus
reduce the danger of itself being cut.

WARNING!

If cordset is cut or damaged remove it immediately from the power

point. This product requires the use of two hands to ensure safe operation. Inspect
the area to be cut before starting. Remove any objects or debris that could be
thrown, jammed or become entangled in the blades.

Switching on

For your safety the Hedge Trimmer is designed with a
two handed safety switch. If only one switch is
squeezed, the tool will not operate.

This ensures both hands are on the tool body during
use. It prevents accidental start up and also keeps
both hands away from the blades during operation.

To turn the Hedge Trimmer ON, squeeze the safety
switch (7) and then the On/Off switch (2) (Fig. 3).

Switching off

To turn the Hedge Trimmer OFF, simply release either switch.

Blade brake

The Hedge Trimmer is fitted with a motor brake which will stop the cutting blade
within 1 second as soon as either switch is released.

Note: 

When the unit is switched off and the motor brake operates there may be

some sparking (or flashing) occurring in the area of the upper motor ventilation
slots. This is normal and will not damage the machine.

OPERATION

Fig. 2

Fig. 3

!!


Содержание HTE-450

Страница 1: ......

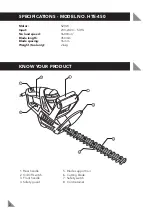
Страница 2: ...lade length 450mm Blade spacing 16mm Weight tool only 2 6kg 1 Rear handle 2 On Off switch 3 Front handle 4 Safety guard 5 Blade support rail 6 Cutting blade 7 Safety switch 8 Cord retainer 2 SPECIFICA...

Страница 3: ...LECTRICAL SAFETY GENERAL SAFETY WARNINGS HEDGE TRIMMER SAFETY WARNINGS ASSEMBLY OPERATION MAINTENANCE SPARE PARTS DESCRIPTION OF SYMBOLS PACK CONTENTS WARRANTY Page 2 Page 4 Page 4 Page 5 Page 7 Page...

Страница 4: ...le insulated in accordance with AS NZS 60745 2 15 therefore no earth wire is required If the supply cord is damaged it must be replaced by a qualified electrician or a power tool repairer in order to...

Страница 5: ...or wet conditions Water entering a power tool will increase the risk of electric shock d Do not abuse the cord Never use the cord for carrying pulling or unplugging the power tool Keep cord away from...

Страница 6: ...ing any adjustments changing accessories or storing power tools Such preventive safety measures reduce the risk of starting the power tool accidentally d Store idle power tools out of the reach of chi...

Страница 7: ...nd knowledge unless they have been given supervision or instruction concerning use of the appliance by a person responsible for their safety Recommendations for the use of a residual current device wi...

Страница 8: ...ower is connected to the Hedge Trimmer especially during operation Disconnect the power from the Hedge Trimmer before making any adjustments Use both handles Keep ventilation openings clear of debris...

Страница 9: ...afe operation Inspect the area to be cut before starting Remove any objects or debris that could be thrown jammed or become entangled in the blades Switching on For your safety the Hedge Trimmer is de...

Страница 10: ...string can be stretched along the length of the hedge as a guide 5 Side trimming hedges Hold the Hedge Trimmer and begin at the bottom and sweep up 6 Shaping The hedge should be trimmed to achieve a t...

Страница 11: ...lasts for a longer period of time it is recommended that the blade rail also be treated with spray lubricant at regular intervals during operation Carbon brushes When the carbon brushes wear out the t...

Страница 12: ...are Part Part No Carbon Brush Pair SPHTE450 21 Brush Holder Pair SPHTE450 19 Blade Assembly SPHTE450 34 DESCRIPTION OF SYMBOLS Warning Read instruction manual V Volts Hz Hertz Alternating current W Wa...

Страница 13: ...erials Reuse of recycled material decreases pollution in the environment Please recycle packaging where facilities exist Check with your local council authority for recycling advice OZITO INDUSTRIES P...

Страница 14: ...PRODUCT TO YOUR NEAREST BUNNINGS WAREHOUSE WITH YOUR BUNNINGS REGISTER RECEIPT PRIOR TO RETURNING YOUR PRODUCT FOR WARRANTY PLEASE TELEPHONE OUR CUSTOMER SERVICE HELPLINE TO ENSURE A SPEEDY RESPONSE...

Отзывы: