background image

1

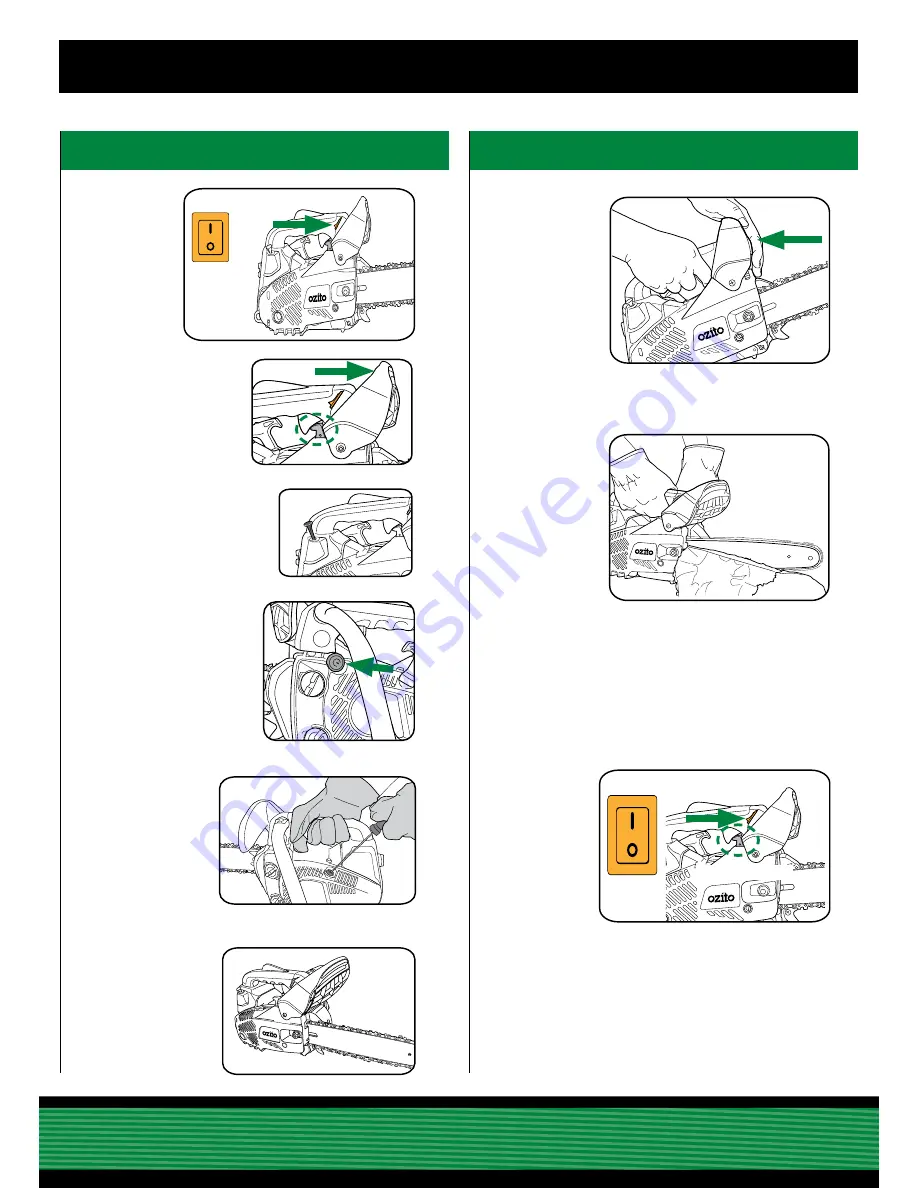
4.  COLD STARTING

5.  CUTTING

1.  Set the 

switch to ON “I”.

3.  Pull the choke (fully withdrawn).

4.  Depress the priming bulb 

approximately 6 times until the 

bulb is full. 

5.  Hold the chainsaw 

securely on the 

ground. Pull the recoil 

starter until “kicks” 

(attempts to start),then 

depress throttle trigger 

to release choke to 

RUN position. Pull the 

recoil starter several 

times until started. 

6.  Allow the engine 

to warm up for 10 

seconds.

1.  When ready to start cutting, release the brake, by pulling the 

front guard back firmly towards the rear of the chainsaw

Stopping the chainsaw

“I”  ON

2.  The chainsaw has bucking spikes to assist with cutting and 

reduce the chance of kickback, use them as follows. Keep the 

bucking spikes touching the wood you are cutting. Due to the 

rotation of the chain, it will pull the saw into the wood. When the 

bucking spikes are touching the timber, it will help prevent any 

sudden jerking or kick-back.

“O”  OFF

Brake Engaged

2.  Make sure the brake 

is ON  when starting for 

safety, by pushing the front 

guard forward

3.  Engage brake and set the On/Off switch to OFF “O”.

Содержание 25.4cc-305mm Bar

Страница 1: ...Motor Speed 3 500 min Max No Load Motor Speed 11 000 min Bar Length 305mm 12 Bar Type Sprocket Nose Chain Brake Automatic Oil Feed Automatic Pump Fuel Mixture 35 1 Chain Oil Standard Chain Bar Oil PCS...

Страница 2: ...Cover Knob 1 FUEL Only use oil that is expressly labelled for use with air cooled 2 stroke engines Use unleaded petrol with a minimum Octane number of 89 2 Fill with 2 stroke oil up to oil line 1 Fill...

Страница 3: ...y 140ml NOTE For operator safety the chain brake disengaging action has been designed to be a firm deliberate action IMPORTANT Pull guard backwards FIRMLY to disengage brake The chain will not run unl...

Страница 4: ...start cutting release the brake by pulling the front guard back firmly towards the rear of the chainsaw Stopping the chainsaw I ON 2 The chainsaw has bucking spikes to assist with cutting and reduce...

Страница 5: ...ioner screw clockwise until the links of the chain just touch the bottom edge of the guide bar 3 For the correct chain tension pull up on the chain from the top and middle of the exposed guide bar The...

Страница 6: ...not clogged Grease the nose sprocket at the tip of the guide bar 7 Check for fuel and oil leakage and loose fastenings especially those securing the handles and the guide bar 8 Clean any dust away fro...

Страница 7: ...ough the Special Orders Desk at any Bunnings Warehouse If you have any further questions please contact Ozito Customer Service on Australia 1800 069 486 New Zealand 0508 069 486 enquiries ozito com au...

Страница 8: ...eatment of the tool This tool is designed for Domestic Home Use only use in commercial or industrial environments will void the warranty CARING FOR THE ENVIRONMENT Petrol tools that are no longer usab...

Страница 9: ...th the appliance 4 Service a Have your petrol tool serviced by a qualified repair personnel using only identical replacement parts This will ensure that the safety of the petrol tool is maintained SAF...

Страница 10: ...led or tampered with in any way WARRANTY TO ENSURE A SPEEDY RESPONSE PLEASE HAVE THE MODEL NUMBER AND DATE OF PURCHASE AVAILABLE A CUSTOMER SERVICE REPRESENTATIVE WILL TAKE YOUR CALL AND ANSWER ANY QU...

Отзывы: