background image

2.Quick Start


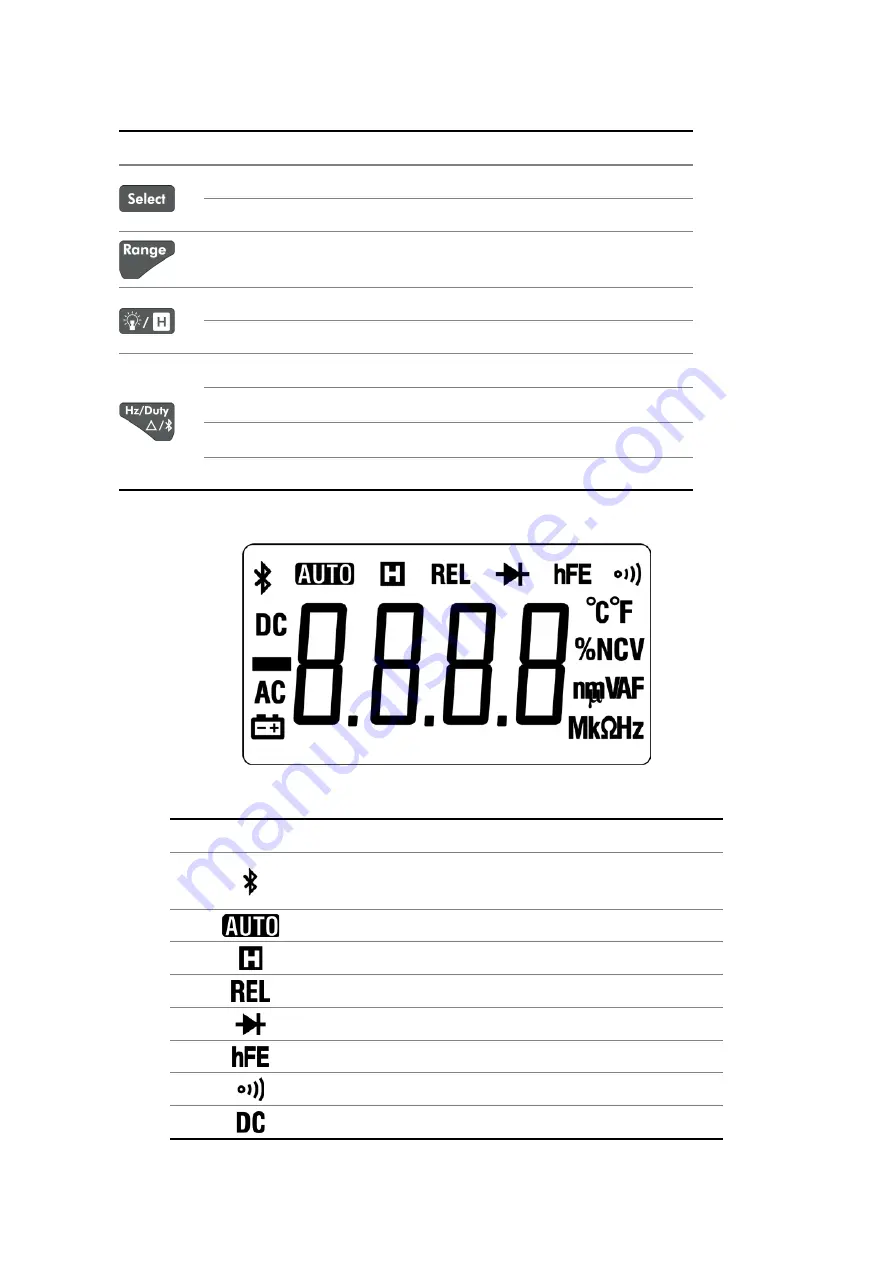
Keypad 

Key 

Description 

Details 


Select DC or AC 


Select Resistance / Continuity / Diode 


Auto/Manual range 

Page 7 


Backlight 

Page 6 

Data Hold 

Page 17 


Select frequency/duty cycle 

Page 14 

Measuring frequency in AC voltage/current mode   
Relative Measurements 

Page 17 

Bluetooth 

(only for OW16B)


Page 18 

Display screen 


Figure 2-2 Display screen   

Symbol 

Description 

Details 


Bluetooth enabled 

Page 18 


Auto range 

Page 7 


Data hold enabled   

Page 17 


Relative enabled 

Page 17 


Diode test selected 

Page 13 


Transistor measurement 

Page 15 


Continuity test selected 

Page 13 


DC 

Page 12 and   


Содержание OW16 Series

Страница 1: ...OW16 Series Digital Multimeter User Manual OW16A OW16B www owon com cn ...

Страница 2: ...place all materials published The information in this manual was correct at the time of printing However LILLIPUT will continue to improve products and reserves the rights to change specification at any time without notice is the registered trademark of the LILLIPUT Company Fujian LILLIPUT Optoelectronics Technology Co Ltd No 19 Heming Road Lantian Industrial Zone Zhangzhou 363005 P R China Tel 86...

Страница 3: ... by OWON and with a copy of customer proof of purchase This warranty shall not apply to any defect failure or damage caused by improper use or improper or inadequate maintenance and care OWON shall not be obligated to furnish service under this warranty a to repair damage resulting from attempts by personnel other than OWON representatives to install repair or service the product b to repair damag...

Страница 4: ...imeter in Brief 7 Front panel 7 Rotary switch 8 Keypad 9 Display screen 9 Input terminals 10 3 Making Measurements 12 Measuring AC or DC Voltage 12 Measuring Resistance 12 Testing for Continuity 13 Testing Diodes 13 Measuring Capacitance 13 Measuring Frequency 14 Measuring Temperature 14 Non Contact Voltage Detect NCV 14 Measuring Transistor Only for specific models 15 Measuring DC or AC Current 1...

Страница 5: ...tions in iOS App 28 Multimeter Offline Record iOS 30 6 To Connect with Computer Only for OW16B 32 How to Connect with Computer 32 Step 1 Install multimeterBLE software 32 Step 2 Install driver of Bluetooth USB adapter 32 Step 3 Connect to multimeterBLE software 38 User Interface in MultimeterBLE Software 40 Operations in MultimeterBLE Software 41 Multimeter Offline Record PC Software 41 7 Technica...

Страница 6: ...e the specified battery type The power for the multimeter is supplied with two standard AA 1 5 V batteries Observe the correct polarity markings before you insert the batteries to ensure proper insertion of the batteries in the multimeter Check all Terminal Ratings To avoid fire or shock hazard check all ratings and markers of this product Refer to the user s manual for more information about rati...

Страница 7: ... appears and flashes Disconnect circuit power and discharge all high voltage capacitors before testing resistance continuity diodes or capacitance Use the proper terminals function and range for your measurements When the range of the value to be measured is unknown set the rotary switch position as the highest range or choose the auto ranging mode To avoid damages to the multimeter do not exceed ...

Страница 8: ...to protect against transients from energy consuming equipment supplied from the fixed installation such as TVs PCs portable tools and other household circuits Measurement CAT III applies to protect against transients in equipment in fixed equipment installations such as distribution panels feeders and short branch circuits and lighting systems in large buildings Measurement CAT IV applies to measu...

Страница 9: ...ely happen Warning It indicates an injury or hazard may be accessible potentially Caution It indicates a potential damage to the instrument or other property might occur Safety Symbols Symbols on the Product The following symbol may appear on the product Direct current DC Fuse Alternating current AC Caution risk of danger refer to this manual for specific Warning or Caution information Both direct...

Страница 10: ...he appearance of the instrument or the instrument can not work normally or fails in the performance test please get in touch with the OWON s distributor responsible for this business or the OWON s local offices If there is damage to the instrument caused by the transportation please keep the package With the transportation department or the OWON s distributor responsible for this business informed...

Страница 11: ...meter turn the rotary switch to the position Sleep Mode The multimeter automatically enters the sleep mode if the rotary switch is not moved or a key is not pressed for 30 minutes When the Bluetooth is activated this function is disabled Pressing or turn the rotary switch will turn the multimeter back to operation mode from the sleep mode One minute before Auto Power off the buzzer will beep five ...

Страница 12: ... of sets the multimeter to the next higher range unless it is already in the highest range at which point the range switches to the lowest range When manual range is enabled press for more than 2 seconds to enter the auto ranging mode Note Manual range is not available when measuring capacitance Multimeter in Brief Front panel 1 2 3 4 5 6 7 Figure 2 1 Front panel overview OW16B with hFE is shown f...

Страница 13: ...tion Details Power off Page 6 DC or AC voltage measurement Page 12 Resistance measurement Page 12 Continuity test Page 13 Diode test Page 13 Capacitance measurement Page 13 Frequency measurement Page 14 Temperature measurement Page 14 Non contact voltage detect Page 14 or Transistor measurement or DC or AC current measurement up to 600 microamperes Page 15 or Page 15 DC or AC current measurement u...

Страница 14: ...ge 14 Measuring frequency in AC voltage current mode Relative Measurements Page 17 Bluetooth only for OW16B Page 18 Display screen Figure 2 2 Display screen Symbol Description Details Bluetooth enabled Page 18 Auto range Page 7 Data hold enabled Page 17 Relative enabled Page 17 Diode test selected Page 13 Transistor measurement Page 15 Continuity test selected Page 13 DC Page 12 and 9 ...

Страница 15: ...ption M Mega 1E 06 1000000 k kilo 1E 03 1000 m milli 1E 03 0 001 µ micro 1E 06 0 000001 n nano 1E 09 0 000000001 Sign Description Measurement type Degree Celsius Temperature Degree Fahrenheit V Voltage Voltage A Ampere Current Ω Ohm Resistance Hz Hertz Frequency Percent Duty cycle F Farad Capacitance Input terminals The terminal connections for the different measurement functions of the multimeter...

Страница 16: ...osition of the multimeter and then connect the test leads to the correct terminals Caution To avoid damaging the multimeter do not exceed the rated input limit Rotary switch position Input terminals Overload protection 750 VAC 1000 VDC 250 VAC 300 VDC 10 A 250 V fast acting fuse 11 ...

Страница 17: ...tch into AC measurement mode will be displayed 2 Connect the black test lead to the terminal and the red test lead to the terminal 3 Probe the test points and read the display Press to enable and cycle through the manual ranges Note When measuring AC voltage press to cycle through frequency measuring duty cycle measuring and original measuring Measuring Resistance Caution To avoid possible damage ...

Страница 18: ...h voltage capacitors before testing diodes 1 Rotate the rotary switch to Press twice to enter diode testing mode will be displayed 2 Connect the black test lead to the terminal and the red test lead to the terminal 3 Connect the red test lead to the positive terminal anode of the diode and the black test lead to the negative terminal cathode The cathode of a diode is indicated with a band 4 Read t...

Страница 19: ...y switch to 2 Connect the red connection of the K type thermocouple to the terminal and the black connection to the terminal 3 Probe the test points and read the display Non Contact Voltage Detect NCV To detect the presence of AC voltage place the top of the meter close to a voltage source When voltage is detected the LED above the display will glow and the meter will beep Warning Always test the ...

Страница 20: ...ment Never place the test leads in parallel with any circuit or component when the leads are plugged into the current terminals 1 Turn off the power of the measured circuit Discharge all high voltage capacitors 2 Connect the black test lead to the terminal For currents below 600 mA connect the red test lead to the terminal for currents within 600 mA 10 A connect the red test lead to the terminal 3...

Страница 21: ...measured circuit and discharge all high voltage capacitors Remove the test leads and restore the circuit to the original condition Note When measuring AC current press to cycle through frequency measuring duty cycle measuring and original measuring 16 ...

Страница 22: ...elative measurement should be carried out under a certain range that is this function is only available under the manual range mode Note This function is not available when measuring AC voltage current and frequency Buzzer Feature Press the function key the buzzer emits a short beep One minute before Auto Power off the buzzer will beep five times to warn Before shutoff the buzzer will emit a long ...

Страница 23: ...ided and non occluded wide range environment even up to 20 meters Install the free application software System Requirements of Mobile Devices Bluetooth 4 0 Android APP Android devices with BLE 4 0 connectivity Android versions 4 3 or above Bluetooth 4 0 iOS APP iPhone 6s 6s Plus iPhone 6 6 Plus iPhone 5c 5s iPhone 5 Support iPhone with BLE 4 0 connectivity iOS7 0 or above iPhone 4s or the older de...

Страница 24: ... latest version of this user manual Android App How to Connect with Android Device 1 Install the free application software for Android on your Android smart device 2 Launch the Multimeter application 3 Turn on the multimeter press and hold until appear on the display 4 Click the icon on the top left of the screen to launch device connection 5 If the Bluetooth function is not activated a dialog box...

Страница 25: ...e Only for OW16B 6 Click BDM in the device list to pair User Interface in Android App Double View Double View Click to disconnect Press hold to edit name Click to enter Single View Add Next page Single view Graph Table Exit About 20 ...

Страница 26: ...n Android App Customize the meter name The device name of meter can be customized Press and hold the name on the top left of the screen a dialog box below will pop up You can input the customized name this name will be memorized in the device If this meter is connected to the same device next time the customized name will be shown If this meter is connected to another device the name is still the ...

Страница 27: ...spoken text or speech rate etc You may change to different voices by installing different TTS engines TTS engines can be downloaded by scanning QR Codes or visit www owon com cn Upgrade Online Click and click About the following interface is shown Click Upgrade as below Click to upgrade Data Graph and Table Click to view data graph and table Click to show setting menu Trending graph Zoom Controls ...

Страница 28: ...ord the measuring data in its own memory After completion of the record use Android APP to reconnect the multimeter and then you can read the measuring data into the Android device as a CSV file You can use this function to record for a long time without staff on duty while reducing Bluetooth consumption to conserve the battery power of the multimeter Note When the low battery indicator appears on...

Страница 29: ...the connection will be aborted 4 After completion of the record to read the measuring data reconnect the Android device and the multimeter 5 In APP single view tap on the icon on the top right select from the pop up menu The file name start with Offline the following part can be customized 6 Tap on APP will read the measuring data and save as a CSV file into the Android device After reading displa...

Страница 30: ...nly for OW16B Turn on Bluetooth and return to the multimeter APP 3 Turn on the multimeter press and hold until appear on the display 4 Tap on the center to launch device connection 5 Select the desired multimeter in the device list 25 ...

Страница 31: ...tkey on the right to add another multimeter User Interface in iOS App Press hold to edit name Single device view Multi device view Graph Table view Add device Voice out Offline record Edit name setting About Same keys of the multimeter Delete the device Combined view Single Device View Single Device View Slide to show other device 26 ...

Страница 32: ...asuring Capacitance AC Alternating Current Hz Measuring Frequency RES Measuring Resistance DUT Measuring Duty Cycle DIO Testing Diodes TEMP Measuring Temperature BEEP Testing for Continuity NCV Non contact Voltage Detect Graph Table View Select device Record pause Zoom the graph using button or gesture Show hide the table Save the displayed data into CSV file Clear the data that is being displayed...

Страница 33: ...n be customized Press and hold the device name in single device view or click softkey in single or multi device view and select Change Device Name a dialog box below will pop up You can input the customized name this name will be memorized in the device If this meter is connected to the same device next time the customized name will be shown If this meter is connected to another device the name is...

Страница 34: ...n In single or multi device view click the icon to turn on voice out Click to turn off In settings interface you can adjust the reading speed Alert In setting interface you can enable the alert notification and set the upper lower limit APP will alert for any out of limit event Upgrade Online In single or multi device view click If Latest is shown indicates it is the latest version no need to upda...

Страница 35: ... work correctly Please check the batteries of the meter to ensure them in a good state 1 Connect the iOS device with the multimeter see How to Connect with iOS Device on P24 2 In APP device view tap on the softkey on the right select Record setting from the pop up menu 3 Set Record interval and Records counts maximum records count is 10 000 Tap on start offline record The memory in the multimeter ...

Страница 36: ...ice Only for OW16B 6 Tap on Read data APP will read the measuring data and save as a CSV file into the iOS device After reading display as below 7 Tap on Display data the data will be displayed in Data Graph and Table interface 31 ...

Страница 37: ...e free multimeterBLE software on computer to monitor the measurements perform remote control view trending graphs etc The recorded data can be saved as CSV file The maximum number of record that can be stored depends on the free storage space in your smart device Up to three multimeters can be connected simultaneously How to Connect with Computer Step 1 Install multimeterBLE software Install the m...

Страница 38: ...6 To Connect with Computer Only for OW16B 3 Select I accept the agreement and then click Next 33 ...

Страница 39: ...6 To Connect with Computer Only for OW16B 4 Select the destination folder and then click Next 5 Click Install 34 ...

Страница 40: ...ind it on the desktop or in Start menu In the drop down menu click on Manage the Computer Management window opens Click on Device Manager on the left hand side On the right hand side double click on Ports COM LPT Under ports if TI CC2540 USB CDC Serial Port COM is displayed that means the driver is installed successfully Remember the COM because you will need to configure the multimeterBLE softwar...

Страница 41: ...for OW16B Note If an unknown device is displayed try to install the driver manually following the steps below How to install the driver manually Right click the unknown device icon in the drop down menu click Update Driver Software 36 ...

Страница 42: ...6B Select Browse my computer for driver software Select a directory path for the driver and click Next After installing successfully click Close In Device Manager check if TI CC2540 USB CDC Serial Port COM is displayed under Ports COM LPT 37 ...

Страница 43: ...re that the Bluetooth USB adapter is plugged into the computer To find the Port COM you will need to look for it under Ports COM LPT in Device Manager window Select the port number and click OK 2 Turn on the multimeter press and hold until appear on the display 3 Click softkey on the right a Scan Devices dialog box appears A progress bar shows the progress of scanning multimeters It will take a fe...

Страница 44: ...for OW16B scan is finished select the desired multimeter in the device list Click the Connect button 4 The measurements will be shown if the connection is successful You can tap on the softkey on the right to add another multimeter 39 ...

Страница 45: ...l to show other device Single Device View Single Device View Range AUTO MANUAL Function Details follow Multi device View Move the cursor here to show click to delete the device Function Description Table Display Function Display Function DC Direct Current CAP Measuring Capacitance AC Alternating Current Hz Measuring Frequency RES Measuring Resistance DUT Measuring Duty Cycle DIO Testing Diodes TEM...

Страница 46: ...the corresponding keys of the multimeter Unify the unit types In Graph Table view sometimes the unit type will be changed while recording for example V is changed to mV To unify the unite types click Function on the top right in the drop down menu check Singleton Multimeter Offline Record PC Software When measuring with OW16B you can use PC software to send a command the multimeter will start reco...

Страница 47: ...only store the recording data of one time When start to record the earlier offline record stored in the multimeter will be overwritten Note If you want to interrupt the recording process of the multimeter reconnect the software and the multimeter select Stop recording 4 After completion of the record to read the measuring data reconnect the software and the multimeter 5 On software interface click...

Страница 48: ...6 To Connect with Computer Only for OW16B 7 Click Open Directory to open the directory where the CSV files are saved 43 ...

Страница 49: ...ig AC Current A μA 1 600 0μA 6000μA 0 1μA 1 3dig mA 60 00mA 600 0mA 0 01mA 1 3dig A 10 00A 0 01A 1 5 3dig Resistance Ω 600 0Ω 6 000kΩ 60 00kΩ 600 0kΩ 6 000MΩ 0 1Ω 0 8 2dig 60 00MΩ 0 01 MΩ 2 3dig Capacitance F 60 00nF 600 0nF 6 000μF 60 00μF 0 01nF 3 3dig 600 0μF 6 000mF 60 00mF 2 0 1μF 3 5dig Frequency 3 Hz 9 999Hz 99 99Hz 999 9Hz 9 999kHz 99 99kHz 999 9kHz 9 999MHz 0 001Hz 0 8 2dig Duty Cycle 4 0...

Страница 50: ...ry indication The is displayed when the battery is under the proper operation range Data Hold Relative Measurement LCD Backlight Input Protection Input Impedance 10 MΩ Battery Not included 3 V 1 5 V 2 AA alkaline batteries LCD Size 47 mm 27 mm Weight without package 0 29 kg Dimension 74 mm 154 mm 49 mm Working temperature 0 to 40 Storage temperature 10 to 60 Relative Humidity 80 Altitude Operating...

Страница 51: ...pe the dust from the instrument surface with a soft cloth Do not make any scuffing on the screen when clean the LCD Clean the instrument with a wet soft cloth not dripping water It is recommended to scrub with soft detergent or fresh water To avoid damage to the instrument do not use any corrosive chemical cleaning agent Dirt or moisture in the terminals can distort readings Follow the steps below...

Отзывы: