background image

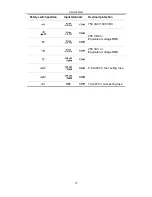
7.Technical Specifications


26 


Characteristics 

Instruction 

Display 

3999 

Frequency Response (Hz) 

The model without "T"  (40 - 400) Hz 

The model with "T" 

(40 - 1000) Hz 

Sample rate for digital data 

3 times/second   

Bluetooth 

B33(T)(+) 


D33(T) 

Without   

Auto ranging 


True RMS 

The model with "T" has this function.   

Diodes Test 


Sleep Mode 


Continuity Test 


Low battery indication 

(The "

" is displayed when the battery 

is under the proper operation range.)


Data Hold 


Relative Measurement 


LCD Backlight 


Input Protection 


Input Impedance 

≥ 10 MΩ   

Battery 

3 V (1.5 V × 2) AA alkaline batteries   

LCD Size 

69 mm * 52 mm   

Weight 

(without package)


0.29 kg 

Dimension 

85 mm * 185 mm * 30 mm 

Working temperature 

0

  to 40


Storage temperature 

10

  to 60


Relative Humidity   

≤ 80%   

Altitude 

Operating: 3,000 m   
Non-operating: 15,000 m   

Interval Period of Adjustment:   

One year is recommended for the calibration interval period.   

Содержание B33

Страница 1: ...Digital Multimeter User Manual B33 T D33 T Note T indicates true RMS optional indicates Multimeter Offline Record function optional www owon com cn ...

Страница 2: ...at in the materials published originally The information in this manual was correct at the time of printing However LILLIPUT will continue to improve products and reserves the rights to change specification at any time without notice is the registered trademark of the LILLIPUT Company Fujian LILLIPUT Optoelectronics Technology Co Ltd No 19 Heming Road Lantian Industrial Zone Zhangzhou 363005 P R C...

Страница 3: ... by OWON and with a copy of customer proof of purchase This warranty shall not apply to any defect failure or damage caused by improper use or improper or inadequate maintenance and care OWON shall not be obligated to furnish service under this warranty a to repair damage resulting from attempts by personnel other than OWON representatives to install repair or service the product b to repair damag...

Страница 4: ...Backlight Control 7 Selecting the Range 8 Multimeter in Brief 8 Front panel 8 Rotary switch 9 Keypad 9 Display screen 10 Input terminals 11 4 Making Measurements 13 Measuring AC or DC Voltage 13 Measuring Resistance 13 Testing Diodes 14 Testing for Continuity 14 Measuring Capacitance 14 Measuring Frequency 15 Measuring Temperature 15 Measuring DC or AC Current 15 5 Multimeter Features 17 Data Hold...

Страница 5: ...w to Connect with Android Device 18 User Interface in Android App 20 Operations in Android App 20 Multimeter Offline Record the model only 22 7 Technical Specifications 25 8 Appendix 27 Appendix A Enclosure 27 Appendix B General Care and Cleaning 27 Appendix C Fuse Replacement 28 ...

Страница 6: ...use the specified battery type The power for the multimeter is supplied with two standard AA 1 5 V batteries Observe the correct polarity markings before you insert the batteries to ensure proper insertion of the batteries in the multimeter Check all Terminal Ratings To avoid fire or shock hazard check all ratings and markers of this product Refer to the user s manual for more information about ra...

Страница 7: ...ator appears and flashes Disconnect circuit power and discharge all high voltage capacitors before testing resistance continuity diodes or capacitance Use the proper terminals function and range for your measurements When the range of the value to be measured is unknown set the rotary switch position as the highest range choose the auto ranging mode To avoid damages to the multimeter do not exceed...

Страница 8: ...s to protect against transients from energy consuming equipment supplied from the fixed installation such as TVs PCs portable tools and other household circuits Measurement CAT III applies to protect against transients in equipment in fixed equipment installations such as distribution panels feeders and short branch circuits and lighting systems in large buildings Measurement CAT IV applies to mea...

Страница 9: ...ately happen Warning It indicates an injury or hazard may be accessible potentially Caution It indicates a potential damage to the instrument or other property might occur Safety Symbols Symbols on the Product The following symbol may appear on the product Direct current DC Fuse Alternating current AC Caution risk of danger refer to this manual for specific Warning or Caution information Both dire...

Страница 10: ...voice warning supported which enhances measurement safety only for the model with Bluetooth 3 3 4 digit reading Larger display easier data reading Multi connection more than one device supported via mobile APP Temperature measuring function Backlit powered screen more suitable for dark measurement environment Smart power off function extending battery life Thin tipped test lead optional to measure...

Страница 11: ... the appearance of the instrument or the instrument can not work normally or fails in the performance test please get in touch with the OWON s distributor responsible for this business or the OWON s local offices If there is damage to the instrument caused by the transportation please keep the package With the transportation department or the OWON s distributor responsible for this business inform...

Страница 12: ...osition except 2 To power OFF the multimeter turn the rotary switch to the position Sleep Mode The multimeter automatically enters the sleep mode if the rotary switch is not moved or a key is not pressed for 15 minutes When the Bluetooth is activated this function is disabled Pressing any key will turn the multimeter back to operation mode from the sleep mode One minute before Auto Power off the b...

Страница 13: ...e each additional press of sets the multimeter to the next higher range unless it is already in the highest range at which point the range switches to the lowest range When manual range is enabled press for more than 2 seconds to enter the auto ranging mode Note Manual range is not available when measuring capacitance Multimeter in Brief Front panel 1 2 3 4 Figure 3 1 Front panel overview ...

Страница 14: ...t Page 14 Resistance measurement Page 13 Capacitance measurement Page 14 Frequency measurement Page 15 Temperature measurement Page 15 DC or AC current measurement up to 4000 microamperes Page 15 DC or AC current measurement up to 400 milliamperes DC or AC current measurement Keypad Key Description Details Select function Select DC or AC Select Resistance Diode Continuity Auto Manual range Page 8 ...

Страница 15: ...with Bluetooth Page 18 Display screen Figure 3 2 Display screen Symbol Description Details Bluetooth enabled Page 18 Auto range Page 8 Data hold enabled Page 17 Relative enabled Page 17 Diode test selected Page 14 Continuity test selected Page 14 DC Page 13 and Page 15 AC Battery is low Page 6 ...

Страница 16: ...nt type Degree Celsius Temperature V Voltage Voltage A Ampere Current Ω Ohm Resistance Hz Hertz Frequency Percent Duty cycle F Farad Capacitance Input terminals The terminal connections for the different measurement functions of the multimeter are described in the table below Warning Before starting any measurement observe the rotary switch position of the multimeter and then connect the test lead...

Страница 17: ...Start 12 Rotary switch position Input terminals Overload protection 750 VAC 1000 VDC 250 VDC or Equivalent voltage RMS 250 VAC or Equivalent voltage RMS 0 5 A 250 V fast acting fuse 10 A 250 V fast acting fuse ...

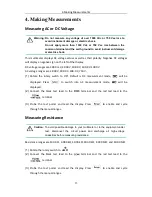
Страница 18: ...e rotary switch to Default is DC measurement mode will be displayed Press to switch into AC measurement mode will be displayed 2 Connect the black test lead to the terminal and the red test lead to the terminal 3 Probe the test points and read the display Press to enable and cycle through the manual ranges Measuring Resistance Caution To avoid possible damage to your multimeter or to the equipment...

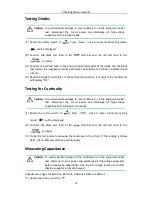
Страница 19: ...Continuity Caution To avoid possible damage to your multimeter or to the equipment under test disconnect the circuit power and discharge all high voltage capacitors before testing for continuity 1 Rotate the rotary switch to Press twice to enter continuity testing mode will be displayed 2 Connect the black test lead to the terminal and the red test lead to the terminal 3 Probe the test points to m...

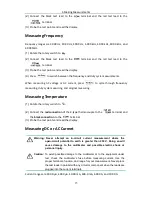
Страница 20: ...mperature 1 Rotate the rotary switch to 2 Connect the red connection of the K type thermocouple to the terminal and the black connection to the terminal 3 Probe the test points and read the display Measuring DC or AC Current Warning Never attempt an in circuit current measurement where the open circuit potential to earth is greater than 250 V Doing so will cause damage to the multimeter and possib...

Страница 21: ...connect the red test lead to the other side with a higher voltage Reversing the leads will produce a negative reading but will not damage the multimeter 5 Select DC or AC measurement mode Default is DC measurement mode will be displayed Press to switch into AC measurement mode will be displayed 6 Turn on the power of the measured circuit and read the display Press to enable and cycle through the m...

Страница 22: ...e measurement should be carried out under a certain range that is this function is only available under the manual range mode Note This function is not available when measuring diodes and frequency Buzzer Feature Press the function key the buzzer emits a short beep One minute before Auto Power off the buzzer will beep five times to warn Before shutoff the buzzer will emit a long beep and then the ...

Страница 23: ...n up to 20 meters When the Bluetooth function is idle for 10 minutes the Bluetooth will be turned off automatically Before turning off the buzzer will beep twice Install the free application software System Requirements of Mobile Devices Bluetooth 4 0 Android APP Android devices with BLE 4 0 connectivity Android versions 4 3 or above For Android device If the system and Bluetooth version of your m...

Страница 24: ...nd hold until appear on the display 4 Click the icon on the top left of the screen to launch device connection 5 If the Bluetooth function is not activated a dialog box will ask whether to turn on Bluetooth Click Yes Click to scan for Bluetooth devices 6 Click BDM in the device list to pair ...

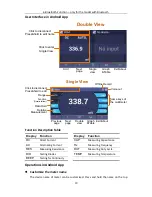
Страница 25: ...t Press hold to edit Voice out Previous page Next page Double view Graph Table Exit About Same keys of the multimeter Offline Record Function Description Table Display Function Display Function DC Direct Current CAP Measuring Capacitance AC Alternating Current Hz Measuring Frequency RES Measuring Resistance DUT Measuring Duty Cycle DIO Testing Diodes TEMP Measuring Temperature BEEP Testing for Con...

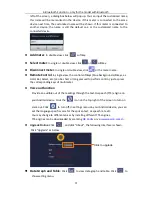
Страница 26: ...s blue background softkeys as Hold Rel Select etc can be short or long pressed to perform control just as press the corresponding keys of multimeter Voice out function Provide an audible out of the readings through the text to speech TTS engine on your Android device Click the icon on the top right of the screen to turn on voice out Click to turn off In settings menu on your Android device you can...

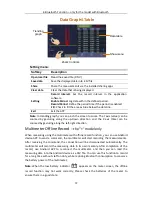
Страница 27: ... up down direction and the X axis time can be zoomed by gesturing along the left right direction Multimeter Offline Record the model only When measuring using the multimeter with offline record function you can use Android device APP to send a command the multimeter will start recording the measurements After receiving the command the connection will be disconnected automatically The multimeter wi...

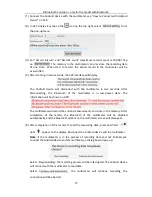
Страница 28: ...g the Bluetooth of the multimeter is in low power state The information will be shown on APP The multimeter will record the current measurements and store in the memory After completion of the record the Bluetooth of the multimeter will be disabled automatically and the Bluetooth symbol on the multimeter screen will disappear 5 After completion of the record to read the measuring data press and ho...

Страница 29: ...he top right select from the pop up menu The file name start with Offline the following part can be customized 7 Tap on APP will read the measuring data and save as a CSV file into the Android device After reading display as below 8 Tap on the data will be displayed in Data Graph and Table interface ...

Страница 30: ...rrent A μA 400 0μA 4000μA 0 1 μA 1 3dig mA 40 00mA 400 0mA 0 01 mA 0 8 2dig A 4 000A 10 00A 1 mA 2 3dig Resistance Ω 400 0Ω 4 000kΩ 40 00kΩ 400 0kΩ 4 000MΩ 0 1 Ω 0 8 2dig 40 00MΩ 0 01 MΩ 2 3dig Capacitance F 40 00nF 400 0nF 4 000μF 40 00μF 0 01 nF 2 5 3dig 100 0μF 1 0 1 μF 3 5dig Frequency 2 Hz 4 999Hz 49 99Hz 499 9Hz 4 999k Hz 49 99kHz 499 9kHz 4 999MHz 1 mHz 0 8 2dig Duty Cycle 3 0 1 99 9 Typica...

Страница 31: ...st Low battery indication The is displayed when the battery is under the proper operation range Data Hold Relative Measurement LCD Backlight Input Protection Input Impedance 10 MΩ Battery 3 V 1 5 V 2 AA alkaline batteries LCD Size 69 mm 52 mm Weight without package 0 29 kg Dimension 85 mm 185 mm 30 mm Working temperature 0 to 40 Storage temperature 10 to 60 Relative Humidity 80 Altitude Operating ...

Страница 32: ...m the instrument surface with a soft cloth Do not make any scuffing on the screen when clean the LCD Clean the instrument with a wet soft cloth not dripping water It is recommended to scrub with soft detergent or fresh water To avoid damage to the instrument do not use any corrosive chemical cleaning agent Dirt or moisture in the terminals can distort readings Follow the steps below to clean your ...

Страница 33: ... and any connectors from the input terminals 2 Lift the tilt stand and loosen the screws with a suitable Phillips screwdriver and remove the battery cover 3 Pry the fuse cover open using a straight screwdriver replace the fuse Use only the fuse of the specified rating 0 5 A 250 V 4 Place the battery cover back in its original position and tighten the screws ...

Отзывы: