background image

OWC THUNDERBAY 4 MINI

DEVICE SETUP

3

DEVICE SETUP

If your OWC ThunderBay 4 mini was purchased with drives included, the four drives have 
been installed into their drive trays and have been packed separately from the ThunderBay 
4 mini enclosure. If you purchased the ThunderBay 4 mini enclosure by itself without drives, 
follow the instructions in 

Section 2.1

 to install your own drives into the ThunderBay 4 mini.

2.1 HARD DRIVE INSTALLATION

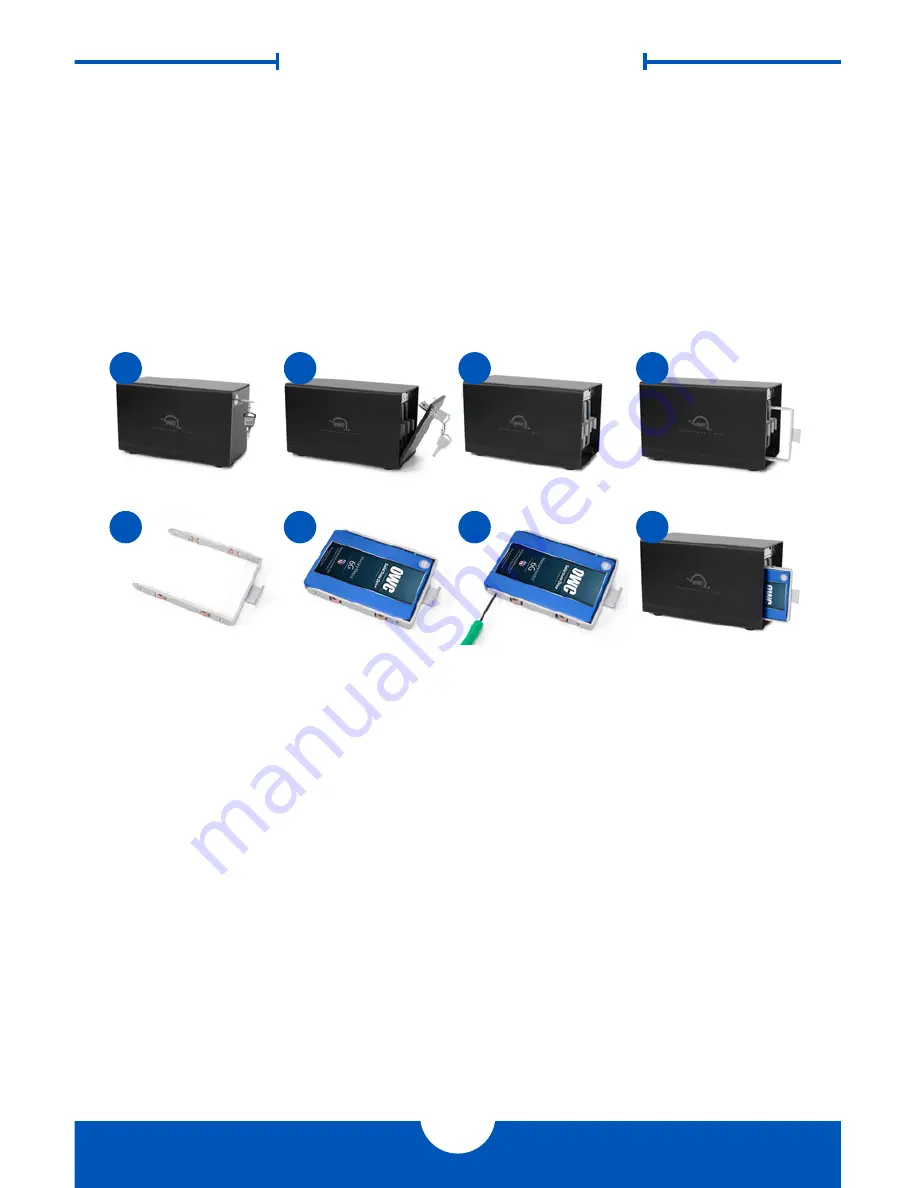
Follow these steps to install hard drives into your ThunderBay 4 enclosure, or to replace 
existing drives. Repeat steps 1 through 8 as necessary for each drive you are installing.

1. Insert one of the included keys into the lock on the upper left of the faceplate.
2. Turn the key clockwise, then pull the key towards you. The faceplate will swing open, as 

shown.

3. Pull up on the faceplate to remove it.
4. Pull on the tab at the center of an empty drive tray to remove the tray from the enclosure.
5. Set the drive tray as shown on your work surface. If you are replacing an existing drive, 

unscrew it from the drive tray at this time.

6. Place your hard drive or SSD inside the drive tray as shown. The label should face up and 

the SATA connectors should be on the far rear corner of the drive.

7. Fasten the drive into the drive tray using four of the included Phillips screws.
8. Slide the drive tray back into the rails in the ThunderBay 4 mini and push until it is seated 

fully. If you encounter resistance, do not force the drive tray. Remove it, check to make 
sure that there are no obstructions and that the drive tray is lined up correctly, then slide 
it in again.

1

2

3

4

5

6

7

8

Содержание THUNDERBAY

Страница 1: ...T H U N D E R B A Y 4 M I N I Assembly Manual User Guide ...

Страница 2: ...2 5 SATA hard drives or SSDs 1 5 3 0 or 6 0Gb s 1 2 PACKAGE CONTENTS 1 3 ABOUT THIS MANUAL 1 4 FRONT VIEW 1 4 1 Front Features 1 5 REAR VIEW 1 5 1 Rear Features DEVICE SETUP 3 2 1 HARD DRIVE INSTALLATION 2 2 QUICK START 2 3 SOFTWARE RAID 2 4 CHANGING DRIVES 2 4 1 Drive Failure SUPPORT RESOURCES 5 3 1 TROUBLESHOOTING 3 2 ABOUT DATA BACKUP 3 3 DATA MIGRATION 3 4 CONTACTING TECHNICAL SUPPORT ...

Страница 3: ...age for the most recent product specifications 1 4 FRONT VIEW 1 4 1 Front Features 1 Locking faceplate Use the included keys to lock the faceplate for security or to remove the faceplate to gain access to the drive bays 2 LED indicators See the following chart for details on the ThunderBay 4 mini s LEDs LED COLOR ThunderBay ON ThunderBay SLEEPING DRIVE ACTIVITY DRIVE BAD BAY EMPTY Power Blue orang...

Страница 4: ... or if the computer is off or in a sleep or hibernation mode the ThunderBay 4 mini will turn off Thunderbolt device chains can support up to six Thunderbolt devices Thunderbolt 2 is backwards compatible with Thunderbolt but any devices connected in a Thunderbolt chain after a Thunderbolt device will operate at original Thunderbolt speed 10Gb s rather than Thunderbolt 2 speed 20Gb s If mixing Thund...

Страница 5: ... Turn the key clockwise then pull the key towards you The faceplate will swing open as shown 3 Pull up on the faceplate to remove it 4 Pull on the tab at the center of an empty drive tray to remove the tray from the enclosure 5 Set the drive tray as shown on your work surface If you are replacing an existing drive unscrew it from the drive tray at this time 6 Place your hard drive or SSD inside th...

Страница 6: ...rs of a RAID array OS X and Windows both have software RAID capabilities natively through their disk management applications and there are third party applications that offer expanded RAID support including SoftRAID for the Mac To learn more about SoftRAID options for the ThunderBay 4 mini please visit www owcdigital com softraidsupport 2 4 CHANGING DRIVES You can add or remove any drive without n...

Страница 7: ...r OWC technical support contact information 3 2 ABOUT DATA BACKUP To ensure that your files are protected and to prevent data loss we strongly suggest that you keep two copies of your data one copy on your OWC ThunderBay 4 mini and a second copy on either your internal drive or another storage medium such as an optical backup or on another external storage unit Any data loss or corruption while us...

Страница 8: ... to do so can cause damage to your drive mechanisms and or the hard drive enclosure Read this user guide carefully and follow the correct procedures when setting up the device Do not attempt to disassemble or modify the device To avoid any risk of electrical shock fire short circuiting or dangerous emissions never insert any metallic object into the device If it appears to be malfunctioning contac...

Отзывы: