Ovislink Wireless-G USB Dongle Скачать руководство пользователя страница 25

5.5 Link Status                                                                                               
 

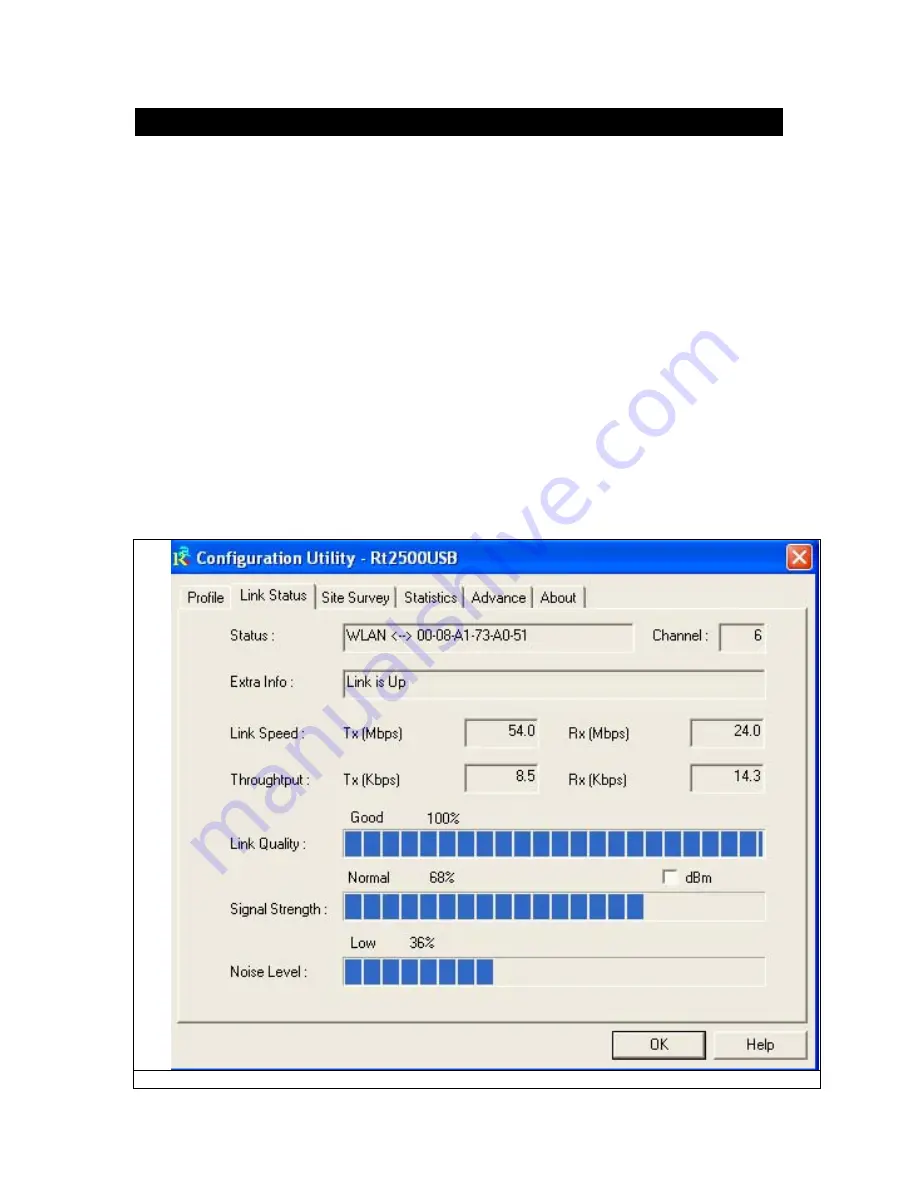
The Link Status (Fig 5-10) provides the link information of the Wireless-G USB Dongle. 
 
When in Infrastructure Mode, 

Status

 will display the connection statistics for the network segment 

that you are on. 


The

 Channel

 field shows the channel which the wireless network devices are currently using.


The 

Link Speed

Tx(Mbps)

 field shows the transfer rate in megabits per second. 

Rx(Mbps)

 field shows the receive rate in megabits per second. 

 
The 

Throughput (Kbps)

 field is the amount of data moved successfully form one place 

to another in a given time period. 
 
The 

Link Quality

 field will display a bar indicating percentage, between 0 and 100 

percent. 
 
The

 Signal Strength

 field will display a bar indicating percentage, between 0 and 100 

percent. 
 

Fig 5-10 Link Status 


Содержание Wireless-G USB Dongle

Страница 1: ...Wireless G USB Dongle User Manual Ver 1 00...

Страница 2: ...o Know the Wireless G USB Dongle 4 Installing Driver Configuration Utility and Hardware for Windows 98SE ME 2000 XP 4 1 For Windows XP 2000 4 2 For Windows ME 98SE 5 Using the Configuration Utility fo...

Страница 3: ...with Wireless G networks at an incredible 54Mbps And for added versatility it can also interoperate with all the 11Mbps Wireless B 802 11b products found in homes businesses and public wireless hotsp...

Страница 4: ...a specific Ad Hoc wireless LAN must be configured to share the same radio channel The adapter provides access to a wired LAN for wireless workstations An integrated wireless and wired LAN is called a...

Страница 5: ...o install the Wireless G USB Dongle in a Desktop or Notebook Select an available USB port on the notebook or Desktop PC Insert the Wireless G USB Dongle into the USB port 2 Windows will automatically...

Страница 6: ...Fig 4 2...

Страница 7: ...creen in Fig 2 1 should appear automatically If the screen doesn t appear automatically you can access the installation by clicking the Start button and choose Run In the drop down box type D setup ex...

Страница 8: ...all Wireless G USB Dongle Driver and Utility Click Next Fig 4 3 Fig 4 3 5 If your use Windows XP you will see Fig 4 4 Please click Continue Anyway If you use Windows 2000 you will see the Fig 4 5 Plea...

Страница 9: ...Fig 4 4 Fig 4 5...

Страница 10: ...6 Then select the country Region Fig 4 6 Fig 4 6 7 Click Finish on the Setup Page Fig 4 7 Fig 4 7 8 Please reboot the computer after the installation of drivers and utility...

Страница 11: ...8 3 Run the Auto Driver Utility Installation Insert the setup CD into your CD ROM drive Unless you have deactivated the auto run feature of Windows the screen in Fig 2 1 should appear automatically I...

Страница 12: ...Fig 4 9...

Страница 13: ...Wireless G USB Dongle Driver and Utility Click Next Fig 4 10 Fig 4 10 5 You will see the following page Fig 4 11 Fig 4 11 6 Please click Install to install the 802 1x utility You will see the followin...

Страница 14: ...has installed successfully Please click Cancel to continue driver installation Then select the country Region Fig 4 12 Fig 4 12 8 Upon clicking OK you will see the following screen Click OK on Fig 4 1...

Страница 15: ...Fig 4 14 10 Please reboot the computer after the installation of drivers and utility is completed...

Страница 16: ...ings 5 2 Access the Configuration Utility After installing the adapter the Configuration Utility icon will appear in your system tray Double click the icon Fig 5 1 Fig 5 1 The utility is divided into...

Страница 17: ...n Authentication The Authentication method used in this profile Encryption The Encryption type used for this profile Network Type The Network type used for this profile Add Click the Add button to cre...

Страница 18: ...e SSID for the wireless network Network Type There are two wireless modes A Infrastructure This mode allows wireless and wired networks to communicate through an access point B Ad Hoc This mode allows...

Страница 19: ...Fig 5 4 A If encryption is not required please click OK to save the profile For configuring encryption please follow the steps below...

Страница 20: ...B WEP 1 Select Authentication type Open System or Shared Key 2 Select the key number that will be used 3 Enter the key 4 Click OK to save the profile Please see the Fig 5 5 Fig 5 5...

Страница 21: ...C WPA 1 Select Authentication type WPA 2 Select Encryption type TKIP or AES Please see the Fig 5 6 Fig 5 6...

Страница 22: ...3 Click 802 1x Setting button Please see the Fig 5 7 Fig 5 7...

Страница 23: ...ll the information which you wan to use If you want to use CA server please click CA Server page Please see the Fig 5 8 Fig 5 7 5 Fill the information which you want to use Please click OK to save the...

Страница 24: ...D WPA PSK 1 Select Authentication type WPA PSK 2 Select Encryption type TKIP or AES 3 Enter the Key 4 Click OK to save the profile Please see the Fig 5 9 Fig 5 9...

Страница 25: ...ices are currently using The Link Speed Tx Mbps field shows the transfer rate in megabits per second Rx Mbps field shows the receive rate in megabits per second The Throughput Kbps field is the amount...

Страница 26: ...l Strength status Channel The Channel Wireless Network devices are using Encryption Encryption type Authentication Authentication type used Network Type Wireless Network mode Rescan Click the Rescan b...

Страница 27: ...Profile screen Figure 5 4 will appear 5 7 Statistics The Statistics screen Shown in Fig 5 7 provides information about the Transmit Statistics and Receive Statistics You can reset counters if you nee...

Страница 28: ...5 8 Advance The Advanced screen Fig 5 8 allows you to set Wireless Mode Ad hoc wireless mode TX BURST B G Protection Tx Rate and Antenna On Off Fig 5 8 Advance...

Страница 29: ...5 9 About The About screen shows release dates as well as driver utility versions and the MAC IP address of the card Fig 5 9 About...

Отзывы: