

Step 3: Connect Power and Network Cables
The server has Dual-Gigabit Ethernet ports that can connect to 10BaseT, 100BaseTx, or 1000BaseT networks. A
dual-port configuration offers added advantages, such as load balancing and failover. You may connect one or
both of the ports.
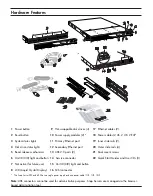
If you connect only one port, you must use the primary port on the back of the server, as shown in the
•
Hardware Features illustration.
To take advantage of network bonding (load balancing or failover), both ports must be physically connected
•
to the network; and (a) for load balancing, connected to the same switch on the same subnet; or (b) for
failover, connected to different switches on the same subnet (in case one switch fails).
Caution
The speed/duplex setting on Snap Servers defaults to autonegotiate. The networking switch or hub
to which the server is connected must also be configured to autonegotiate; otherwise, network throughput or
connectivity to the server may be seriously impacted.
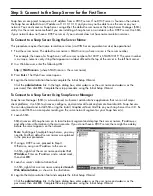
Cabling the Server to the Network
Use the provided Ethernet cables to connect the server to the network. When you connect the network cables to
active ports, the network lights on the bezel (LAN 1 and LAN 2) are green.
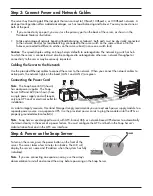
Connecting the Power Cord
Note
The Snap Server 650 (shown)
has dual power supplies. The Snap
Server 520 and 620 (not shown) have
a single power supply and will require
only one UPS and/or electrical outlet for
installation.
As a data integrity measure, Overland Storage strongly recommends you connect each power supply module to a
separate power source via a separate UPS.
Use the provided power cords to
plug the modules into the UPSs or
properly grounded electrical outlet(s).
Note
Snap Servers are designed to work with APC-brand, USB- or network-based UPS devices to automatically
shut down cleanly in the event of a power failure. You must configure the APC unit both in the Snap Server’s
Administration Tool and in the APC user interface.
Step 4: Power on the Snap Server
To turn on the server, press the power button on the front of the
server. The server takes a few minutes to initialize. The LCD will
display the server’s name and IP address when the system has fully
initialized.
Note
If you are connecting an expansion array, use the array’s
documentation to install and connect the array before powering on the Snap Server.
Power