background image

GETTING STARTED

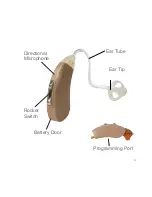
Rocker switch

 – the rocker switch is used to change between 

program settings using our exclusive QuickFit technology 
and is used to control the volume.

Battery door

 – this also serves as the On/Off switch.  Close 

the door to turn on your device. Open the door to turn off 
the device.

Ear tube & tip

 – each unit comes equipped with an ear tube 

& tip that connects to the unit’s speaker. Amplified sound 
travels through the ear tube & tip to your ear. The ear tube 
also features a retention loop to help keep the tube and tip 
in place.

Directional microphone

 – your Ascend’s directional micro-

phone can be activated to suppress background noise and 
allow for greater speech focus in noisy environments.

Programming port

 – covered by a small, black flap on the 

back of the device body, this slot is used by our engineers 
to program your device. Please do not remove the flap or 
tamper with the port.

5

Содержание ascend

Страница 1: ...Ascend...

Страница 2: ......

Страница 3: ...your Ovation Ascend 10 Ear Tubes and Tips 12 QuickFit Program Selection 15 Volume Adjustment 16 Directional Microphone Noisy Mode 17 Telecoil Phone Mode 18 Troubleshooting 21 Caring for your Ovation h...

Страница 4: ...g aid before there may be an adjustment period of up to a few weeks before you can begin to enjoy all the benefits that your Ovation offers Be patient as you adjust to wearing your Ovation Ascend and...

Страница 5: ...d speech clarity in noisy environments On device volume control Telecoil phone mode for use with most smartphones and with other compatible telephones and looped locations We recommend that you start...

Страница 6: ...ries to help you maximize your hearing experience Ovation Ascend Tubes and Tips Tubes labeled in RED are for right ear Tubes labeled in BLUE are for left ear 3 1 Set Open Fit Ear Tips 1 Set Double Dom...

Страница 7: ...moving from device body Protective Storage Case Your Ovation storage case is heavily padded and designed to be portable We recommend keeping your device in the storage case or in a dry box when not in...

Страница 8: ...be tip that connects to the unit s speaker Amplified sound travels through the ear tube tip to your ear The ear tube also features a retention loop to help keep the tube and tip in place Directional m...

Страница 9: ...6 Rocker Switch Programming Port Directional Microphone Ear Tube Battery Door Ear Tip...

Страница 10: ...ng them unusable in your Ovation device Pulling off the plastic sticker activates the battery Do not pull the tab off until you need to use the battery The bat teries may take up 2 minutes to fully ac...

Страница 11: ...not open the battery door too far or damage may occur Step 2 With the top of the battery door facing you hold the battery with the rounded edge positioned toward the back place the battery into the b...

Страница 12: ...the plastic sticker and close the battery door to turn the device on To turn off the device and to prevent battery use when not using the device gently pull the battery door open Match flat side of th...

Страница 13: ...e battery but also serves as the On Off switch ON Simply close the battery door OFF Open the battery door when you are not wearing your Ascend to turn the unit off and conserve battery life Opening th...

Страница 14: ...t is for the right ear Next place your Ovation Ascend over the top of your ear until it rests securely behind your ear While holding your Ascend in place insert the ear tip into the ear canal and curl...

Страница 15: ...b to grip the ear tube near the tip Then use your other hand to pinch off the ear tip from the end piece You may need to use some force to remove the tip Attaching an ear tip Place a new ear tip onto...

Страница 16: ...wise direction until the tube releas es from the unit Attaching the ear tube Gently push the device end of the ear tube onto the unit and gently turn it in a clockwise direction until the device end o...

Страница 17: ...d the cleaning wire through the ear tube starting at the device end until it comes out at the ear tip end then pull the cleaning wire back out through the tube Be sure to wipe off the wire before the...

Страница 18: ...determine which one you like best Use that setting the majority of the time Simply press and release the upper portion of the rocker switch for 3 seconds to change the program setting Continue pressin...

Страница 19: ...ounds you are hearing and giving you additional control over your listening experience To increase volume tap and release the upper portion of the rocker switch To decrease volume tap and release the...

Страница 20: ...he rocker switch as described on pg 15 until you hear 3 beeps While in Noisy Mode your device will switch from an Omni Directional hearing experience to a Directional hearing experience giving you the...

Страница 21: ...g systems including movie theaters concert halls sports arenas and places of worship When the sign at right is present it signifies that a telecoil system is available at that location Activating the...

Страница 22: ...al spot where the audio quality is at its clearest and loudest Compatible Loop Systems As described on the prior page many public places are equipped with telecoil compatible assisted listening system...

Страница 23: ...20...

Страница 24: ...p is clean and clear of wax and ear tube is attached properly Microphone and hearing port is clean and clear of wax Battery may need replacing Note Leaving the battery on in your unit overnight will s...

Страница 25: ...22...

Страница 26: ...ully remove any traces of wax and debris Do not rinse or submerge your Ovation Ascend device in water In fact do not not use water alcohol or any other liq uid agent to clean your unit as they may dam...

Страница 27: ...not remove the unit by pulling on the battery door and never pull the door back father than what is necessary to insert or remove a battery When you re not wearing your Ovation Ascend open the battery...

Страница 28: ...es not cover malfunctions due to unusual wear and tear or mis treatment of the hearing aid such as physical shock damage from moisture or sweat excessive wax build up or tamper ing with the instrument...

Страница 29: ...on Ascend simply return it and we will issue a full refund no questions asked To initiate a return call us within 60 days of receiving your order to obtain a Return Merchandise Authorization RMA All r...

Страница 30: ...122 dB HFAvg full on gain 113 dB Peak gain 53 dB Reference test gain 30 dB Frequency range 200 5500 Hz Total harmonic distortion 3 Equivalent input noise 25 dB Battery current drain 1 0 mA Induction...

Страница 31: ...28...

Страница 32: ...nquiry actual observation or review of any other available information concerning the prospective user that the prospective user has any of the following conditions Visible congenital or traumatic def...

Страница 33: ...tion or a foreign body in the ear canal Pain or discomfort in the ear Special care should be exercised in selecting and fitting a hearing aid whose maximum sound pressure level exceeds 132 decibels be...

Страница 34: ...te for a hearing aid evaluation The audiologist or hearing aid dispenser will conduct a hearing aid evaluation to assess your ability to hear with and without a hearing aid The hearing aid evaluation...

Страница 35: ...aring loss DISCLAIMER No hearing aid can restore normal hearing or improve a hearing impairment resulting from organic conditions nor can it prevent further hearing loss You must be patient while adju...

Страница 36: ......

Отзывы: