Outlaw Audio
•
RR2180 Stereo Receiver
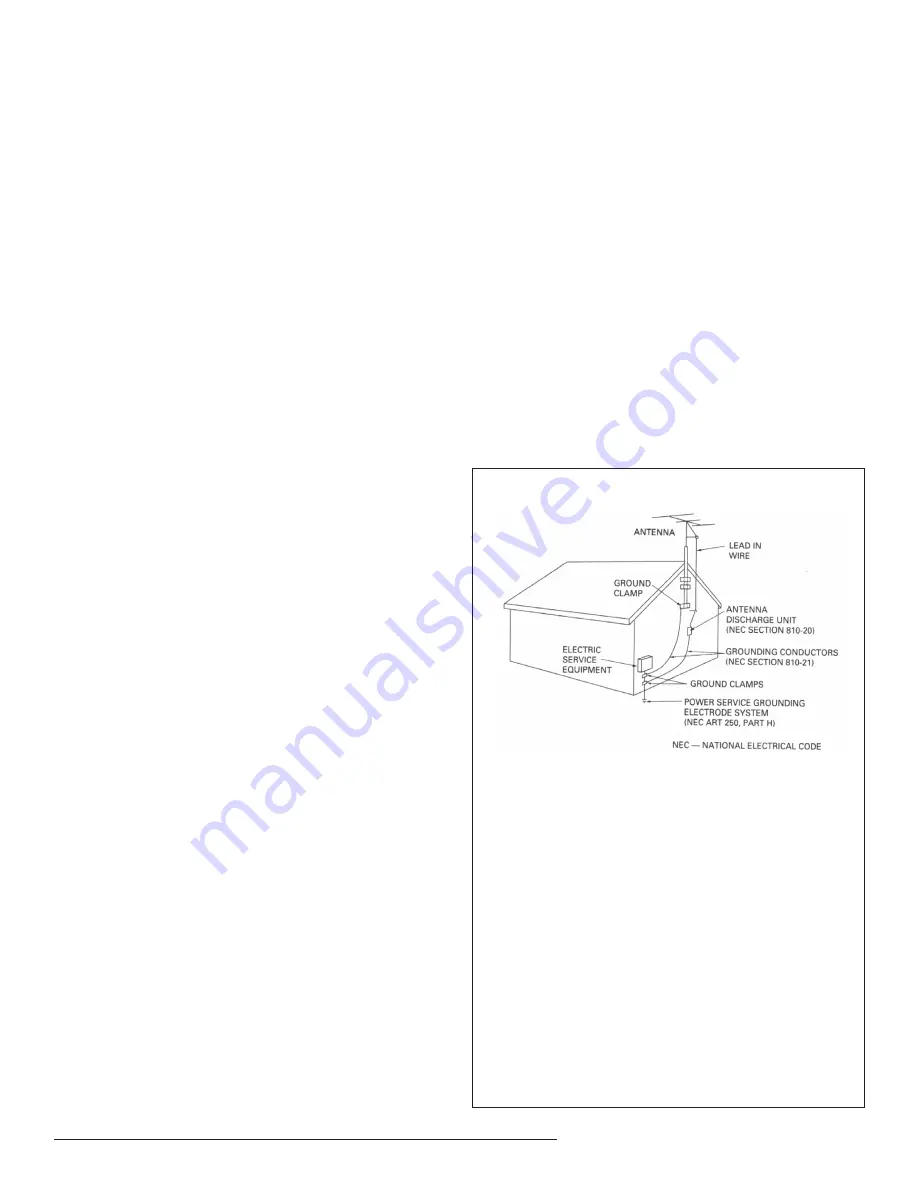
If an outside antenna or cable system is connected to the equipment,
be sure the antenna or cable system is grounded so as to provide some
protection against built up static charges and voltage surges. Section
810 of the national Electrical Code, ANSI/NFPA 70 (in Canada, part 1
of the Canadian Electrical Code) provides information with respect to
proper grounding of the mast and supporting structure, grounding of
the lead-in wire to an antenna discharge unit, size of grounding con-
ductors, location of antenna discharge unit, connection to grounding
electrodes and requirements for the grounding electrode.
Keep Antenna Clear of High Voltage
Power Lines or Circuits
An outside antenna system should be located well away from power
lines, electric light or power circuits and where it will never come into
contact with these power sources if it should happen to fall. When in-
stalling an outside antenna, extreme care should be taken to avoid
touching power lines, circuits or other power sources as this could
be fatal. Because of the hazards involved, antenna installation should
be left to a professional.
Safe Antenna and Cable Connection
Stereo Receiver Quick Start Guide
In this quick start guide, we’ll provide some information on the receiver’s
features and will go into greater detail on operating the receiver in the full
Owner’s Manual, located at www.outlawaudio.com
High Power Stereo Amplifier
2 x 125 watts continuous power, 20 Hz to 20 kHz @ 8 ohms, <0.05% THD,
both channels driven
7 Analog Inputs
Connect all of your analog audio sources with ease. Included are a rear panel
phono input (moving coil or moving magnet), 4 line level RCA inputs, an
external processor loop, and a front panel 3.5mm auxiliary input.
2 USB-A Inputs (Front and Rear Panel)
Connect a USB storage device. These inputs support hi-res audio and USB
devices with speeds of up to 2.0 and up to 16GB of storage.
1 USB-B Input (Rear Panel)
Connect a compatible computer (PC) for hi-res audio playback through your
main music system. For your computer to communicate with the receiver,
you will need to download a USB Audio Driver; it can be found at:
www.outlawaudio.com
2 Optical Inputs
Connect your source devices’ optical output here for hi-res audio playback
through your main music system. If playing audio when you first switch to an
optical input, the receiver's front panel display will briefly show the incoming
audio's sample rate.
2 Digital Coax Inputs
Connect your source devices’ digital coax output here for hi-res audio play-
back through your main music system. If playing audio when you first switch
to a digital coax input, the receiver’s front panel display will briefly show the
incoming audio’s sample rate.
Internet Radio
Be able to stream stations from around the world. First, ensure an Ethernet
cable is connected to the receiver. Internet Radio can be navigated with the
up and down cursor arrows; additionally, the ENTER button is used to select
a category or station, while a short press of the MENU button is used as a
back button. Note, that loading times depend upon individual stations as well
as your internet speed.
AM/FM Radio
When first switching to the tuner input, there can be an initial load time of
roughly 8 seconds. Don’t forget to hook up your antennas!
DLNA
If your receiver is connected to the internet via an Ethernet cable, and you have
a DLNA Media Server, you will be able stream music to your receiver over the
network. Your media playback will then be controlled by your DLNA server.
Making RCA Connections
When making connections with RCA type plugs, make certain to gently, but
firmly insert the plug into the jack. Loose connections can cause intermittent
sound and may damage your speakers. The barrel assembly of some high
quality RCA plugs may be very tight, and it is important to ensure a proper
connection between the interconnection cable and the input jack.
Speaker Connections
We do not recommend that you use any wire with a gauge higher than 16.
When making your speaker connections, ensure that there are no stray strands
of speaker wire. Remember to keep your speakers in phase by connecting
the positive, or red wire, to the matching terminal on the receiver as well as
the speaker; the same should be done with the negative or black wire.
This receiver is capable of powering 2 pairs of speakers, Speaker A and Speaker
B. While this unit can support down to a 4 ohm load, if you plan on running
both pairs of speakers concurrently, they will need to be rated 8 ohm nominal.
Power Connections
Once all audio and system connections have been made, connect the power
cord to an AC power source. Please make certain that the receiver is turned
off when connecting the power cord and plugging it into an AC outlet.
Basic Operation
Bringing the unit in and out of standby can be done by using the corresponding
button on the front panel, or by using the ON and OFF buttons on the remote.
When in standby, if you do not see a blue LED lit on the front panel's STANDBY
button, ensure the master power switch on the rear panel is in the on position.
Switching between which input to monitor as well as volume changes, and
many other operations, can be made via the remote and the front panel. While
the unit can be operated with its default settings, and these basic instructions,
the full owner's manual can be downloaded at: www.outlawaudio.com/manuals.
The owner's manual will provide in-depth instructions and information on
how to best configure the stereo receiver for your personal setup.
Содержание RR2180
Страница 1: ......


