background image

19

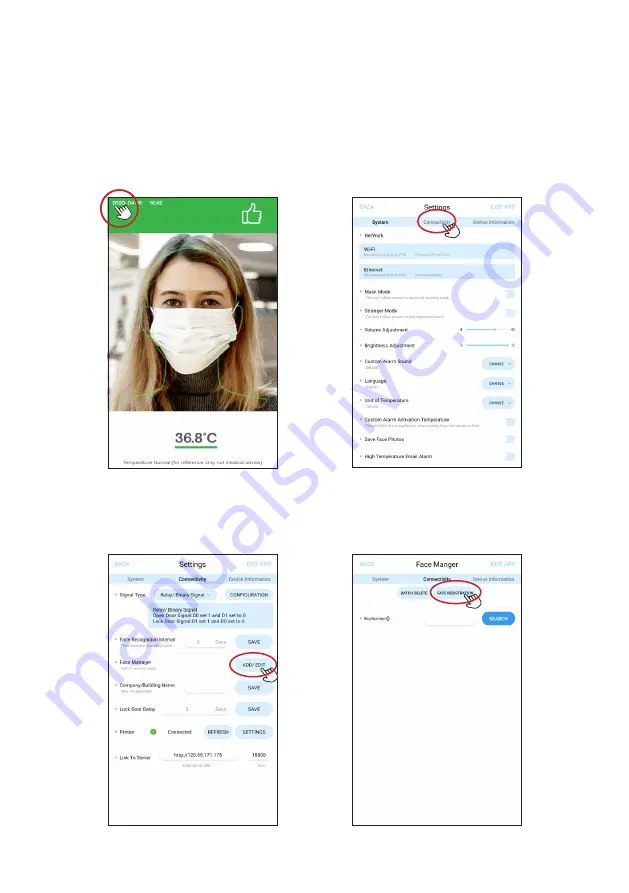
Step 3.  On the Connectivity screen, next 
to “Face Manager” select “ADD/EDIT”.

Step 4.  On the Face Manager screen, 
select “FACE REGISTRATION”.

Step 1.  Click the upper-left hand corner 
to open the APK Settings section.

Step 2.  Click “Connectivity“.

Operating Instruction

Face Registration - Single Registration

Содержание iDISPLAY Thermometer

Страница 1: ...User Manual Adult Height Child Height Counter Height Wall Mount Optional...

Страница 2: ...ctivation Temperature 18 Face Registration Single Registration 19 Face Registration_Batch Import 22 Face Registration Deleting Registrants 25 Stranger Mode 26 Mask Mode 28 Add company name 29 Set or c...

Страница 3: ...n and or make improvements or changes in the product s and or the program s described in this documentation at any time without prior notice The information in this document is provided in good faith...

Страница 4: ...an approved adaptor of the same type and rating WARNING Dangerous voltage constituting a risk of electric shock is present inside this equipment WARNINGS The main plug shall be the main disconnect de...

Страница 5: ...lt Thermometer Stand 3M long PSU with different region plugs Mini mouse UK EU US USB Hub Reflective floor sticker x4pcs Screwdriver Mini USB To USB Cable Wall bracket M3 Screw x3pcs Self tapping screw...

Страница 6: ...r Stand 3M long PSU with different region plugs Mini mouse UK EU US USB Hub Reflective floor sticker x4pcs Mini USB To USB Cable Screwdriver Wall bracket M3 Screw x3pcs Self tapping screw and expansio...

Страница 7: ...nter Thermometer Stand 3M long PSU with different region plugs Mini mouse UK EU US USB Hub Reflective floor sticker x4pcs Screwdriver Wall bracket M3 Screw x3pcs Optional Self tapping screw and expans...

Страница 8: ...7 Product Diagram 2 2 4 5 5 6 6 3 3 7 8 1 2 2 4 5 5 3 3 7 9 8 10 11 12 9 1 Adult Height...

Страница 9: ...3 Wide dynamic camera 4 8 inch IPS screen 5 Speaker 6 Hidden USB interface 7 DC 12V 2A 8 RJ45 9 USB 2 0 10 Relay 11 Wiegand OUT 12 Wiegand IN Product Diagram Note Items marked with use cables for the...

Страница 10: ...screen 5 Speaker 6 Hidden USB interface 7 DC 12V 2A 8 RJ45 9 USB 2 0 10 Relay 11 Wiegand OUT 12 Wiegand IN Product Diagram Note Items marked with use cables for the Access Control System Check details...

Страница 11: ...m section on pages 35 36 7 9 8 1 2 2 4 5 5 6 3 3 6 1 2 2 4 5 5 3 3 7 9 8 10 11 12 Counter Height No Description 1 Infrared temperature measurement module 2 Indicator light has White Green Red three mo...

Страница 12: ...t advisable to have the iDISPLAY Thermometer in direct sunlight as this could adversely affect the accuracy of the temperature readings It is also not advisable to put the iDISPLAY Thermometer outside...

Страница 13: ...ance of infrared temperature sensor to the target is 40cm 80cm Accuracy of temperature measurement Temperature measurement accuracy of infrared temperature sensor to temperature measurement target 0 2...

Страница 14: ...Carefully open the package using a box cutter Take out the Thermometer and all the accessories Step 2 Connect the power cable to the thermometer and power socket Installation Instructions Adult and Ch...

Страница 15: ...er as pictured below Use a pen to draw a straight line about 50 centimeters 1 97in long Step 4 Using the line drawn in step 3 as a guide remove the protective film on the backside of the reflective st...

Страница 16: ...the thermometer will indicate this with an alarm stating Temperature Normal as well as a green color on the screen with a green dot on the forehead Step 6 When the temperature exceeds 37 7C 99 86F th...

Страница 17: ...select both For example select Both Step 4 Click BACK to check if the unit of temperature has changed Step 1 Click the upper left hand corner to open the APK Settings section Step 2 Next to Unit of Te...

Страница 18: ...17 Step 5 The unit of temperature is changed to both Operating Instruction...

Страница 19: ...y Step 1 Click the upper left hand corner to open the APK Settings section Step 2 Turn on Custom Alarm Activation Temperature option A pop up will appear with the temperature input box Note Please fol...

Страница 20: ...ace Manager select ADD EDIT Step 4 On the Face Manager screen select FACE REGISTRATION Step 1 Click the upper left hand corner to open the APK Settings section Step 2 Click Connectivity Operating Inst...

Страница 21: ...positioned in the center and is not wearing a mask Step 8 In the Name field add the name Click SAVE Step 5 Select Single Registration Step 6 On the Single Registration screen select the photo icon to...

Страница 22: ...eir temperature taken the screen will display their information Step 9 You will be directed back to the Face Manager section Select BACK on the upper left hand corner Step 10 Select BACK again on the...

Страница 23: ...to Face Manager select ADD EDIT Step 4 On the Face Manager section select FACE REGISTRATION Step 1 Click the upper left hand corner to open the APK Settings section Step 2 Click Connectivity Operating...

Страница 24: ...rt then select Start Import Step 5 Insert a USB disk containing the registrants photos into the USB port The photos should be frontal view in png or jpg format with a minimum resolution of 640 480 The...

Страница 25: ...24 Step 9 Once all the information is important click CONFIRM to finish the process Operating Instruction...

Страница 26: ...Select BATCH DELETE then select the registrants you wish to delete Select DELETE to delete the selected registrants Step 1 Click the upper left hand corner to open the APK Settings section Step 2 Cli...

Страница 27: ...r person needs to be registered refer to the Face Registration section on pages 19 21 Step 1 Click the upper left hand corner to open the APK Settings section Step 2 Turn on Stranger Mode then select...

Страница 28: ...27 Step 5 When the temperature is abnormal a red color will appear and an alarm will sound for 3 seconds Operating Instruction...

Страница 29: ...emperature is abnormal a red color will appear and an alarm will sound for 3 seconds Step 1 Click the upper left hand corner to open the APK Settings section Step 2 Turn on Mask Mode then select BACK...

Страница 30: ...ilding Name field add your company name Step 4 The company name will appear on top of the temperature scanning screen Step 1 Click the upper left hand corner to open the APK Settings section Step 2 Cl...

Страница 31: ...NFIRM to set the password To change the password follow the same process Step 4 Select BACK in the upper left hand corner to return to the temperature scanning screen Step 1 Click the upper left hand...

Страница 32: ...eft hand corner to open the APK Settings section Step 6 Enter the password that was set in Step 4 Select CONFIRM to enter the Settings section Note If the password is forgotten enter 000000 as the pas...

Страница 33: ...4 Select REFRESH to connect to the printer Step 1 Connect the printer provided by OUTFORM to the device with a USB port Step 2 Click the upper left hand corner to open the APK Settings section Operati...

Страница 34: ...be printed with your custom message and a number Step 5 The printer is now connected Select SETTINGS to customize the content on the printer label Step 6 Enter your company name and a custom message B...

Страница 35: ...ure is optional the default setting for this is OFF Note The records in the device will be deleted immediately once exported to teh USB disk Please refer to the next two steps to turn on the Save Face...

Страница 36: ...ccess Control System Step 2 Click the upper left hand corner to open the APK Settings section Step 3 Select Connectivity Step 4 Next to Signal Type select LOCK TYPE to choose the one which matches you...

Страница 37: ...now connected to the Access Control System Step 5 If your door system is Relay choose Relay Binary Signal The process is now complete Step 6 If your door system is Wiegand select Wiegand 34 or Wiegand...

Страница 38: ...ion screws x4 to the wall 75 0mm 2 95 in 75 0mm 2 95 in Pedestal Adult and Child change to Wall mount Step 3 Release M3 screws x3 from the bottom of the wall bracket and take out the bottom piece Put...

Страница 39: ...38 Step 5 Release Cross Screws x4 from Adult Child Height top base Step 6 Take out the Thermomoter with top base Pedestal Adult and Child change to Wall mount...

Страница 40: ...ike shown in the drawing below and take out all the cables from the pedestal Step 8 Take out the Thermometer by releasing the big nut under top base Put nut aside to be used in the next step Pedestal...

Страница 41: ...r to the pre installed wall bracket by tightening the big nut that was removed in the last step Step 10 Reinstall the M3 screws x3 that were removed in Step 3 to the bottom bracket piece Pedestal Adul...

Страница 42: ...n the package using a box cutter Take out the Thermometer and all the accessories Step 2 Place the Counter Thermometer on the surface in a suitble position closer to the edge of the surface Installati...

Страница 43: ...rmometer and power socket Step 4 Use the reflective sticker to measure the correct standing distance from the front of table as pictured below Use a pen to draw a straight line about 50 centimeters 1...

Страница 44: ...p 4 as a guide remove the protective film on the backside of the reflective sticker and place the adhesive side on the floor For operating instructions refer to the Getting Started section on pages 14...

Страница 45: ...ly expansion screws x4 to the wall 75 0mm 2 95 in 75 0mm 2 95 in Counter change to Wall mount Step 3 Release M3 screws x3 from the bottom of the wall bracket and take out the bottom piece Put aside to...

Страница 46: ...ter to the pre installed wall bracket by tightening the big nut that was removed in the last step Counter change to Wall mount Step 5 Release Cross Screws x6 from Counter base Take off the base piece...

Страница 47: ...46 Counter change to Wall mount Step 9 Reinstall the M3 screws x3 that were removed in Step 3 to the bottom bracket piece...

Страница 48: ...cross screws x4 Step 2 Insert the Wall unit onto the aluminum tube with nut cap Step 3 Install Thermometer to pre installed wall bracket by tight the big nut that removed from last step Step 4 Reinst...

Страница 49: ...mometer and power socket Step 6 Use the reflective sticker to measure the correct standing distance from the front of wall as pictured below Use a pen to draw a straight line about 50 centimeters 1 97...

Страница 50: ...2 as a guide remove the protective film on the backside of the reflective sticker and place the adhesive side on the floor For operating instructions refer to the Getting Started section on pages 14 1...

Страница 51: ...he Homepage Step 4 To open System Settings on the Homepage select Settings Step 1 Insert the provided mouse into the USB port as depicted in the drawing below Step 2 Click the upper left hand corner t...

Страница 52: ...51 Step 7 Enter your Wi Fi password Step 8 The Wi Fi is now connected Step 5 Go to Network Internet Step 6 Turn on Wi Fi then select your Wi Fi network How to upgrade the APK 1 2...

Страница 53: ...52 Step 9 On The Homepage select the small arrow on the bottom to enter the Hotseat section Step 10 Select the iDISPLAY application in the Hotseat section How to upgrade the APK...

Страница 54: ...evice Information Step 3 Select CHECK FOR UPDATE to check for a new version Step 4 If there is a new version a message will appear to start download Wait about 2 minutes the APK will reinstall itself...

Страница 55: ...disconnecting the power and reconnecting power If the alarm doesnt turn on 1 Restart by disconnecting the power and reconnect power 2 If this does not resolve the issue go to the Settings section fin...

Страница 56: ...For additional assistance visit outformsupport com...

Отзывы: