background image

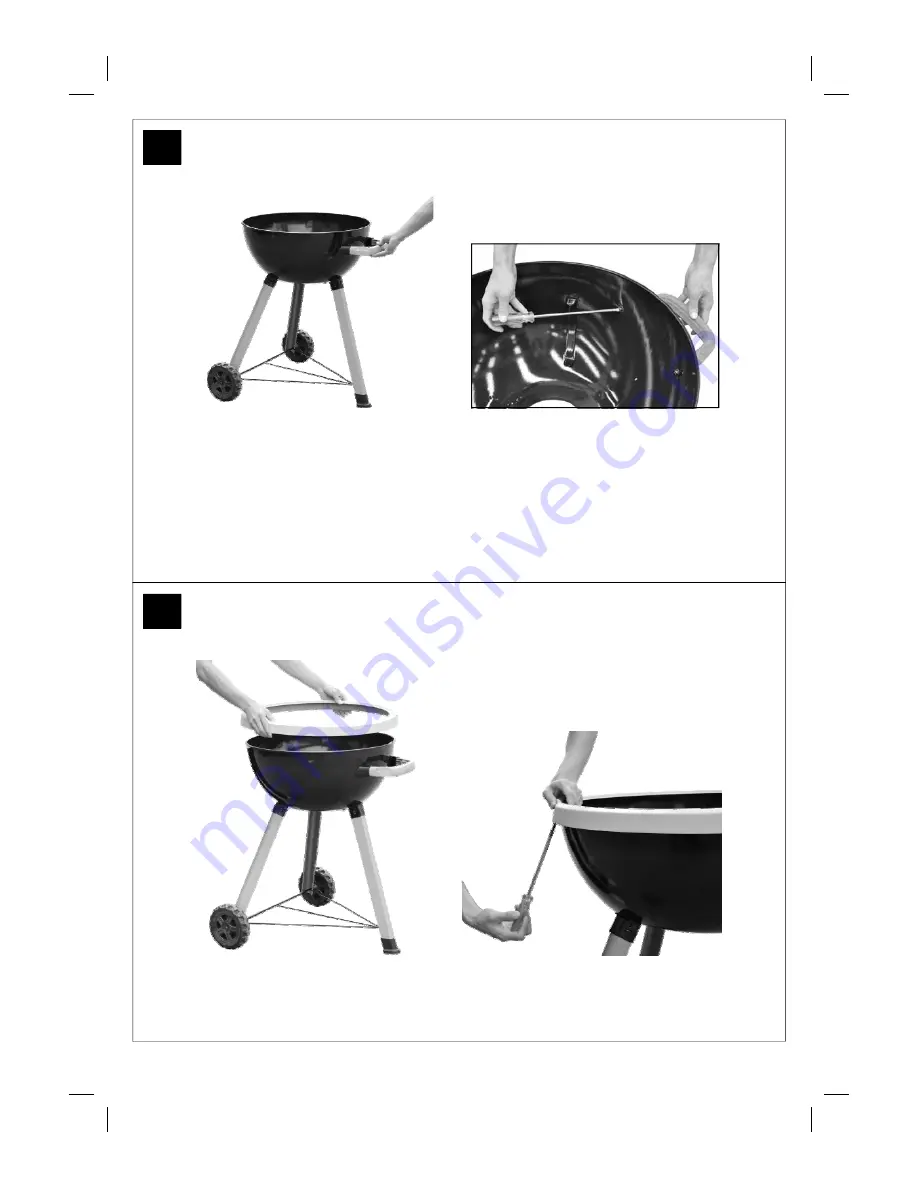
Carefully turn the completed trolley over, right side up. 
 
Attach the Body Handle (B6) onto the barbecue body by inserting M6x30 Bolts (D3) through Ø6 
Washers (D4), barbecue body, Left and Right Heatproof Spacers (B7, B8) and screwing into 
body handle. After completing assembly, ensure that the tabs for hanging tools should be 
located on top side. 
 
Note: Please differentiate the heatproof spacers with the mark “L”, “R”. 

Place the Body Ring


(B5) onto barbecue body, and secure with three M5x30 Bolts (D1). 

Содержание Cook Dome 571

Страница 1: ...or petrol for lighting or re lighting Use only firelighters complying to EN1860 3 Do not move the appliance during use Any modification of the appliance misuse or failure to follow the instructions ma...

Страница 2: ...k Dome 571 HOOD A1 Hood 1 A2 Hood Handle 1 BODY B1 Barbecue Body 1 B2 Cooking Grill 1 B3 Grill Lifting Handle 2 B4 Charcoal Grill 1 B5 Body Ring 1 B6 Body Handle 1 B7 Left Heatproof Spacer 1 B8 Right...

Страница 3: ...3 2 Parts Diagram Quantity varies according to model purchased Specifications subject to change without prior notice A1 A2 B5 B2 B4 B1 B8 B6 C2 C4 C6 B10 C3 B3 B7 B9 C1 B11 C5...

Страница 4: ...4 3 Parts Diagram Quantity varies according to model purchased Specifications subject to change without prior notice D1 D3 D4 D2 D4...

Страница 5: ...sharp edges are present Please read the Important Information section carefully before assembly and use of your barbecue 1 2 Place Long Leg C2 into position as shown Insert Short Legs C1 into remainin...

Страница 6: ...ole in the end of the long leg and then thread the straight ends of the leg support rack through the holes in the short legs as shown Place Wheel Spacers C5 on each straight bar of the leg support rac...

Страница 7: ...rough 6 Washers D4 barbecue body Left and Right Heatproof Spacers B7 B8 and screwing into body handle After completing assembly ensure that the tabs for hanging tools should be located on top side Not...

Страница 8: ...level within the body Place the Cooking Grill B2 onto the upper brackets in barbecue body Ensure the cooking grill lies level within the body Slide the Ash Tray B9 into position underneath the barbec...

Страница 9: ...1 over the body handle Carefully place the Hood A1 onto the barbecue body Note The hood can be hooked onto the barbecue body whilst it is removed for cooking or cleaning ASSEMBLY IS NOW COMPLETE PROCE...

Страница 10: ...Do not add starter fluid to charcoal that is already alight n Do not use in high winds Hot embers could be blown out of the barbeque and cause damage or serious injury n Always place charcoal in the...

Страница 11: ...the barbecue with red hot charcoal for at least 30 minutes before use Do not begin cooking until charcoal has an ashed over coat Do not attempt to cook whilst charcoal is flaming 7 5 Heat Control The...

Страница 12: ...f Cooking Session Ash can be shaken from the charcoal basket where it will drop into the ash tray Ash should not be disposed of until you are certain it is cold and will not be able to re ignite Dispo...

Страница 13: ...g a cloth wrung out in hot soapy water and dry thoroughly Excess fat and food debris can be removed from inside the body using a soft plastic or wooden scraper It is not necessary to remove all the gr...

Страница 14: ...ndence record your serial number here See sticker on side of barbecue body Serial No __________________ This number may be required when ordering spare parts or accessories A part reference number may...

Страница 15: ...uct has not been subjected to misuse or neglect including fat fires and flare ups The product has not sustained damage through foreign objects substances or accidents The care and maintenance instruct...

Отзывы: