OutBack reserves the right to make changes to the products and information contained in this document without notice.
Copyright © 2015 OutBack Power. All Rights Reserved. OutBack
is a registered trademark of The Alpha Group. p/n 044-026-B0-001, Rev. A (03/2015)
Enclosure mounting procedure:
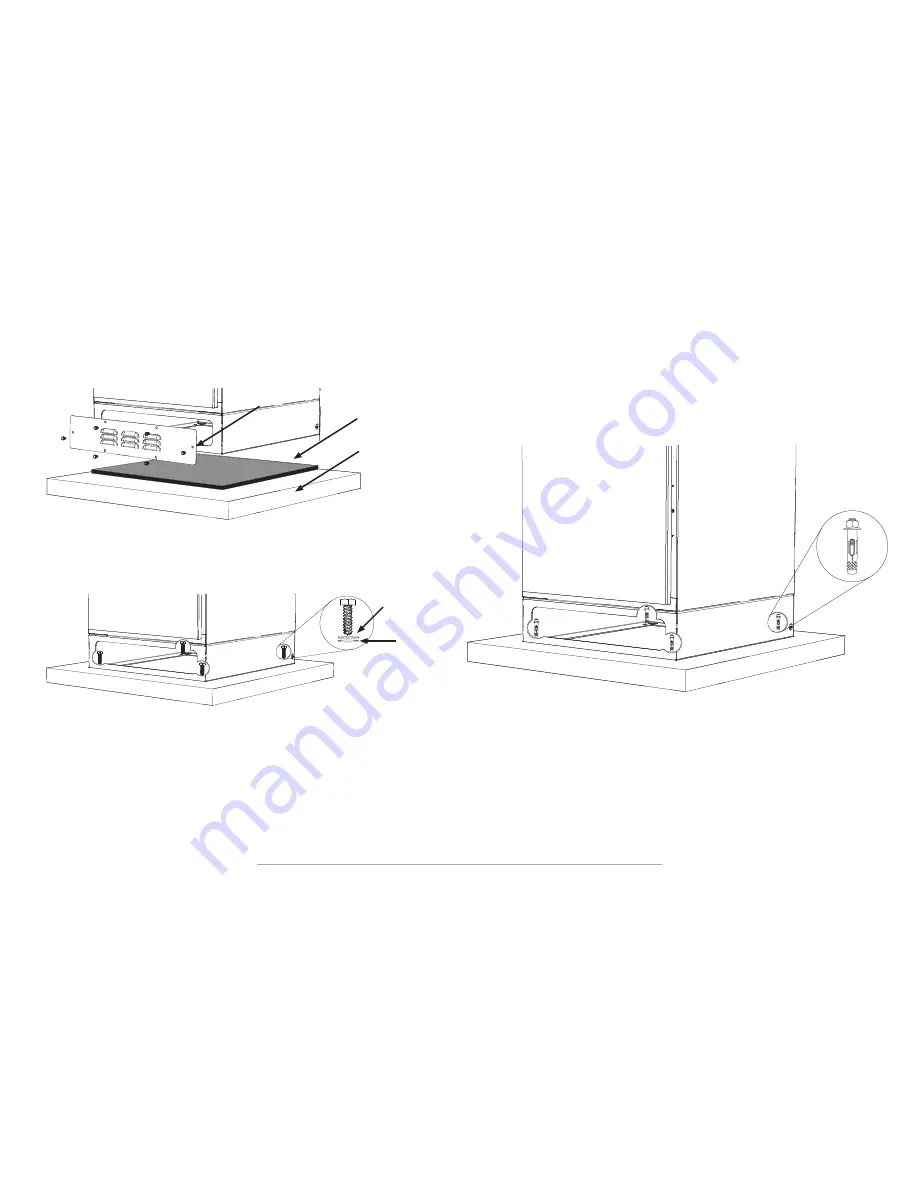
1. Remove the six bolts holding the covers in place on the front and back of the enclosure riser (See Figure 5).
2. Note the location of the mounting holes on the bottom of the unit. Ensure that there are at least 4" (10.2 cm)
between the wall and the nearest mounting hole.
3. Clean the mounting holes using compressed air and/or a vacuum cleaner.
4. Place the enclosure so the mounting holes line up with the holes in the floor (See Figure 6).
5. Insert the 1/2" UNC bolts into the holes.
6. Finger-tighten all of the bolts.
7. Once snug, use a wrench to finish tightening the bolts to the manufacturer's specifications. Be careful not to
overtighten.
Figure 5, Mounting - Cover Removal / Vapor Barrier Placement
Vapor Barrier
Pad
Figure 6, Mounting - Precast Pad / Pour-in-Place Pad Installation
Figure 7, Mounting - Existing Concrete Pad Installation
Installation Procedure - Precast Pad / Pour in Place
Installation Procedure - Existing Concrete Pad
Enclosure mounting procedure:
1. Remove the six bolts holding the covers in place on the front and back of the enclosure riser (See Figure 5).
2. Note the location of the mounting holes on the bottom of the unit as well as the vapor barrier. Ensure that
there are at least 4" (10.2 cm) between the wall and the nearest mounting hole.
3. Remove the cabinet from the pad. Use a hammer drill and masonry bit to drill four holes to the bolt
manufacturer's specifications.
4. Clean the holes using compressed air and/or a vacuum cleaner.
5. Place the enclosure so the mounting holes line up with the holes on the vapor barrier as well as the holes in
the existing concrete pad (See Figure 7).
6. Insert the anchors into the holes (make sure the nuts are just below the top of the stud).
7. Finger-tighten all of the nuts.
8. Once snug, use a wrench to finish tightening the anchors (tighten to the bolt manufacturer's specifications).
Be careful not to overtighten.
Spring Washer
Flat Washer


