OSEPP USA, INC.
2105 S Hardy Dr., Unit # 19
Tempe, Arizona, 85282
USA
www.osepp.com
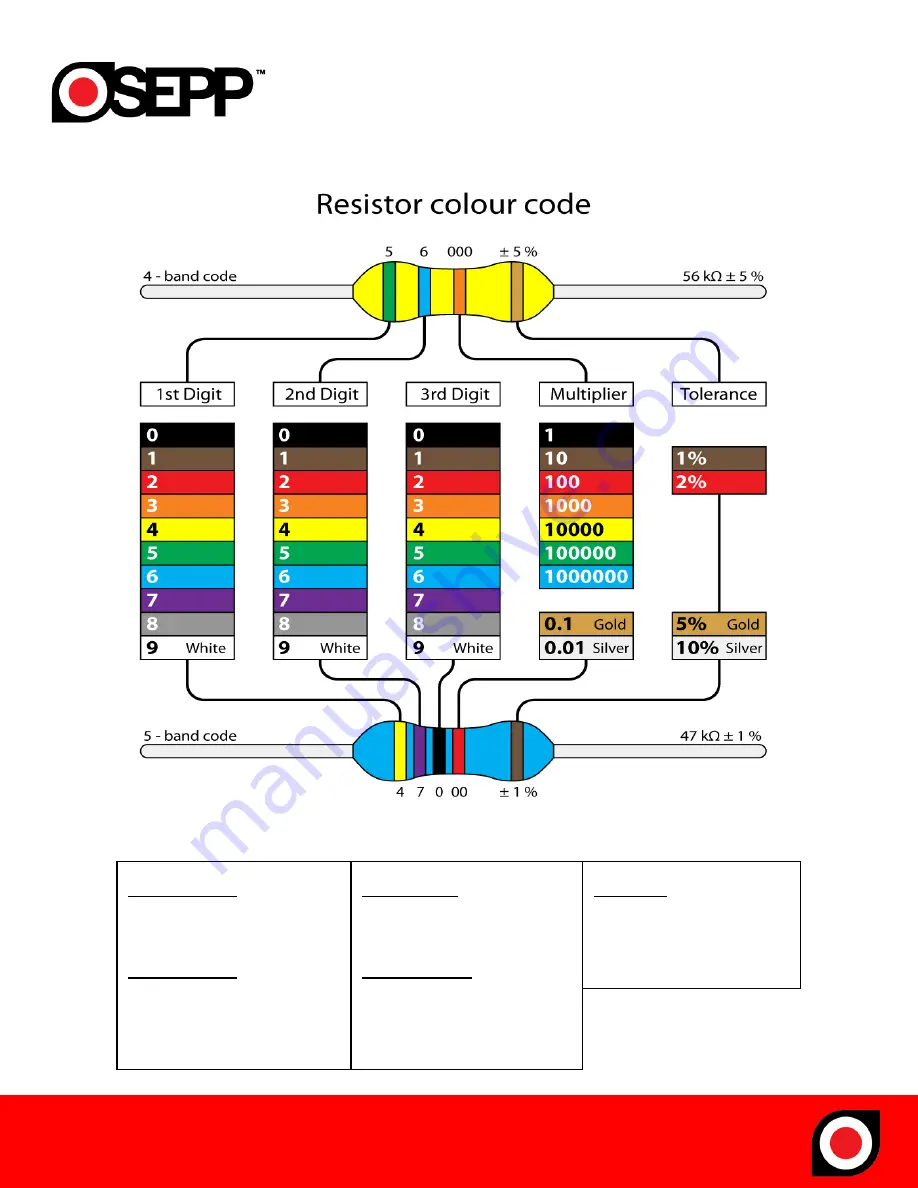
100 ohms
Brown/Black/Brown/Gold
300 ohms
Orange/Orange/Brown/Gold
1 MEG
Brown/Black/Green/Gold
1K ohms
Brown/Black/Red/Gold
10K ohms
Brown/Black/Orange/Gold
Страница 1: ...tutes Kit Contents Component Name Value Qty Designator Important Info Image Reference LED 5mm 5mm 24 LED1 LED24 Watch the polarity Long leg is positive Mini Push Button 6x6mm 2 KEY1 KEY2 No polarity R...
Страница 2: ...e polarity Integrated Circuit IC STC15W204S 1 U1 Match the notch on the silkscreen to the notch on the IC Battery Clip AAA 4 BT1 BT2 BT3 BT4 Pay attention to the placement direction Capacitor 100nF 1...
Страница 3: ...05 S Hardy Dr Unit 19 Tempe Arizona 85282 USA www osepp com 100 ohms Brown Black Brown Gold 300 ohms Orange Orange Brown Gold 1 MEG Brown Black Green Gold 1K ohms Brown Black Red Gold 10K ohms Brown B...
Страница 4: ...zona 85282 USA www osepp com Step by Step Instruction STEP 1 Place and solder IC into place Match the notch on the IC to the notch on the PCB silkscreen image STEP 2 Place and solder the resistors int...
Страница 5: ...Unit 19 Tempe Arizona 85282 USA www osepp com Step 3 Place and solder the capacitor in place There is no polarity with the capacitor Step 4 Place and solder the mini switches into place There is no po...
Страница 6: ...Watch for polarity Refer to the under side of the buzzer for polarity label Step 6 Place and solder the LEDs x24 into place The longer lead on the LED is positive To hold the LED in place to solder be...
Страница 7: ...C 2105 S Hardy Dr Unit 19 Tempe Arizona 85282 USA www osepp com Step 7 Place and solder the battery clips x4 into place Please refer to the image below for battery clip placement Step 13 Finished imag...