background image


Menu Operations


47 


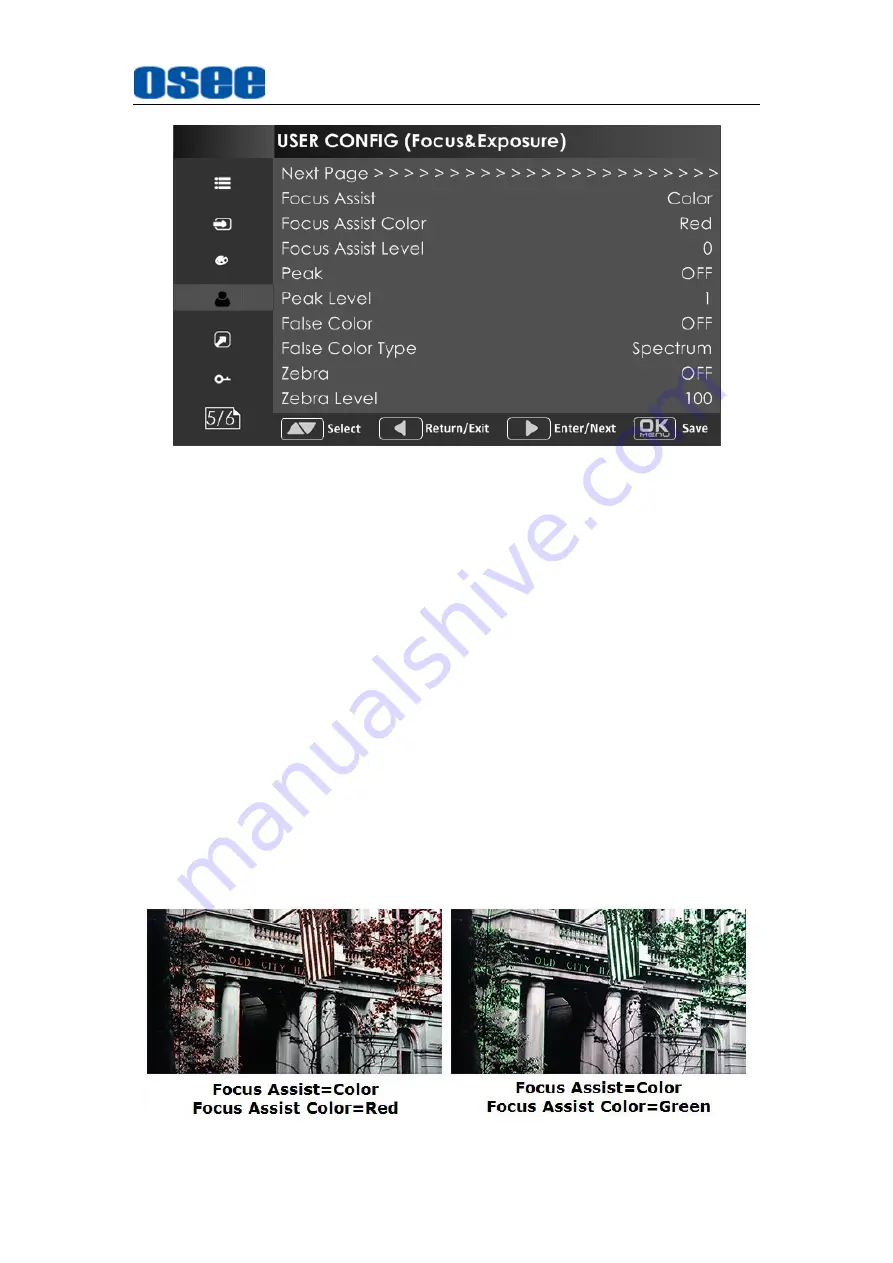
Figure 5.1-20    USER CONFIG Menu-Page5 

1. 

Focus Assist 

The FOCUS ASSIST function is used to display images on the screen with 
intensified edge to help camera focus operation.   

Set 

USER CONFIG


Focus Assist 

item to enable the focus assist 

function. The intensified edges are those areas whose difference value 
exceeds the reference focus level (

SENSITIVITY

), and the intensified 

edge are displayed in the designated color set by 

Focus Assist Color


FOCUS ASSIST MODE 


Color Mode

: Set 

USER CONFIG


 Focus Assist 

item as 

Color

the  image  is  in  color  mode,  then  set 

USER  CONFIG


  Focus 

Assist


Color 

to color the intensified edge. 


Gray Mode

: Set 

USER CONFIG


 Focus Assist 

item as 

Mono

the  image  is  in  black and  white mode,  that  is  removing  all  colors 
and only leaving the luminance data of the signal. 


Figure 5.1-21    Illustration for FOCUS ASSIST Function 

Содержание LCM156-A

Страница 1: ...LCM156 A LCM215 A LCD Monitor User Manual...

Страница 2: ......

Страница 3: ...0 Release Date Company OSEE TECHNOLOGY LTD Contact Information Address No 22 Building No 68 zone Beiqing Road Haidian District Beijing China Post Code 100094 Tel 86 010 62434168 Fax 86 010 62434169 We...

Страница 4: ...better The safety matters or operations that user must pay attention to when using this product Contents The user manual applies to the following device types LCM156 A LCM215 A The images of LCM156 A...

Страница 5: ...4 1 3 Main Menu ON OFF 15 4 1 4 Fast Menu 15 4 1 5 Function Menu User Preset 16 4 2 Rear Panel 17 4 2 1 Arrangement of Rear Panel 17 4 2 2 Power On 19 4 3 Supported Signal Format 20 Chapter 5 Menu Op...

Страница 6: ......

Страница 7: ...esponse time In addition the unit boasts a full wide viewing angle as well as excellent brightness and contrast ratio By adopting the advanced 10 bit digital signal processing technology plus 3D comb...

Страница 8: ...technology between the interlacing and the progressive Support waveform vector scope histogram and audio meter Support HDR technology and wide range color space Support multiple color space SMPTE C EB...

Страница 9: ...ainst harmful interference in a residential installation This equipment generates uses and can radiate radio frequency energy and if not installed and used in accordance with the instructions may caus...

Страница 10: ...qualified service personnel Servicing will be required under all of the following conditions The unit has been exposed to rain or moisture Liquid had been spilled or objects have fallen onto the unit...

Страница 11: ...r cord from being walked on or pinched particularly at plugs convenience receptacles and the point where they exit from the unit If the power cord is damaged turn off the power immediately It is dange...

Страница 12: ...6...

Страница 13: ...ow before installing LCM156 A Check the equipment for any invisible damage that may have occurred during transit Confirm all the items listed on the packing list have been received Remove all the pack...

Страница 14: ...ns use 75 rated connectors 4 Connect 100 240V50 60Hz AC or 11 17V3A DC power source using the power cord or 11 16 8V DC camera battery with optional battery plate 5 Connect the power cord to the power...

Страница 15: ...n 9 The pedestal and the monitor are packaged separately Connect a standard signal line to the corresponding input port All BNC connector impedance must be 75 Please use the power cord supplied to avo...

Страница 16: ...10...

Страница 17: ...Information is displayed in the top left corner of the screen and includes the input channel and signal format You can define it in USER CONFIG menu 2 Waveform and Vector This is effective only for SD...

Страница 18: ...ode available the monitor will display 8 IMD The IMD text displays at the bottom of the screen the length can t exceed 16 characters and you can choose letter number or other character for it The Stat...

Страница 19: ...e Fast menu Adjust downward 1 It is DOWN button when working with the main menu Toggle this button to select the next item or decrease the number 2 When not displaying the Main menu display the Fast m...

Страница 20: ...ly Function button F1 F1 FUNCTION and U1 User Preset button Function button F2 F2FUNCTION and U2 User Preset button Function button F3 F3FUNCTION and U3User Preset button Function button F4 F4 FUNCTIO...

Страница 21: ...f the screen as shown in Figure 4 1 3 Close the Main men press LEFT button to quit the displayed Main menu Figure 4 1 3 Main Menu 4 1 4 Fast Menu When not displaying the Main menu press UP or DOWN but...

Страница 22: ...ness 0 63 8 After you have loaded the adjust menu list it will be closed automatically if you do nothing operation on it within the OSD Time The main menu the fast menu the function menu and the input...

Страница 23: ...ions are as the same as F1 U1 s Use FUNCTION KEY menu to assign F1 F4 You can assign the function from among Camera LUT Undef Blue Only Mono Marker Audio Meter Time Code Waveform Type Vectorscope Hist...

Страница 24: ...r 2 AC Power Input AC IN 100 240V 50 60HzAC 3 DC Power Input DC IN XLR 3pin 11 17V 3ADC 4 SDI Input SDI1 IN BNC 5 SDI Input SDI2 IN BNC 6 SDI Output SDI1 OUT BNC 7 VIDEO Input VIDEO IN BNC 8 HDMI IN H...

Страница 25: ...Method 2 Powered by DC power input Connect external power through the DC IN interface XLR 3pin 11 17V3A DC Method 3 Powered by battery The battery plate kit is an optional accessory Mount the battery...

Страница 26: ...pter and the power cord specified by the manufacture for your safety 4 3 Supported Signal Format The supported signal format for this device is as shown in Table 4 3 1 Table 4 3 1 Supported Signal For...

Страница 27: ...IT 4 4 4_XYZ_10BIT 4 4 4_XYZ_12BIT 1080I60 59 94 1080P24 23 98 1080P25 1080P30 29 97 1080P50 4 2 2 YCbCr 10 BIT 1080P60 59 94 3G 2K 1080SF24 23 98 4 2 2 YCbCr 12 BIT 4 4 4 YCbCr 10 BIT 4 4 4 YCbCr 12...

Страница 28: ...22...

Страница 29: ...how to modify and customize the menu settings The main menu includes the following menu items as shown in Figure5 1 Figure 5 1 Main Menu 5 1 Main Menu Press the OK MENU button at the bottom of the fro...

Страница 30: ...OK MENU button to modify the value of the sub menu Figure 5 1 2 the Sub menu Value List Control Icon There is a white control icon when you select the menu or its value in the sub menu list Next Page...

Страница 31: ...enu The relationship of Items Default Value Domain Range and Description of the sub item is shown in Table 5 1 1 Table 5 1 1 The Description of STATUS Menu Items Items Default Value Description Page1...

Страница 32: ...menu values in STATUS menu can t be modified they are displayed the actual status of the monitor 5 1 2 INPUT CONFIG Menu The INPUT CONFIG menu items are used to set the source of the input signals the...

Страница 33: ...3 Set color range YCbCr Color Matrix Auto Auto ITU R BT 709 ITU R BT 2020 Set YCbCr color matrix 1 Signal Format Setting The device provides four inputs SDI IN1 SDI IN2 Set the input format through IN...

Страница 34: ...Value Domain Range Description Gamma 2 2 1 8 2 2 2 4 2 6 2 8 BT 1886 PQ HLG Adjust Gamma Color Temp D65 D93 D65 D61 D55 DCI USER1 USER2 Set the color temperature Red Gain 512 0 512 Adjust the Red Gai...

Страница 35: ...ad LUT File To load a LUT file from the U disk 1 Camera LUT The LCM156 A supports multiple camera LUTs as shown in Table 5 1 5 Table 5 1 5 The Relationship Between EOTF and HDR Camera LUT LUT Name Com...

Страница 36: ...SGamut_LCRec709A Sony_SLog3SG3Cine_LCRec709 Sony_SLog3SG3Cine_LCRec709A HDR ARRI_LogC_HLG_Rec2020 OSEE ARRI_LogC_PQ_Rec2020 Canon_Clog2Cin_HLG_Rec2020 Canon_Clog2Cin_PQ_Rec2020 Canon_Clog3Cin_HLG_Rec2...

Страница 37: ...pop up a USER file selection window press the arrow button to choose from User1 User16 to set the storage path for the selected LUT For example select User1 and press OK MENU button to confirm the set...

Страница 38: ...1 7 CONFIG Menu There are six pages in USER CONFIG menu The relationship of Items Default Value Domain Range and Description of the sub item is shown in Table 5 1 6 Table 5 1 6 The Description of USE...

Страница 39: ...ft speaker select a channel according to the type of audio source Speak Out R EBD CH2 When the audio source is EBD the range of this item is EBD CH1 EBD CH16 Right speaker select a channel according t...

Страница 40: ...ep is 0 01 When set the Aspect Marker as Variable set the aspect ratio at this item Center Marker OFF OFF ON Set whether to show the center marker Area Marker OFF OFF 80 85 88 90 93 95 Set the safety...

Страница 41: ...Set the display type of WFM Waveform Size Small Small Middle Large Set the waveform display size Waveform Location TOP RIGHT Small Left Up Center Up Right Up Right Center Right Down Center Down Left D...

Страница 42: ...dge of images with color selected in FOCUS COLOR Enable Disable the focus assist function and set focus assist mode When the difference of the edges exceeds the reference value FOCUS LEVEL the edge de...

Страница 43: ...e zebra function that will compare the signal luminance with the ZEBRA LEVEL and fill the relevant image area whose luminance is higher than the ZEBRA LEVEL with a zebra pattern Zebra Level 50 0 100 S...

Страница 44: ...FUNCTION KEY menu items F1 Button F4 Button are used to assign function to the function key F1 F4 on the front panel and adjust the value of the function parameter The menu items of FUNCTION KEY are...

Страница 45: ...ratio of the screen it is different from the formats of the input signals and the details are as shown in Table 5 1 8 Table 5 1 8 The Relationship of Input Signal Formats and Its Aspects Input Signal...

Страница 46: ...display the screen in monochrome presentation inactivate this mode to display the screen in color mode Press F1 F4 button to activate the assigned function and adjust the parameter value 5 1 4 2 AUDI...

Страница 47: ...per is the over level line and the lower is the reference level line If the audio value is higher than the reference level the audio bar over the reference level line will display yellow and if the au...

Страница 48: ...ems are displayed on Page3 in USER CONFIG menu and they are used to adjust the marker parameters the menu items are as shown in Figure 5 1 12 Figure 5 1 12 USER CONFIG Menu Page3 1 Markers Marker Illu...

Страница 49: ...appointed transparency For example set ASPECT as 16 9 Aspect Marker as 4 3 and Area Marker as 95 then the comparison of the three Marker Mats are as shown in Figure 5 1 13 Figure 5 1 13 MARKER MAT 3...

Страница 50: ...mode when Cross Hatch is ON 5 1 4 4 DISPLAY Menu The DISPLAY menu items are displayed on Page4 in USER CONFIG menu and they are used to adjust the parameters displayed on the screen the menu items ar...

Страница 51: ...CONFIG Waveform SIZE item to adjust the size of the waveform there are three kinds of sizes for waveform Small size waveform set Waveform SIZE item as Small and this kind of waveform could be located...

Страница 52: ...ce in the image Histogram Type Set USER CONFIG HISTOGRAM item to open or close the histogram display and set the histogram display mode as LUMA or RGB the two histogram types are as shown in Figure 5...

Страница 53: ...xceeds the reference focus level SENSITIVITY and the intensified edge are displayed in the designated color set by Focus Assist Color FOCUS ASSIST MODE Color Mode Set USER CONFIG Focus Assist item as...

Страница 54: ...Slog2 ARRI LogC Canon Clog2 Canon Clog3 Panasonic Vlog RED RedLogFilm RED RL3G10 BMD BMD 4K ARRI Rec709 SONY LC709A SONY LC709 Panasonic V709 RED G3 RED G4 For example Set USER CONFIG False Color item...

Страница 55: ...em settings on Page6 in USER CONFIG menu Figure 5 1 25 USER CONFIG Menu Page7 1 Display Test Pattern Set USER CONFIG Internal Signal item as ON it will display the color test pattern on the screen 2 S...

Страница 56: ...tem as ON the status menu will be displayed in the top left corner of the screen and it includes the input channel and signal format 5 Switch Menu Language Set USER CONFIG Language item as Chinese or...

Страница 57: ...ware files from your USB drive and update your firmware Make sure you have inserted your USB disk with the stored firmware files into the USB interface of the monitor or it will inform you a Can t Det...

Страница 58: ...9 Table 5 1 9 The Description of IMD Menu Items Items Default Value Domain Range Description IMD Display ON OFF ON Set whether to display IMD Characters on screen IMD Protocol Local TSL3 1 TSL4 0 Loca...

Страница 59: ...tocol the IMD character abides by the corresponding protocol 5 1 6 KEY INHIBIT Menu The KEY INHIBIT menu item is used to lock the setting so that they can t be changed by an unauthorized user and the...

Страница 60: ...ttons LEFT DOWN UP RIGHT OK MENU 1 Operations to the Main menu Display the Main Menu Press OK MENU button to enter into the main menu it displays at the center of the screen Switch menu items After di...

Страница 61: ...tem value press DOWN or UP button to switch among its value list Confirm the modification to sub menu item value Press OK MENU button to confirm the selection of a value and the control icon is back t...

Страница 62: ...56...

Страница 63: ...ntrast Typ 700 1 1000 1 Luminance cd 300 1500 Response Time ms 15 25 Backlight RGB LED WHITE LED Backlight Life Hrs 15000 Min 30000 Min Work Temperature 0 C 50 C Power Supply 100 240V50 60HzAC 11 17V3...

Страница 64: ...8 dB 5 to 270 MHz 15 dB 270 MHz to 1 5 GHz 10 dB up to 3 GHz Maximum Signal Level 800 mV pk pk 10 Signal Amplitude 800 mV pk pk 10 DC Offset 0 V 0 5 V Overshoot 10 Jitter 0 2 UI Rise Fall Time 700 ps...

Страница 65: ...Specifications 59 Figure 6 2 Rear Panel Unit mm Figure 6 3 Side View Unit mm...

Страница 66: ...Specifications 60 Figure 6 4 Top View Unit mm LCM215 A Figure 6 5 Front Panel Unit mm...

Страница 67: ...Specifications 61 Figure 6 6 Rear Panel Unit mm Figure 6 7 Side View Unit mm...

Страница 68: ...Specifications 62 Figure 6 8 Top View Unit mm Specifications are subject to change without notice No Text Below...

Страница 69: ...RE INFORMATION PLEASE VISIT http www osee dig com OSEE TECHNOLOGY LTD No 22 Building No 68 zone Beiqing Road Haidian District Beijing China Tel 86 010 62434168 Fax 86 010 62434169 E mail sales osee di...

Отзывы: