background image


Parameter Settings


11 

1

1

2

2


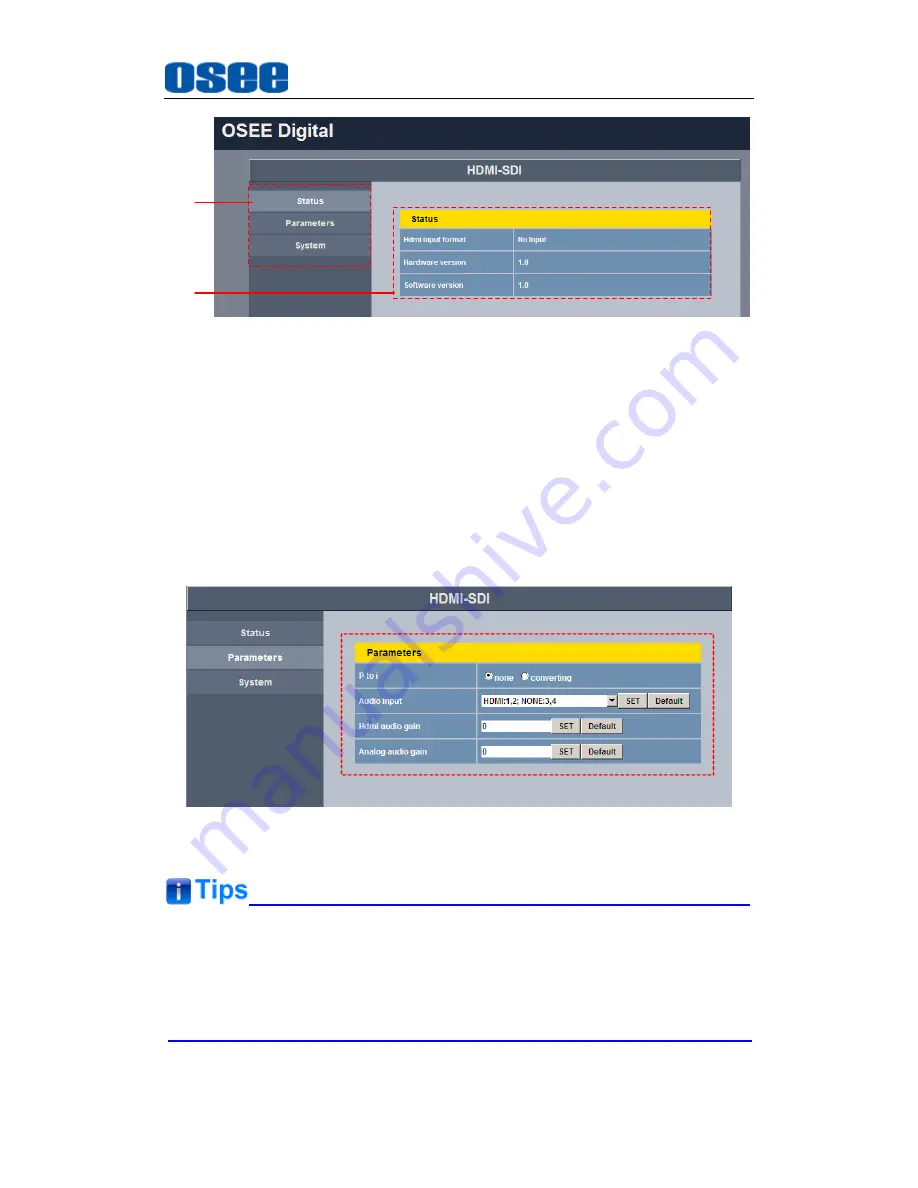
Figure 4.1-1    Management Interface 

As shown in Figure 4.1-1, the management interface is divided into two parts: 

1. 

Navigation menu list: it shows the navigation menus: 

Status

Parameters

 and 

System

. Click the navigation menu, it will show the 

corresponding settings on the right side. 

2. 

Parameter list: it shows the parameter names, values and operation 

buttons of the selected navigation menu, as shown in the red rectangle in 
Figure 4.1-2. The title in the yellow rectangle of the parameter list and the 
parameter list will change with the navigation menu when switched. 


Figure 4.1-2    Parameter List 


  The SET button is used to confirm the modification of the parameter value. 

  The Default button is used to reset the default settings to the product 

originals. 


Содержание HSC5831

Страница 1: ...HSC5831 Converter User Manual...

Страница 2: ......

Страница 3: ...lease Date March 12th 2015 Company OSEE TECHNOLOGY CO LTD Contact Information Address No 22 Building No 68 zone Beiqing Road Haidian District Beijing China Post Code 100094 Tel 86 010 62434168 Fax 86...

Страница 4: ...them better The safety matters or operations that user must pay attention to when using this product Contents The user manual applies to the following device types HSC5831 The images of HSC5831 are a...

Страница 5: ...iew 1 Chapter 2 Safety 3 Chapter 3 Unpack and Installation 7 Chapter 4 Parameter Settings 9 4 1 Management Interface 10 4 1 1 STATUS Menu 12 4 1 2 Parameters Menu 13 4 1 3 System Menu 14 4 2 Parameter...

Страница 6: ......

Страница 7: ...er fields which require high definitions Figure 1 1 Illustration of HSC5831 Features High standard SDI output and accurate audio embedding can guarantee that the signals meet the broadcast requirement...

Страница 8: ...the transmission and monitoring Supports the input signal of DVI resolution WEB page control without fussy installation of control software Adopts the innovative detachable installation part this uni...

Страница 9: ...ainst harmful interference in a residential installation This equipment generates uses and can radiate radio frequency energy and if not installed and used in accordance with the instructions may caus...

Страница 10: ...ot block any ventilation openings Do not use this unit near water Do not expose the unit to rain or moisture Do not install near any heat sources such as radiators heat registers stoves or other appar...

Страница 11: ...s and the point where they exit from the unit If the power cord is damaged turn off the power immediately It is dangerous to use the unit with a damaged power cord It may cause fire or electric shock...

Страница 12: ...6...

Страница 13: ...ing List No Item Quantity 1 Converter 1 2 Power cord 1 3 adapter 1 4 User manual 1 5 warranty card 1 Installation 1 Prepare for installation Make sure you have prepared the followings before mount the...

Страница 14: ...signal inputs and outputs Figure 3 1 the interfaces of the Converter 3 Provide a 12V 2A DC power supply 4 Connect the power supply to the power interface 5 Screw the protection parts for power supply...

Страница 15: ...igure 4 1 Load the Management Interface Use a twisted pair cable to connect the network interface of a computer with the network interface of the converter before electrify the converter The IP addres...

Страница 16: ...2 Set the IP Address of the Computer You can check or modify the parameters in this management interface the following will introduce these operations 4 1 Management Interface Open the management inte...

Страница 17: ...s on the right side 2 Parameter list it shows the parameter names values and operation buttons of the selected navigation menu as shown in the red rectangle in Figure 4 1 2 The title in the yellow rec...

Страница 18: ...As shown in Table 4 1 2 HDMI input format Hardware version 1 0 Hardware version Software version 1 0 Software version The formats of the input signals are different with the formats of the displayed...

Страница 19: ...0P60 STD_720P_60 720P59 94 720P59 94 STD_720P_60 720P50 720P50 720P50 STD_720P_50 480p60 480p60 480I60 STD_525P_60 576p50 576p50 576I50 STD_625P_50 480I60 480I60 480I60 STD_525I_60 576I50 576I50 576I5...

Страница 20: ...dio signal NONE means there is no audio signal ANALOG means it is external audio signal Hdmi audio gain 0 96 12 HDMI audio gain Analog audio gain 0 96 10 Analog audio gain Analog audio signal is prior...

Страница 21: ...anguage mode Factory Default OFF OFF ON whether to restore the product originals Click Factory Default button in System menu list or press the Default button in the converter will both reset the defau...

Страница 22: ...Down Value List of Audio Input Show item values click button it will show the drop down value list of Audio input select the value according to the actual situation Confirm the selection click button...

Страница 23: ...Please keep the power on when restoring the product originals Please consider it seriously when reset parameters to the product originals by reset operation because the customized parameters will not...

Страница 24: ...18...

Страница 25: ...66 768 1360 768 1280 1024 1280 960 1280 800 1280 768 1280 720 1152 864 1024 768 Video Standard SMPTE 259M 270Mbps SMPTE 292M 1 485Gps SMPTE 425M 2 97Gps Supported Format 3G 1080p 50 59 94 60Hz HD 1080...

Страница 26: ...Error Reference source not found 20 Figure 5 1 Rear Panel Unit mm Figure 5 2 Top View Unit mm...

Страница 27: ...Error Reference source not found 21 Figure 5 3 Side View Unit mm Specifications are subject to change without notice No Text Below...

Страница 28: ......

Страница 29: ...E INFORMATION PLEASE VISIT http www osee dig com OSEE TECHNOLOGY CO LTD No 22 Building No 68 zone Beiqing Road Haidian District Beijing China Tel 86 010 62434168 Fax 86 010 62434169 E mail sales osee...

Отзывы: