background image


5


170809


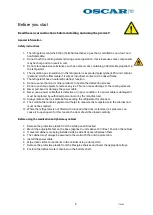
Before you start 


Read these user instructions before installing and using the product! 


General information 
 
Safety instructions 


1.


The refrigerator contains R134a (Tetrafluoroethane), a gas that is certified as non-toxic and 
non-flammable.  

2.


Do not touch the cooling element during normal operation, this is because some components 
may be sharp and can result in cuts.  

3.


Do not store explosive substances such as aerosol cans containing a flammable propellant in 
the refrigerator.  

4.


The insulation gas (insulation) in the refrigerator is expanded polystyrene (EPS) and contains 
"pentane" which is flammable if it comes into direct contact with a naked flame.  

5.


The refrigerator has an automatic defrost function.  

6.


Do not use mechanical or other products to hasten the defrosting process 

7.


Do not use sharp objects to remove any ice. This can cause damage to the cooling element.  

8.


Never pull, bend or damage the power cable.  

9.


Never use a power cable that is defective or in poor condition. If a power cable is damaged it 
must be replaced by authorised personnel or by the manufacturer.  

10.


Always remove the lock plate before sending the refrigerator for disposal. 

11.


The small bottle contains glycerol and helps to measure the temperature in the cabinet and 
must not be emptied.  

12.


Where the refrigerator is not fitted with a lock and the door is slammed, air pressure can 
cause it to open again; for this reason the door should be closed carefully.  


Before using the medication and pharmacy cabinet


1.


Remove the protective plastic from the white panel if desired.  

2.


Mount the adjustable feet on the base (applies to units above 140 litres). Position the cabinet. 

3.


If several cabinets are being installed side by side fit spacers between them.  

4.


The cabinet must always be secured to the wall with the anti-tip protection.  

5.


Install the power cable.  

6.


Wipe clean visible components in the cabinet using a damp cloth.  

7.


Remove the protective plastic from the Plexiglas shelves and insert the appropriate trays.  

8.


Position the defrost water container on the bottom shelf.  


Содержание 1-A210

Страница 1: ...1 170809 User instructions Oscar Vaccine Medication Cabinet MX Oscar Pharmacy Cabinet AX ...

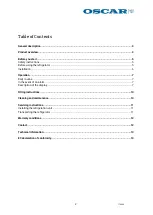
Страница 2: ... 5 Installation 6 Operation 7 Daily routine 7 In the event of an alarm 7 Description of the display 7 Fitting instructions 10 Cleaning and maintenance 10 Servicing instructions 11 Installing the refrigeration unit 11 Transporting the refrigerator 11 Warranty conditions 12 Contact 12 Technical information 13 EC declaration of conformity 14 ...

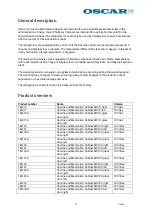
Страница 3: ... from the factory Product overview Product number Name Volume 1 M070 Vaccine and Medication Cabinet MX70 right 70 litres 1 M071 Vaccine and Medication Cabinet MX70 left 70 litres 1 M070G Vaccine and Medication Cabinet MX70 glass door right 70 litres 1 M071G Vaccine and Medication Cabinet MX70 glass door left 70 litres 1 M100 Vaccine and Medication Cabinet MX100 right 100 litres 1 M101 Vaccine and ...

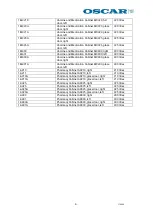
Страница 4: ...400 glass door right 400 litres 1 M401G Vaccine and Medication Cabinet MX400 glass door left 400 litres 1 A210 Pharmacy Cabinet AX210 right 210 litres 1 A211 Pharmacy Cabinet AX210 left 210 litres 1 A210G Pharmacy Cabinet AX210 glass door right 210 litres 1 A211G Pharmacy Cabinet AX210 glass door left 210 litres 1 A325 Pharmacy Cabinet AX325 right 325 litres 1 A326 Pharmacy Cabinet AX325 left 325 ...

Страница 5: ...r use a power cable that is defective or in poor condition If a power cable is damaged it must be replaced by authorised personnel or by the manufacturer 10 Always remove the lock plate before sending the refrigerator for disposal 11 The small bottle contains glycerol and helps to measure the temperature in the cabinet and must not be emptied 12 Where the refrigerator is not fitted with a lock and...

Страница 6: ...outside the shelf and or against the back of the refrigerator 7 To ensure optimal circulation in the refrigerator there should be an airflow between the goods in other words between the packaging 8 The power supply to the medication cabinet is 230 V 50 Hz 95 W 9 The refrigeration unit refrigerant is R134a 10 The refrigerator has a service class of 6 11 Do not place heavy objects on top of the medi...

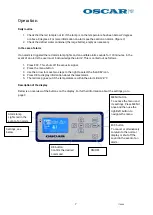
Страница 7: ...acoustic signal 2 Press the menu button 3 Use the arrow to move two steps to the right to select the ALARM icon 4 Press OK to display information about the latest alarm 5 The red lamp goes out if the temperature is within the alarm limit 2 8 C Description of the display Below is an overview of the buttons on the display For further information about the settings go to page 9 MENU button To access ...

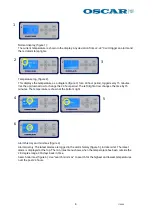
Страница 8: ...e the 24 hour period The left right arrow changes the time by 15 minutes The temperature is shown at the bottom right Alarm history and min max figure 4 Alarm History The latest alarms are logged in the alarm history figure 5 in date order The latest alarm is displayed at the top The min max menu shows when the temperature has been outside the 2 8 degree range 365 days back in time Search min max ...

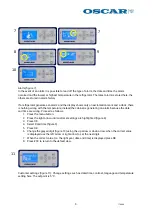
Страница 9: ...an alarm because the date and time are wrong Proceed as follows 1 Press the menu button 2 Press the right arrow until customer settings are highlighted figure 8 3 Press OK 4 Select Date time figure 9 5 Press OK 6 Change the greyed digit figure 10 using the up arrow or down arrow when the correct value is displayed use the left arrow or right arrow to set the next digit 7 When the correct value i e...

Страница 10: ...using a damp cloth Use cleaning products generally used in healthcare Wipe clean using a dry cloth Do not clean the medication cabinet by pouring water on it Check the defrost water container the large bottle empty as necessary Check that the defrost water hose running from the unit down to the defrost water container is clean The small bottle contains glycerol and helps to measure the temperature...

Страница 11: ...s from the refrigerator 3 Remove the defrost water container and glycerol bottle 4 Remove the anti tip protection from the wall 5 Move the refrigerator to the desired location If the cabinet is to be transported in a vehicle the cabinet should be packaged 6 If there are adjustable feet these should be mounted 7 Secure the cabinet with the anti tip protection 8 Insert the shelves in the desired pos...

Страница 12: ...caused by Transport Negligence on the part of the user or overloading Failure to comply with the operating instructions on the part of the purchaser user Voltage fluctuations maximum permitted 10 Lightning Repairs or changes to the design undertaken by a party other than a service company approved by the manufacturer Nor does the warranty cover Insignificant faults such as the repair of scratches ...

Страница 13: ...ht left Right left Right left Right left Right left Right left Right left Material exterior interior White sheet metal stainles s steel White sheet metal stainles s steel White sheet metal stainles s steel White sheet metal stainles s steel White sheet metal stainles s steel White sheet metal stainles s steel White sheet metal stainles s steel White sheet metal stainles s steel White sheet metal s...

Страница 14: ...d manufactured in accordance with the following standards EN 13463 1 2009 Non electrical equipment for use in potentially explosive atmospheres Part 1 Basic method and requirements EN13463 5 2011 Non electrical equipment intended for use in potentially explosive atmospheres Part 5 Protection by constructional safety c EN60335 2 89 Household and similar electrical appliances Part 2 89 Particular re...

Отзывы: