PLEASE CAREFULLY READ THE INSTRUCTIONS FOR USE AND ASSEMBLY CONTAINED IN THIS MANUAL
BEFORE OPERATING AND INSTALLING THE WINCH
INSTALLATION
3
PACKAGE CONTENTS:
Winch complete of coverage, gearmotor, contactors/reversing contactor units, assemply screws, drilling template,
operation and installation manual.
TOOL NEEDED FOR INSTALLATION:
Drilling with a Ø9 bit, 13mm hex wrench, Allen wrench 8, phillips screwdriver anc silicone.
INSTALLATION REQUIREMENTS:
The winch can be positioned at any point, vertically or orizontally, once identified the mounting location , verify
that the surface of support is as flat as possible, otherwise smooth appropriately.
IT'S IMPORTANT THAT THE POINT WHERE YOU HAVE DECIDED TO FIX THE LIFT IS SUITABLE TO RESIST
THE PULL, MAY SERIOUSLY DAMAGE
- Always install an appropriate thermal magnetic breaker to protect the circuit and electric motor from overheating
or damage
- All electrical components (motor, contactor, controllers) must be installed so as to be protected again splashes
or sprays of water
INSTALLATION PROCEDURE:
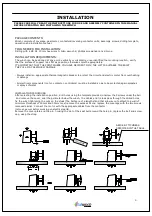
After selecting the installation position, drill holes using the template provided, unscrew the 2 screws under the bell
and remove the cover, seal the perimeter below the winch, t he cables and tie rods pass through the drilled holes,
fix the winch tightening the nuts on the studs (the bolts are of a length stand that allows you to attach to a wall of
minimum thickness of 18mm and 30mm max) remove the excess silicone, replace the coverage with the two screws
removed earlier. Connect the motor with the appropriate cables from the contactor
(remove power before working on electrical parts).
Remove the cover plate and the pin, housing the slot of the seat belt around the hole pin, replace the bolt and screw
cap, wrap the strap.
ABIDE BY TICHNESS
SPECIFIED IN THE TABLE
SILIC
ONE
Содержание Italwinch ACHILL 500W 12V
Страница 4: ......


