


3. Real-Time Preview
The left side of the user interface contains Image Capture commands. Click
"
Preview
"
to display camera viewfinder
contents live on your monitor screen.
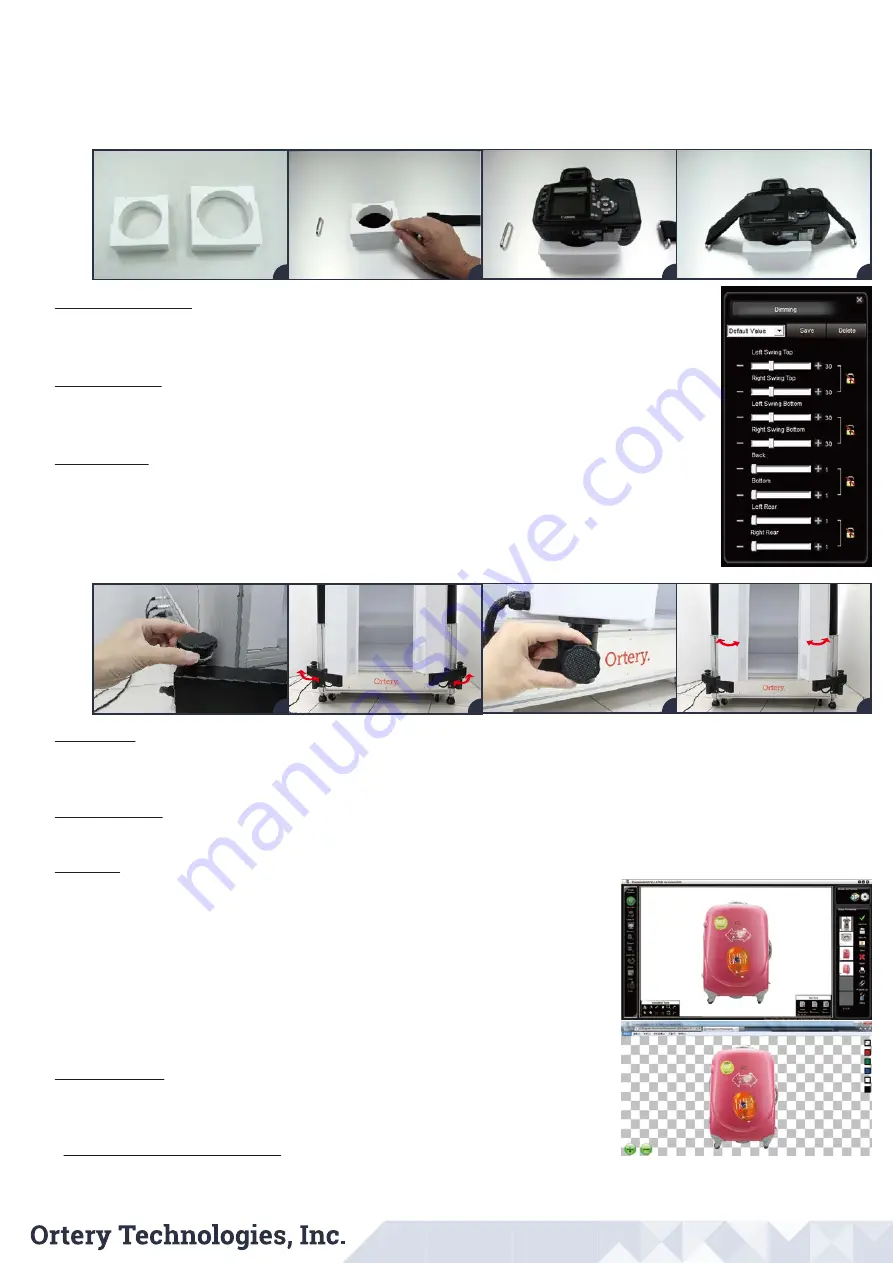
4. Lamp Controls
Press the "Dimming" button to make lighting adju
stments. Left swing top, right swing top, left swing bottom, right swing
bottom, back, bottom, left rear and right rear
lights c
an be dimmed to optimize the image composition.
5. Swing Lights
Photosimile 220
provides front swing lights for creating a better lighting environment to enhance the photography results.
These lights can be adjusted to light different areas.
To lock the position of a swing arm in place, tighten the hand screw connecting it to the holding bracket.
To lock the angle of a swing light in place, tighten the black hand screw at the bottom.
6. AfterImage
After clicking
"
Preview
"
you will find the AfterImage feature. This feature places a transparent copy of previously captured images over the current
Preview to help align objects
and take consistent photos
and animations over time. Use the slider to adjust AfterImage transparency.
7. Highlight Alert
Press "Highlight Alert"
to preview which parts of the image will be pure white (R, G, B = 255) when a picture is taken.
8. AutoPNG
This feature allows you to quickly take two pictures of an object and combine them to create a PNG file
with a transparent background. Pressing the AutoPNG button activates and deactivates this mode.
AutoPNG is green when its On and red when its Off. When using it for the first time, select "Dual (side /
top shot) – New Settings" and follow the instructions to determine the best exposure for the first and
second shots.
For the first shot, use aperture, shutter, ISO and
other settings to
properly expose the object.
For the second shot, adjust the exposure slider until the Highlight alert begins to indicate the
background surrounding the object will be pure white.
9. Focus Stacking
Focus stacking allows you to take several pictures over a defined focus range then combine them to
create a single image that is blur free and has a greater depth of field.
10. Camera Settings / Crop / Snap
Use the live preview, "Dimming", "Crop" and "Camera Settings" to compose photos. Note for most compatible cameras, camera setting changes
immediately appear in the preview. Click
"Snap"
to take pictures and automatically download them for viewing.
a
b
c
d
a
b
c
d
Top shots
Camera mount top shots: Photosimile 220 came with two different diameter size of camera mount sponges (80 mm and 85 mm), find the
camera mount sponge that best fits your camera body and lens. Peel off the tape on the back of the camera mount sponge. Align it with the
opening on the top of the studio then stick in place. The camera should sit flat with the lens pointed down into the studio. (Optional) Use the
Velcro strap to secure the camera in place.
a-d
a-b
c-d


