


Assembly Instructions
3
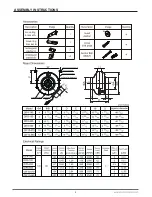
Mounting
1.
Attach mounting bracket A to the fan on opposite side of the junction box using 2 rubber washers (rectangular
washer
B) and 2 cross tapping screws (ST4.2x20) provided
2.
Attach mounting bracket B to the fan on the junction box side using the remaining 2 rubber washers and 2 cross
tapping screws
, this bracket contains an optional sensor switch mounting hole. Visit www.ortechindustries.com for
sensor switch options.
3.
Using table A below, mark the holes for the fan's installation screw the 4 pcs of M6X80
screws to the stud where the
fan will be mounted(refer to illustration 3)
4.
Mount the fan with a rubber washer through the screws. Before fully tightening, review illustration
4
for the
remaining
washer placement.
5.
Duct the fan with the duct tape or mounting clamps (sold separately).
Notices on Installation
Fan can be installed vertically or horizontally
1. The inlet and outlet directly connected with the duct and fastened with the mounting clamps then finally
suspended with the suspended bracket.
2. The insulation resistance test should be conducted in case the fans are kept at the warehouse for more than 6
months before the operation. The resistance should be over 20M.
3. Rotate the impeller by hand before operation and check its flexibility to make sure no bump or block. Connect
to power source, and make impeller and motor work to observe:
- Direction of rotation should correspond to direction-of-rotation arrow on the label.
- Operation that it should not be any overheating, noise, gradually slow-impeller
if not, it approves to operate in normal condition.
4. For a durability reason, the filter and back-draft damper are recommended.
5. For inquiry of a three-speed regulator, please contact us and assistance of installation in the instruction
manual.
6. The unit is for indoor use and both ends must be properly ducted.
7. The lead of the fan shall be No.18 AWG
8. The minimal height of installation is 2.3M.
9. Back draft devices are recommended.


