ORQA FPV.ONE Скачать руководство пользователя страница 27

ORQA ORIGINAL BATTERY 


The goggles should be powered by a power source with a voltage between


6.0 and 10.0 VDC. The best way to power your goggles is to use the supplied


Orqa Original Battery. 

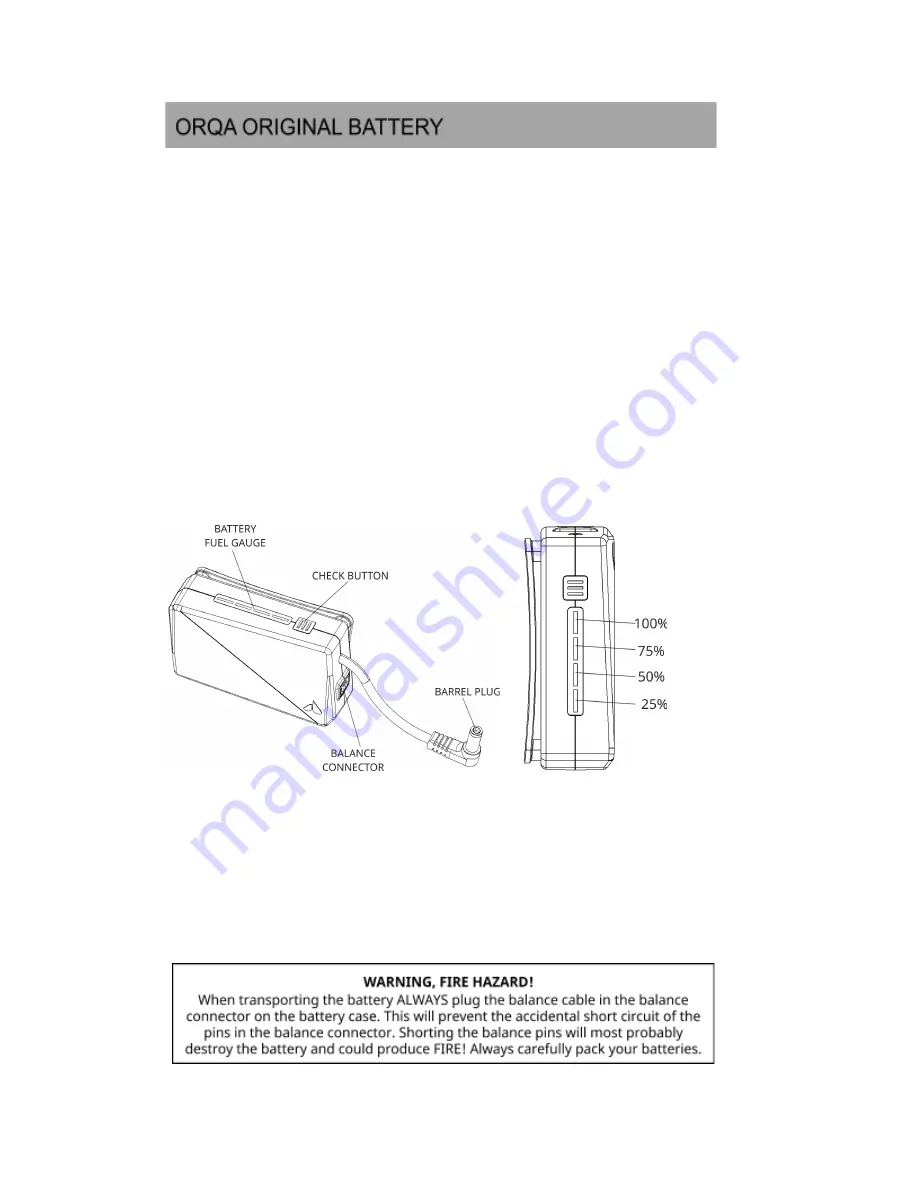
The Orqa Original Battery holds two 18500 Li-ion cells inside connected in 2S


configuration. The battery case features the battery fuel gauge. To check the


actual battery charge level, press and hold the button on top of the battery.


The battery fuel gauge displays the level with four LED-backlit bars. Each bar


represents roughly 25% of the full charge. The battery capacity is 2000 mAH. 

The battery fuel gauge goes off after 2 seconds even if you are still holding


the button pressed. This will prevent the unintended battery discharge if the


button gets unintentionally pressed in transport. 


Once the battery is empty, it needs to be recharged. To recharge the battery,


connect the barrel plug to the Li-ion battery charger.


The battery case features the standard JST 3 pole balance connector. The


best practice is to balance charge the battery in order to keep the cell's


voltage on the same level. This will ensure the optimal performance and


long life of the battery cells. 


27 

Orqa FPV.ONE User Manual, Rev.1.6 

©2020. Orqa Ltd. 

Содержание FPV.ONE

Страница 1: ...FPV VIDEO GOGGLES FPV ONE User Manual Rev 1 6 September 2020 Orqa FPV ONE User Manual Rev 1 6 2020 Orqa Ltd...

Страница 2: ...CEIVER SETTINGS 9 INPUT SOURCE 11 IMAGE SETTINGS 12 STAND BY 13 FEATURES 14 BATTERY 16 ABOUT 17 DVR 19 VIDEO PLAYBACK 23 BOOT SCREEN LOGO 25 CONNECTIONS PINOUT 26 ORQA ORIGINAL BATTERY 27 CHARGING THE...

Страница 3: ...PACKAGE CONTENTS 3 Orqa FPV ONE User Manual Rev 1 6 2020 Orqa Ltd...

Страница 4: ...GETTING TO KNOW THE GOGGLES 4 Orqa FPV ONE User Manual Rev 1 6 2020 Orqa Ltd...

Страница 5: ...5 Orqa FPV ONE User Manual Rev 1 6 2020 Orqa Ltd...

Страница 6: ...GETTING TO KNOW THE GOGGLES 6 Orqa FPV ONE User Manual Rev 1 6 2020 Orqa Ltd...

Страница 7: ...the main menu or advanced playback functions depending on which one is the main joystick Battery Check Press the Battery Check Button to show the battery status or it can be used for exiting the menus...

Страница 8: ...ayback settings To enter the main or additional menu simply press the corresponding joystick Once inside the menu move the corresponding joystick up down left or right in order to select the required...

Страница 9: ...module the goggle s OSD and module s OSD will work together without conflicting with each other For example if RapidFire is selected you will be able to change the channel by short pressing the CHANNE...

Страница 10: ...nu you can select the desired frequency of the RapidFire receiver module Please note that RapidFire firmware must be updated to at least version 1 3 to have the full functionallity with the Orqa goggl...

Страница 11: ...put you feed to the goggles When automatic mode is on the default setting is Receiver but as soon as you plug in another source it will automatically switch to that input If an HDMI source with an uns...

Страница 12: ...t and right With the ASPECT RATIO setting you can choose between the 16 9 and 4 3 image ratio Adjust this setting to best fit your image source SUPER SIZE due to large FOV some of the users can experi...

Страница 13: ...ivate the Stand by mode set it to On The goggles will enter the stand by after the set delay time has passed The default delay time setting is 20 seconds and it can be adjusted in steps of 10 seconds...

Страница 14: ...again For quick ZERO POINT setup long press the Battery check button The HEAD TILT ALARM is used to help the pilots aim the directional antenna Especially long range pilots need to keep the antenna p...

Страница 15: ...SOUND THE JOYSTICK SETTINGS You can choose from below joystick settings you can invert joystick swap up and down on joystick you can switch the buttons sound on off joystick choose right or left joyst...

Страница 16: ...isplayed To adjust the position enter the OSD Position menu and then position the battery info on the screen by moving the left hand joystick up down and left right Once you are satisfied with the pos...

Страница 17: ...the current version Hardware version Hardware version shows the hardware electronics version of the goggles This info is factory set and cannot be changed by the user Goggle ID is the unique ID of you...

Страница 18: ...18 Orqa FPV ONE User Manual Rev 1 6 2020 Orqa Ltd...

Страница 19: ...nsert the micro SD card with the contacts facing up Inserting the micro SD Card incorrectly m ight result in getting the card stuck in the goggles To start recording press the DVR Quick Record button...

Страница 20: ...ystem All other files that might be present on the micro SD card will not be deleted When the Auto Delete option is turned OFF the DVR will record until all the available space on the micro SD card is...

Страница 21: ...one The microphone recording level should be adjusted through the Microphone Volume menu The default level is set to 50 To adjust this setting press or on the Microphone Volume menu item and then move...

Страница 22: ...There must be some sort of video signal HDMI Av in or Receiver for the recording to start To stop DVR recording and save the file you can press the DVR button but if there is still video signal left...

Страница 23: ...e list and press the main joystick The video starts playing instantly At the end of the video the system will return to the file list To delete the video move with the joystick to the trash icon and d...

Страница 24: ...nize and display the files created by the goggles DVR Quick video controls use it to control video with the non main joystick Seek right Seek left Faster video speed Slower video speed Pause resume Pl...

Страница 25: ...ert the SD Card into the goggles and power them up The goggle s system will use the STARTUP JPG file from the SD Card as the custom boot screen The system will store the image file into the internal m...

Страница 26: ...CONNECTIONS PINOUT 26 Orqa FPV ONE User Manual Rev 1 6 2020 Orqa Ltd...

Страница 27: ...esents roughly 25 of the full charge The battery capacity is 2000 mAH The battery fuel gauge goes off after 2 seconds even if you are still holding the button pressed This will prevent the unintended...

Страница 28: ...s that the charger will make sure that the cells inside the battery will always be charged to the same voltage Having the cells balanced will ensure the long time optimum battery performance Optimal c...

Страница 29: ...typical Integrated Head Tracker output 3 5mm jack HDMI video input micro HDMI Battery connector 2 1 x 5 5mm barrel connector IPD range 56 74 mm Integrated DVR 1280x960 50 60fps H 264 mp4 Standard rece...

Страница 30: ...WARRANTY WARNING Any damage done to the product caused by the attempt to open disassemble or modify it will void the warranty 30 Orqa FPV ONE User Manual Rev 1 6 2020 Orqa Ltd...

Отзывы: