


Service menu
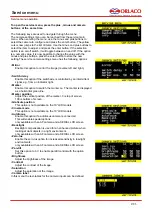
Service menu operation
To open the service menu, press the plus , minus and camera
buttons at the same time.
The following keys are used to navigate through the menu
The camera settings menu can be reached from the service main
menu. When entering the menu, use the minus and plus buttons to
select the camera to configure and press the enter button. The yellow
cursor now jumps to the list of items. Use the minus and plus buttons to
select the item to adjust, and press the enter button. If the selection
option is an on/off switch, it will toggle between on and off. If the option
is a numeric value, it is now possible to change the value with the
minus and plus buttons, press the enter button to store the new
setting.The service camera settings menu has the following options
• Mirror
Enable this option to mirror the image (reverse left and right).
• Switch delay
Enable this option if the switchwire is controlled by an intermittent
signal, e.g. from an indicator light.
• Marker
Enable this option to switch the marker on. The marker is displayed
as a horizontal green line.
• Marker position
Adjust the vertical position of the marker. 0 is top of screen,
100 is bottom of screen.
• Graticule position
This option is not available on the 10”LCD models.
• Cinema mode
This option is not available on the 10”LCD models.
• Autofocus
Enable this option if a autofocus camera is connected.
This will enable special options
only available with an AF camera and a SERIAL LCD screen
• Backlight
Backlight compensation is used for an enhanced picture when
looking at dark objects in a light environment.
only available with an AF camera and a SERIAL LCD screen
• Zero-lux
Enable the zero-lux option for increased sensitivity in low-light
environments.
only available with an AF camera and a SERIAL LCD screen
• Pan-tilt
Set this option to 'on' to enable pan/tilt control with the option
button.
• Brightness
Adjust the brightness of the image.
• Contrast
Adjust the contrast of the image.
• Saturation
Adjust the saturation of the image.
• Camera label
In this menu the text-lables for the camera inputs can be defined.
P. 05


