Orion SkyView Pro 127mm EQ Скачать руководство пользователя страница 3

3

table of contents


1.  Unpacking. . . . . . . . . . . . . . . . . . . . . . . .  3


2.  Parts List. . . . . . . . . . . . . . . . . . . . . . . . .  3


3.  Assembly  . . . . . . . . . . . . . . . . . . . . . . . .  3


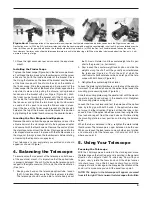
4.  Balancing the Telescope . . . . . . . . . . . . .  5


5.  Using Your Telescope . . . . . . . . . . . . . . .  5


6.  Setting Up and Using the 


  Equatorial Mount. . . . . . . . . . . . . . . . . . .  7


7.  Astronomical Observing . . . . . . . . . . . .  11


8.  Astrophotography . . . . . . . . . . . . . . . . .  14


9.  Care and Maintenance . . . . . . . . . . . . .  14

  10.  Specifications . . . . . . . . . . . . . . . . . . . .  15

1. unpacking

The entire telescope will arrive in one box. Be careful unpack‑
ing the box. We recommend keeping the box and all origi‑
nal packaging. In the event that the telescope needs to be 
shipped to another location, or returned to Orion for warranty 
repair, having the proper box and packaging will help ensure 
that your mount will survive the journey intact.
Make sure all the parts in the Parts List are present. Be 
sure to check each box carefully, as some parts are small. 
If anything appears to be missing or broken, immediate‑
ly call Orion Customer Support (800‑676‑1343) or email 
 [email protected] for assistance.

2.  Parts list


Tripod


1  

Equatorial mount


1  

Tripod support tray


Counterweight shaft


Large counterweight


Small counterweight


Slow‑motion control knobs


Right ascension axis rear cover


Latitude adjustment L‑bolt


Optical tube assembly


25mm Sirius Plössl eyepiece


10mm Sirius Plössl eyepiece


Star diagonal


Finder scope


Finder scope bracket with O‑ring


Dust cover


Padded carrying case for optical tube
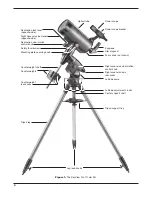
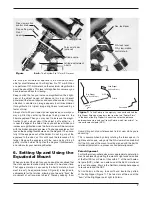
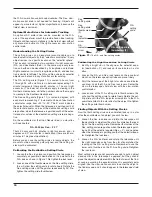
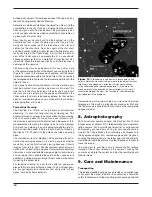
3.  assembly

Assembling the telescope for the first time should take about 
30 minutes. No tools are needed other than the ones provid‑
ed. All screws should be tightened securely, but be careful 
not to over‑tighten or the threads may strip. Refer to Figure 1 
during the assembly process.
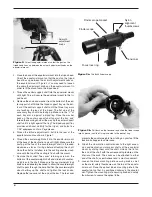
During assembly (and anytime, for that matter), do not touch 
the surfaces of the telescope’s front meniscus lens or the 
lenses of the finder scope or eyepieces with your fingers. The 
optical surfaces have delicate coatings on them that can eas‑
ily be damaged if touched inappropriately. Never remove any 
lens assembly from its housing for any reason, or the product 
warranty and return policy will be voided.
1.  Stand the tripod legs upright and spread the legs out as far 

as they will go. Keep the tripod legs at their shortest (fully 
retracted) length, for now; you can extend them to a more 
desirable length later, after the scope is fully assembled.

C

ongratulations on your purchase of an Orion telescope. Your new SkyView Pro 127mm EQ is designed 

for, high‑resolution viewing, and astrophotography of astronomical objects. With its precision optics and 
 sturdy equatorial mount, you’ll be able to enjoy hundreds of fascinating celestial denizens.
These instructions will help you set up, properly use, and care for your telescope. Please read them over 
thoroughly before getting started.

Warning: 

Never look directly at the Sun 

through your telescope or its finder scope—even 

for an instant—without a professionally made 

solar filter that completely covers the front of 

the instrument, or permanent eye damage could 

result. Young children should use this telescope 

only with adult supervision.

Содержание SkyView Pro 127mm EQ

Страница 1: ...Exceptional Consumer Optical Products Since 1975 Customer Support 800 676 1343 E mail support telescope com Corporate Offices 831 763 7000 89 Hangar Way Watsonville CA 95076 Orion SkyView Pro 127mm E...

Страница 2: ...ew Mounting plate securing knob Counterweight shaft Counterweights Counterweight lock knobs Tripod leg Finder scope Finder scope bracket Eyepiece Star diagonal Focus knob not shown Right ascension slo...

Страница 3: ...minutes No tools are needed other than the ones provid ed All screws should be tightened securely but be careful not to over tighten or the threads may strip Refer to Figure 1 during the assembly proc...

Страница 4: ...counter clock wise until the top of the casting is flush with the mount 7 Remove the knurled toe saver retaining screw on the bottom of the counterweight shaft and slide both counter weights onto the...

Страница 5: ...weight lock knobs and slide the weights along the shaft until they exactly counterbalance the telescope Figure 4a That s the point at which the shaft remains horizontal even when you let go of the tel...

Страница 6: ...w If not some coarse adjustment to the finder scope bracket s alignment thumb screws will be needed until the object comes into the finder scope s field of view With the image in the finder scope s fi...

Страница 7: ...caused by the Earth s rotation from west to east An equatorial mount Figure 6 is designed to compensate for that motion allowing you to easily track the movement of astronomical objects thereby keepi...

Страница 8: ...ly aligned and used it makes accurate polar alignment quick and easy to do To install the polar axis finder scope remove the cover at the rear of the mount s right ascension axis Figure 9 and thread t...

Страница 9: ...latitude of the mount nor should you move the tripod Doing so will undo the polar alignment The tele scope should be moved only about its right ascension and declination axes Additional Note Regarding...

Страница 10: ...Loosen the Dec lock lever and position the telescope as accurately as possible in declination so it is parallel to the R A axis as shown in Figure 1 Re tighten the lock lever 2 Loosen one of the thum...

Страница 11: ...ateur astronomy This section is intended to get you ready for your voyages through the night sky Observing Tips A Site Selection Pick a location away from street lights and bright yard light ing Avoid...

Страница 12: ...ore eyepieces to access a wide range of magnifications This allows the observer to choose the best eyepiece to use depending on the object being viewed At least to begin with the two supplied eye piec...

Страница 13: ...brightest moon Titan VENUS At its brightest Venus is the most luminous object in the sky excluding the Sun and the Moon It is so bright that sometimes it is visible to the naked eye during full daylig...

Страница 14: ...photo tripod by threading the tripod s 1 4 20 shaft into the hole on the tube s mounting block The included mirror star diagonal while preferred for astro nomical observing because of its viewing ang...

Страница 15: ...ses Any quality optical lens cleaning tissue and optical lens clean ing fluid specifically designed for multi coated optics can be used to clean the telescope s meniscus lens or the exposed lenses of...

Страница 16: ...r Way Watsonville CA 95076 If the product is not registered proof of purchase such as a copy of the original invoice is required This warranty does not apply if in Orion s judgment the instrument has...

Отзывы: