background image

WIRELESS

SURVEILLANCE SYSTEM

QUICK START GUIDE

01

02

03

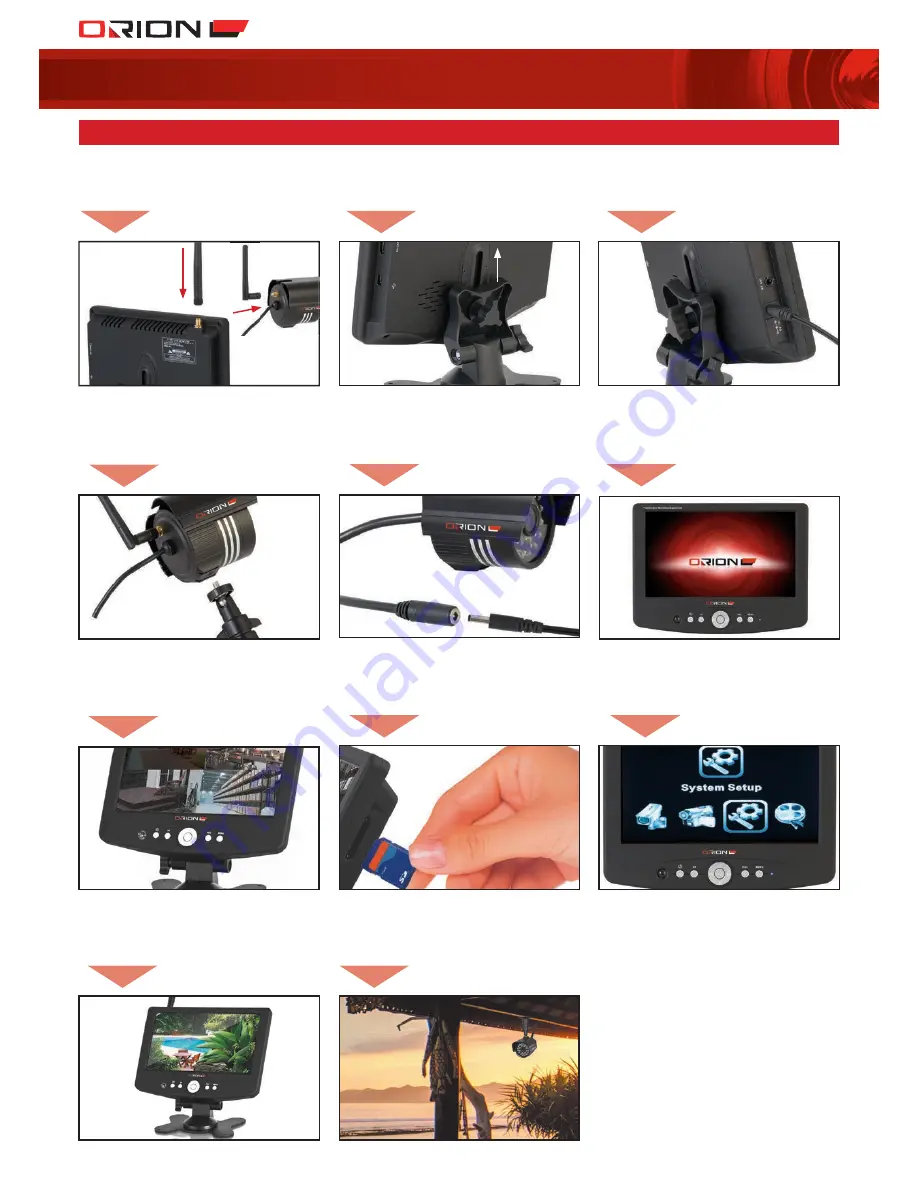
Install antenna  

on DVR unit and  

all cameras.

Install stand  
on DVR unit.

Do not permanently 

mount cameras and 

DVR at this stage.

Connect power 

supply to a 240V 

power point 

and DVR.

05

Connect power 
supply to 240V 
power points and 
cameras.

08

Insert SD card into 

the DVR.

04

Install stands on all  
cameras.

11

Mount DVR and 
cameras on suitable 
locations.

09

Format SD card: 

Menu>  

SYSTEM SETUP>  

SD FORMAT> YES 

10

Wireless surveillance 
system is ready  
to use.

06

DVR screen will 
automatically turn on 
after power supply 
connected.

07

Cameras and DVR 

are paired. Camera 

live images displayed 

on DVR screen after 

start up.

Содержание SC242

Страница 1: ...VIDEO SIGNAL TRANSMISSION WITH DIGITAL ENCRYPTION WITHOUT SIGNAL LOSS WIRELESS SURVEILLANCE SYSTEM 50 METRES LONG TRANSMISSION RANGE UNDER IDEAL CONDITIONS SD CARD STORE RECORDINGS ONTO 8GB SD CARD IN...

Страница 2: ...SURVEILLANCE SYSTEM 2 18CM LCD DIGITAL VIDEO RECORDER WITH TWO DAY NIGHT CAMERAS SC242 1 IDENTIFICATION MOUNTING SCREWS PLUGS USER MANUAL 8GB SD CARD 4 X DETERRENT STICKERS CONTENTS CONTENTS REMOTE C...

Страница 3: ...ally if your device is capable of audio recording Users of this equipment should at all times act responsibly and consider the rights and reasonable expectations of privacy of individuals Surveillance...

Страница 4: ...o camera Power supply to camera Power supply to DVR Wireless connection to camera 6 DVR CONTROL PANEL REMOTE CONTROL RECEIVER DISPLAY POWER AV OUTPUT CONTROL SELECTION CONFIRM PLAY PAUSE INSTANT RECOR...

Страница 5: ...2 To increase or decrease volume in live or playback mode 1 To scroll left and right to select item in menu mode 2 To fast forward or rewind in playback mode 3 To select channel 1 4 camera on display...

Страница 6: ...all antenna on DVR unit and all cameras 2 Install stand on DVR unit DO NOT permanently mount cameras and DVR during set up stage 3 Connect power supply to a 240V power point and DVR 4 Install stands o...

Страница 7: ...power supply connected 7 The cameras come with the kit have already paired to the DVR Live image from camera will be displayed on the DVR display screen when power is connected 8 Insert SD card into...

Страница 8: ...RECORD SETUP SD OVER WRITE YES 10 OPERATION 18CM LCD DIGITAL VIDEO RECORDER WITH TWO DAY NIGHT CAMERAS SC242 4 3 5 1 6 2 WIRELESS SIGNAL INDICATOR Signal Strength Indicator Possible Action Perfect N A...

Страница 9: ...t YES or NO then press button to confirm Play back recorded video on computer Insert SD card containing recordings into computer card reader Download latest version of VLC Media Player to play back re...

Страница 10: ...t compliable Check DVR date and time scheduled setting date and time and motion detected setting setup Check SD memory card is inserted in the DVR and compliable to use SD memory card full Overwrite i...

Страница 11: ...ded under the Australian Consumer Law You are entitled to a replacement or refund for a major failure and for compensation for any other reasonably foreseeable loss or damage You are also entitled to...

Страница 12: ...DVR 05 Connect power supply to 240V power points and cameras 08 Insert SD card into the DVR 04 Install stands on all cameras 11 Mount DVR and cameras on suitable locations 09 Format SD card Menu SYSTE...

Отзывы: