


3
Using the PinPoint Mask to Focus
With the mask in place over the front of your telescope and your camera attached
to the scope and turned on, center a bright star in the field of view. You should see
the diffraction spike pattern on the camera’s LCD screen (for DSLRs) or on your
laptop computer running your preferred image capture software
(Figure 5). If the
scope is grossly out of focus you may see the grid pattern of the mask, in which
case you should adjust the scope’s focus to shrink down the grid pattern until it
turns into a dot with spikes.
NOTE: Use a bright star to focus on, not a planet. A planet is not a point source so
it will not work. For planetary imaging you would focus on a star first, then move
the telescope to the planet for imaging.
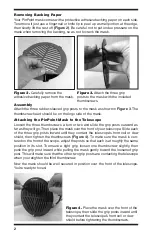
A “live view” image is best if your camera or software permits it, because then you’ll
be able to see the results of your focus adjustments in real time, and the focusing
process will be faster. If needed, though, you can take successive still exposures and
review each exposure on the screen, tweaking the telescope’s focus slightly after
each exposure, then taking another one. In either case, you’ll want to “zoom in” as
needed so you can get a clear view of the spike pattern and, in particular, the cen-
ter spike’s position relative to the other two spikes that form the “X”
(see Figure 5).
DSLRs often have two or more magnification settings for live view focusing, and
capture programs used with a laptop often allow subframe viewing, which magni-
fies the image.
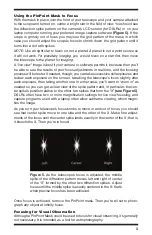
As you turn your telescope’s focus knobs to move in and out of focus, you should
see that center spike move to one side and the other of the X. Make fine adjust-
ments of the focus until the center spike lands exactly in the center of the X; that is,
it bisects the X. Then you’re in focus!
Figure 5. As the telescope’s focus is adjusted, the middle
spike of the diffraction pattern moves left and right of center
of the “X” formed by the other two diffraction spikes. Adjust
focus until the middle spike is exactly centered in the X; that’s
when precise focus has been achieved.
Once focus is achieved, remove the PinPoint mask. Then you’re all set to photo-
graph any object at infinity focus.
Focusing for Visual Observation
Although a PinPoint Mask could be used to focus for visual observing, it’s generally
not necessary. It is intended as a tool for astrophotography.