

1.7.5 Basic Setting Table
[Reference]
In case to reset hardware and network setting, ID and password of user
and Administrator will be automatically returned to the above default value.
*Frame rate can be affected by the external video output option.
So factory default is off. When you install the camera, enable this option. Then disable
it after the installation.
Static IP
Enable
192.168.1.30
192.168.1.1
255.255.255.0
80
554
5000 ~ 5999
admin/admin
root/root, guest/guest
iplinker.net
H.264 15fps@ 2048x1536
MJPEG 15fps@ 640x480
None
OFF
rtsp://<ip address>:554/stream1
rtsp://<ip address>:554/stream2
rtsp://<ip address>:554/stream3
After installation, deactivate it.
Network
Static IP/Dynamic IP
IP Server Enable
IP Address
Gateway
Subnet Mask
RTSP Port
RTP Port Range
ID and Password
User ID/Password
Domain of Related Server
DDNS Server
Stream setting
Stream 1
Stream 2
Stream 3
Video out*
Administrator
ID/Password
Web Connection
Port
Item
Default(Basic setting)
Remarks
Chapter 2. Installation and Video Check
2.1 Installation
2.2 Network Setting and Video Check
On the assumption that User PC and the camera are used under static IP, and
the camera is to be directly connected with User PC or Local Network.
The installation procedure is to be;
1) Connect the camera and PC with LAN Cable.
2) Power on camera.
※Use regulated 12V DC, 1A
※Use PoE(Power Over Ethernet) : The cable includes data and power, so it's
easy to install the camera. So, you can save time to install and cost. When you
connect the camera with PoE and DC adaptor, Only PoE is used.
3) Wait about 2 minute after power on camera, the system will be booted.
To connect the unit in user's PC, change the setting value of PC network environment.
on your PC.
Default network setting value of the unit is to be;.
<Caution>
Before changing the setting value, please memorize the previous setting
value
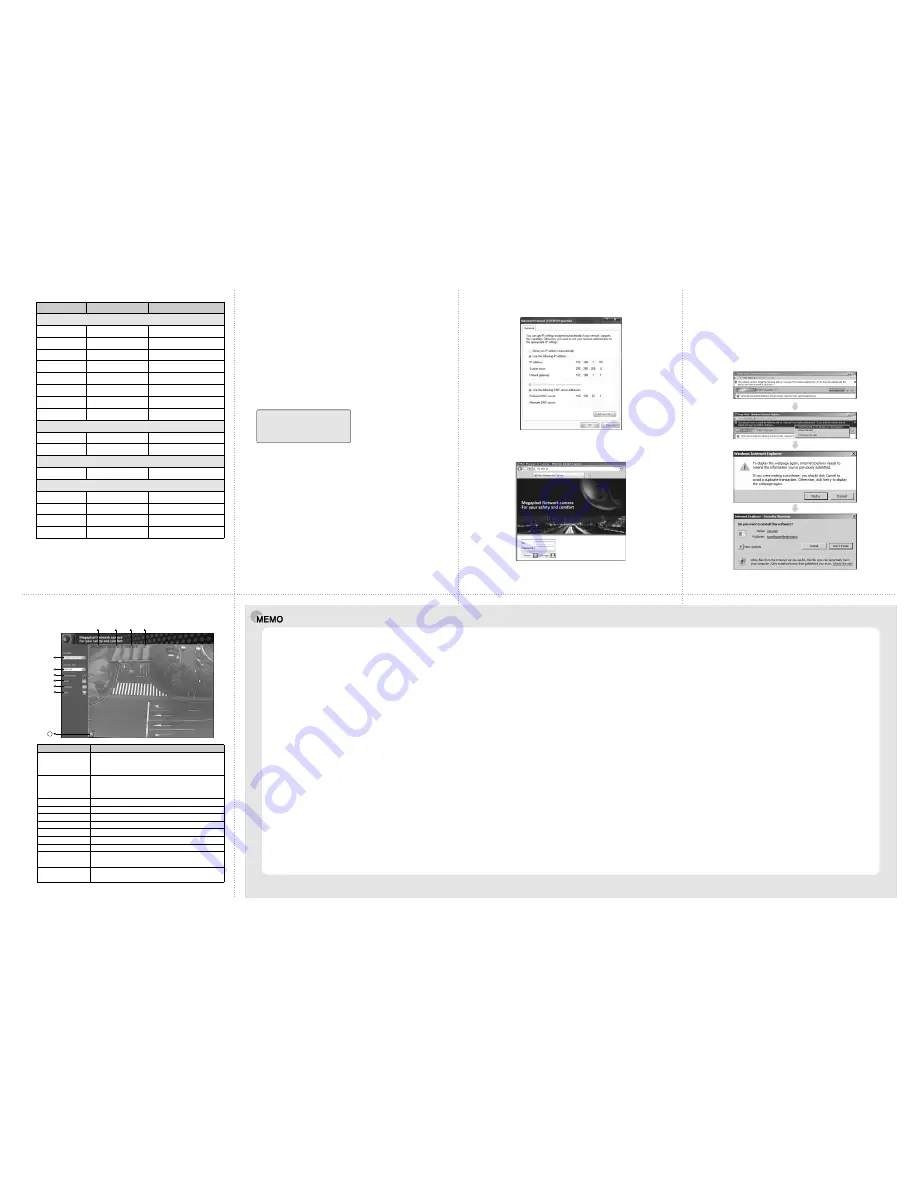
2.2.1 Change the setting value of PC network environment
2.2.2 Connect the camera with web browser
Set IP Address, Subnet Mask and Gate-way of user's PC with 192.168.1.50 /
255.255.255.0 / 192.168.1.1 as shown on below picture.
Run web browser and input the default IP address(192.168.1.30) in URL line
and press "Enter". Then, below picture is to be shown.
※If the page does not open, Please refer to "Chapter 11 appendix" in the CD.
2.2.3 Input ID/Password
2.2.4 Active-X auto installation
Shown the main page, input ID and Password and click on "Viewer" to see the
video feed.(Default administrator's ID &Password is 'admin'.)
Click "install" on the security certificate to load the Active-X control.
If you choose "Don't install", the web viewer would not work.
<Caution>
[Reference]
Please change default value of ID/Password into new ones after the
installation.
Please refer to 5.3 Administrator's ID and Password Change regarding
'Change Administrator'.
10
11
12
9
3B25524B
13
2.2.5 Complete the installation
Upon installation, Web Viewer appears and image of camera is to be seen.
11
⑩
①
②
③
④
⑤
⑥
⑧
⑦
⑨
Item
Description
⑩Status Icon
⑪Stream Info.
Connect or disconnect to the stream
Saves the stream as a moving picture file in the .avi format
Saves the snapshot as an image file in the .bmp format
Specify the file saving path
Display camera title
Display the date
Display current time
Select stream codec and resolution menu related to
live-view was defined only by the admin.
(H.264/MPEG/MJPEG)
Default size is 640X480.
Adjust the screen to the optimal size(Recommendation :
Select the same size with stream resolution)
Display the site information such as Day/Night, Motion,
Alarm input/output
Display the stream information such as Audio and
recording condition
①Stream selection
②Window size
④Recording
⑤Capture
⑥Saving path
⑦Camera name
⑧Date
⑨Time
③Connection/Disconnection
IP Address
: 192.168.1.30
Subnet Mask : 255.255.255.0
Gateway
: 192.168.1.1
②
③
①
※The specification is subject to change without any prior notice to improve the quality.


