Orion OLME-K4950 Скачать руководство пользователя страница 36

7. 

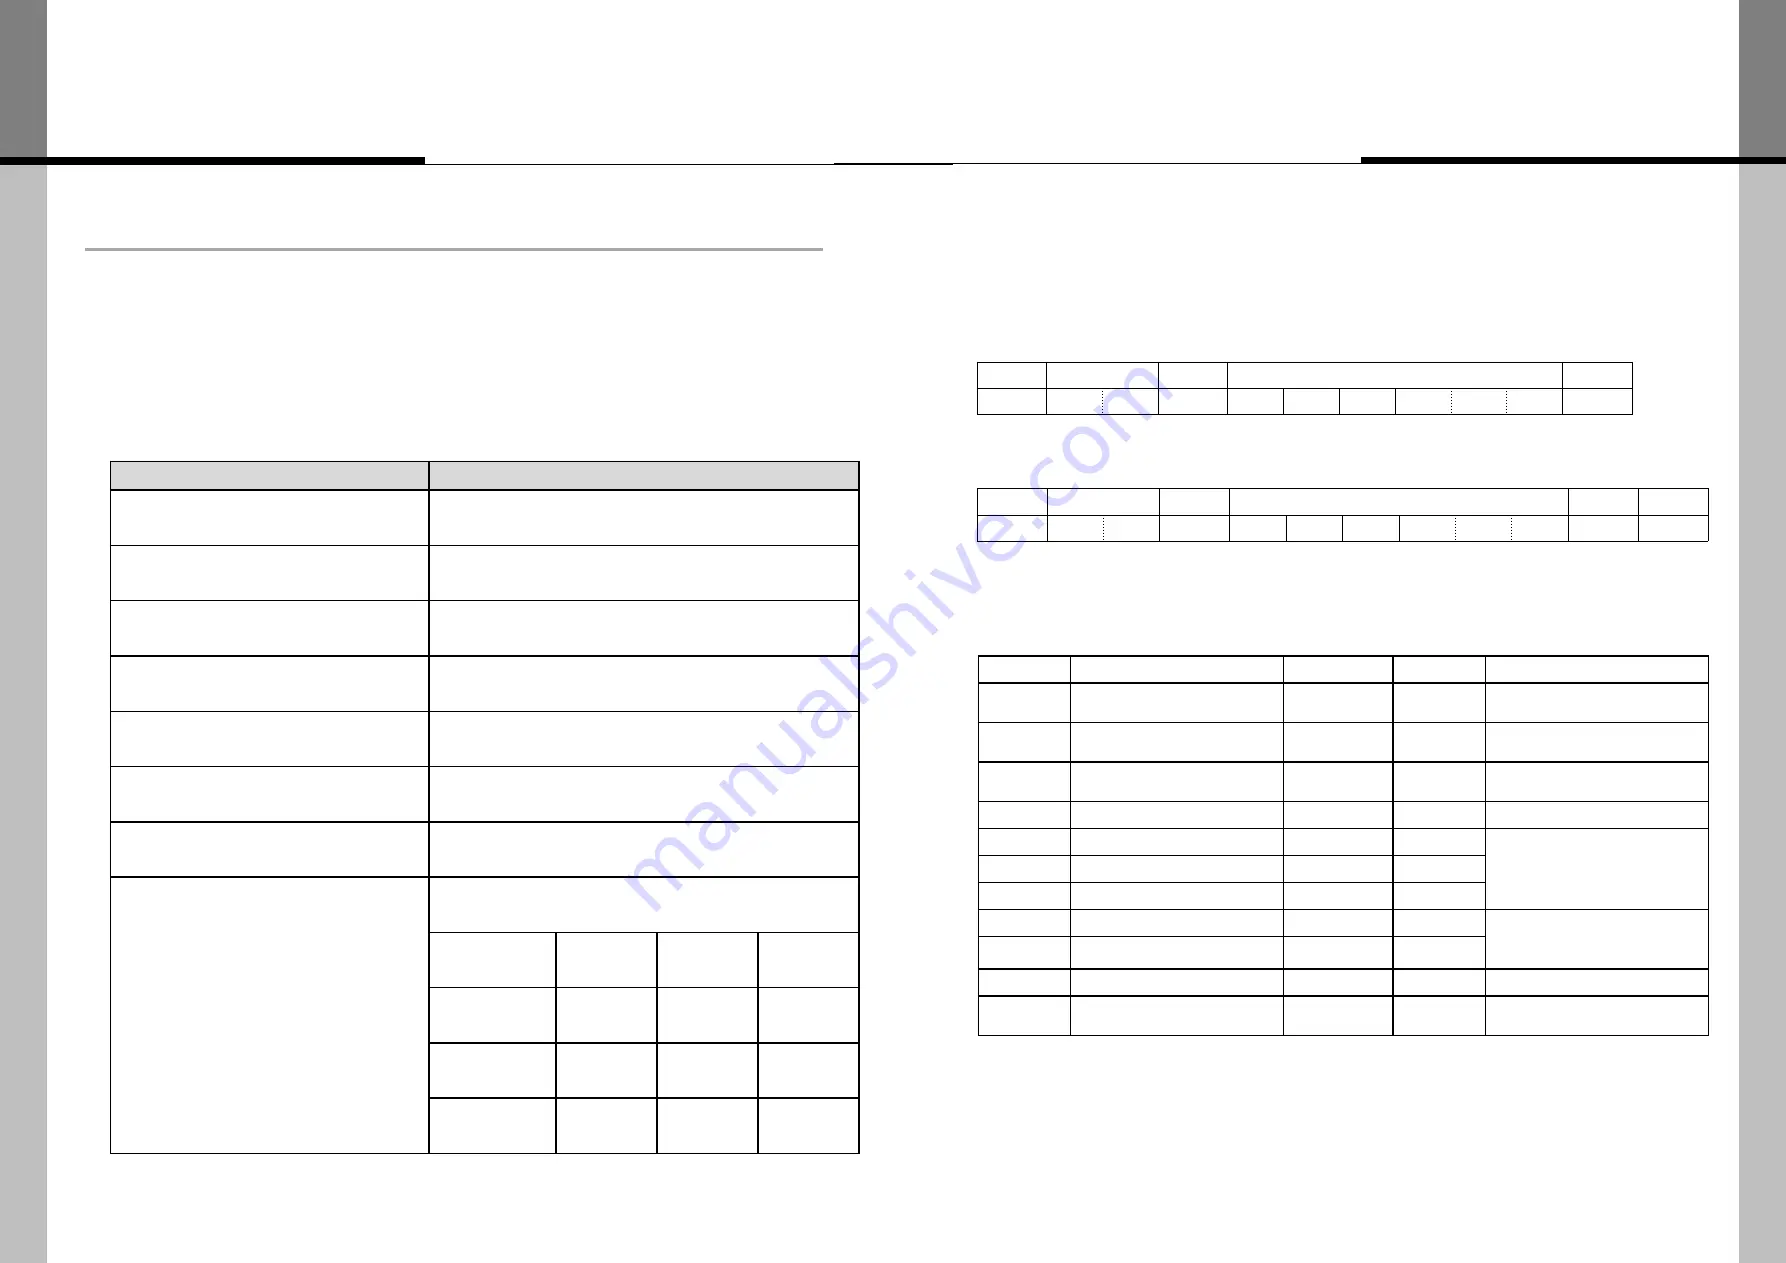
PROTOCOL


Introduction 


- This document contains the communication PROTOCOL between LCD and its control devices for better use. 

     - It focuses on the brief functional explanation and communication protocol without detailed technical matters.  


7.1. Communication Setting


ITEM  

SPECIFICATION  

     TRANSMISSION & RECEPTION TYPE       ASYNCHRONOUS SERIAL COMMUNICATION 

     CONNECTION TYPE 

     DAISY CHAIN 

     BAUD RATE 

     57600 bps 

     DATA BITS 

     8 

     PARITY  

     NONE 

     STOP BITS  

     1 

     FLOW CONTROL 

     NONE 

     CABLE & PIN ASSIGN 

9PIN D-SUB, MALE / FEMALE STRAIT TYPE 

PC 

PIN NO. 

PIN NO. 

MONITOR 

RX DATA 

TX DATA 

TX DATA 

RX DATA 

GND 

GND 

7.2. Protocol Format


STX

 - 0x02

, EXT 

- 0x03 

ITEM 

 DESCRIPTION 

 VALUE 

 SIZE 

REMARK  

STX 

START OF CODE  

0x02 

1 BYTE      


MCMD 

MAIN COMMAND  

VARIABLE 

1 BYTE      


SCMD 

SUB COMMAND 

VARIABLE 

1 BYTE  


LEN 

LENGTH OF ID & DATA 

VARIABLE 

1 BYTE  


GID 

GROUP ID 

VARIABLE 

1 BYTE  

ID = 0 : 

ALL MONITOR(BROADCAST) 


MID1 

MONITOR ID (MSB) 

VARIABLE 

1 BYTE  

MID2 

MONITOR ID (LSB) 

VARIABLE 

1 BYTE  

D1 

FIRST DATA 

VARIABLE 

1 BYTE  


DATA : n  BYTE 


Dn 

nTH DATA 

VARIABLE 

1 BYTE  

CS 

CHECKSUM 

VARIABLE 

1 BYTE  

SUM = "FF“


EXT 

END OF CODE 

0x03 

1 BYTE      


7.2.1 Send Protocol Format 

7.2.3 Description of Protocol Format 

STX 

COMMAND 

LEN 

DATA 

EXT 

STX 

MCMD  SCMD 

LEN 

GID 

MID1 

MID2 

D1 


Dn 

EXT 

STX 

COMMAND 

LEN 

DATA 

CS 

EXT 

STX 

MCMD  SCMD 

LEN 

GID 

MID1 

MID2 

D1 


Dn 

CS 

EXT 

7.2.2 Receive Protocol Format 

- 68 -


- 69 -


Содержание OLME-K4950

Страница 1: ...DISPLAY CO LTD www oriondisplay net Address 217 1gongdan ro Gumi si Gyeongsangbuk do Korea Tel 82 2 6678 8533 Fax 82 2 6678 8599 A revolutionary MLCD Infinitely Expandable MLCD A revolutionary MLCD P...

Страница 2: ...ding amplifiers that produce heat 9 Do not defeat the safety purpose of the polarized or grounding type plug A polarized plug has two blades with one wider than the other A grounding type plug has two...

Страница 3: ...important operating and maintenance servicing instructions in the literature accompanying the appliance 2 Contents 3 European Union Disposal Information Cautions for consisting Clearance for Ventilat...

Страница 4: ......

Страница 5: ...hed for heat dispersion If the front space of monitor has to be sealed there must be consideration for the heat dispersion in the rear side of monitor Regularly clean off the vent holes in the back of...

Страница 6: ...ANEL P ANEL P ANEL P ANEL CUSHION P ANEL 8 9 If you need to stand LCD If you need to lay down If you need to lay down LCD Please do not stand LCD Please do not lean over Please do not lean over the y...

Страница 7: ...rlong termstatic display Note Moving pictureor black patternis strongly recommended for screensaver 2 Operating methods to minimize burn in image due to long term static information display For optima...

Страница 8: ...that LCD is twisted Keep all LCDs balanced in vertical or horizontal force after setting Multi Vision Avoid LCD is set up tilted so it can give a damage to down LCD Avoid that LCD outside is shocked...

Страница 9: ...tilation hole is blocked the inside temperature may rise to cause overheatingresulting in fire Do not touch product s front surface with Do not poke the front screen with sharp material It may damage...

Страница 10: ...ler input port 5 RS232C IN Display control via COM port D Sub 9pin FEMALE 6 RS232C OUT Display control via COM port D Sub 9pin MALE 7 DVI IN To input Display Port signals 8 HDMI IN To input HDMI video...

Страница 11: ...ngle Monitor and PC should be connected a Com Port in a PC and RS 232C IN port in a monitor is connected with supplied RS 232C cable If you do not have Com Port you need to use an USB converter for RS...

Страница 12: ...UT HDMI IIN DVIIN DPIN DPOUT HDMI IIN DVIIN DPIN DPOUT HDMI IIN DVIIN DPIN DPOUT HDMI IIN DVIIN DPIN DP OUT HDMI IIN DVIIN DPIN DP OUT HDMI IIN DVIIN DPIN DP OUT HDMI IIN DVIIN DPIN DPOUT HDMI IIN DVI...

Страница 13: ...IR RS232CIN RS232COUT LAN IR RS232CIN RS232COUT LAN IR RS232CIN RS232COUT LAN IR RS232CIN RS232COUT LAN IR RS232CIN RS232COUT LAN IR RS232CIN RS232COUT LAN IR RS232CIN RS232COUT 22 23 3 4 2 Connection...

Страница 14: ...2 C IN RS232C OUT LA N I R RS232 C IN RS232C OUT LA N I R RS232 C IN RS232C OUT LA N I R RS232 C IN RS232C OUT LA N I R RS232 C IN RS232C OUT LA N I R RS232 C IN RS232C OUT ID 1 ID 2 ID 3 ID 4 ID 5 ID...

Страница 15: ...2C OUT LA N I R RS232 C IN RS232C OUT RS 232C 1 Click MULTI ID 2 Select another number which is not in use for AUTO GROUP ID and click AUTO ID SET in ID menu 3 After that ID setting status in OSW Scre...

Страница 16: ...MLCD set of upper left corner MLCD set in the same way as the above 4 procedure 8 Set the IDs identified through the above 7 procedure for CURRENT GROUP MULTI ID in NEW ID Menu And then Increase the...

Страница 17: ...tion is as follows It s different from physical RS 232C cable connection ID 7 ID 4 ID 1 ID 8 ID 5 ID 2 ID 3 ID 6 ID 9 4 3 Using Auto Setting This feature is a way to automatically set the ID by enteri...

Страница 18: ...I R RS23 2C IN RS232 C OUT L A N I R RS23 2C IN RS232 C OUT L A N I R RS23 2C IN RS232 C OUT L A N I R RS23 2C IN RS232 C OUT L A N I R RS23 2C IN RS232 C OUT RS 232C If the physical connection is abo...

Страница 19: ...rightness Brightness adjusts the brightness of the monitor 0 100 Contrast Contrast adjusts the difference between darkness and lightness on the monitor Adjust the Brightness first and then adjust Cont...

Страница 20: ...the number of vertical monitor in multi screen 1 16 Multi Position set the position number of the segnent image in multi screen 240 B Comp Set Activate Bezel compensation ON OFF B Comp Value Set beze...

Страница 21: ...DICOM DP HDMI1 Opt HDMI2 HDMI3 HDMI4 QUAD Prog 1 PIP PBP Prog 2 Prog 3 POWER ON Turn on the display POWER OFF Turn off the display MENU Display OSD MENU on the screen ENTER MENU Movement INFO Display...

Страница 22: ...OK Info MODE DICOM DP HDMI1 Opt HDMI2 HDMI3 HDMI4 QUAD Prog 1 PIP PBP Prog 2 Prog 3 Entering individual control mode key combination Prog 1 key UP key OK key ID key 3 digits Ex pop up the OSD menu on...

Страница 23: ...icture Main Image of OSW Orion Software 6 1 Installation Insert the Installation CD You can see following installation start screen Select proper version for your product and start installation OSW su...

Страница 24: ...ion X Y 15 15 Set 4 MODE Broadcast Mode Drag Mode 5 MULTI SCALE Full Screen On Off 6 POSITION Screen Position 7 OSD INFO On Screen Display Information 8 APPLICATION Picture Help ID Setting 9 OTHER Fan...

Страница 25: ...s the communication between PC and MLCD Connect MLCD to PC LAN Port via LAN cable Go to OSW Menu CONNECTION CONNECT and select the LAN port you want to connect In order to disconnect the communication...

Страница 26: ...case of connection to a LAN Hub This function is used to control the MLCD via LAN PORT During the setting process MLCD and control PC should be connected via RS 232C cable only Do not connect Etherne...

Страница 27: ...s computer Check the network information 1 Execute the OSW 2 Serial Connection Turn on the MLCD 3 Click left top of the mouse on the MLCD that you want to control on the screen configuration window T...

Страница 28: ...After inputting column row number MLCD matrix with input source color is displayed in the Screen Configuration after click the button SET When broadcast checkbox is checked entire command transmission...

Страница 29: ...ng the left button of the mouse Maybe you want to select more than one MLCD set drag the mouse Then you can transmit the Protocol command respectively to selected MLCD Sets When broadcast checkbox is...

Страница 30: ...input source and the signal It is displayed at the center of the screen DP 3840x2160 60Hz HDCP Disabled Group ID 1 Monitor ID 1 POSITION To change monitor position only one monitor 1 Select Screen co...

Страница 31: ...een configuration window 2 Click the Change button after change the position number ID 1 ID 2 ID 3 ID 4 ID 1 ID 2 ID 3 ID 4 ID 1 ID 2 ID 3 ID 4 ID 1 ID 2 ID 3 ID 4 3 Select Screen configuration window...

Страница 32: ...er ON Control Go to OTHER POWER to control power related operation AUTO POWER Automatic power on by AC power connection 6 7 Control 6 7 2 Picture Control To use Picture Control go to APPLICATION PICTU...

Страница 33: ...URATION Adjust the saturation value of the screen 0 100 BACKLIGHT Adjust the backlight value of the screen 0 100 GAMMA Select a display gamma for best picture quality 1 8 2 0 2 2 2 4 COLOR TEMP Color...

Страница 34: ...k On or Off Alert Message Alert Message Enable or Disable If input signal disappear or input cable is unplugged when it enabled information of monitor come automatically from the monitor via communica...

Страница 35: ...tton then firmware version is loaded M STM firmware version S RTD firmware version When Standby mode only STM firmware version is loaded S 1 1 67 M 1 1 67 HELP menu About Click About item in HELP menu...

Страница 36: ...TX DATA 3 3 RX DATA GND 5 5 GND 7 2 Protocol Format STX 0x02 EXT 0x03 ITEM DESCRIPTION VALUE SIZE REMARK STX START OF CODE 0x02 1 BYTE MCMD MAIN COMMAND VARIABLE 1 BYTE SCMD SUB COMMAND VARIABLE 1 BYT...

Страница 37: ...ER RED GREEN BLUE 0x0322 D1 0x00 RED 0x02 GREEN 0x03 BLUE D2 0 255 DEFAULT 127 HUE 0x0323 D1 0 100 DEFAULT 50 SATURATION 0x0324 D1 0 100 DEFAULT 50 COLOR RANGE 0x0334 D1 0x00 Full 0x01 LIMIT FUNCTION...

Страница 38: ...Control Command and Data 7 3 7 LAN Configuration Command and Data FUNCTION MCMD SCMD DATA REMARK LAN ON OFF 0x0750 D1 0x01 ON 0x00 OFF GET TCP IP 0x0760 D1 D4 IP ADDRESS READ ONLY D5 D8 SUBNET MASK D...

Страница 39: ...atically via communication line This function works only when the Alert Message Enable 7 3 9 Monitor Status Command and Data 74 75 FUNCTION MCMD SCMD DATA REMARK NO SIGNAL EVENT 0xA1F0 AUTO RETURN 0xA...

Страница 40: ...Horizontal Pixels Vertical Lines Polarity H V Standard Type Input Total Addr Width Sync Width Back Porch Total Addr Width Sync Width Back Porch 640 480 60 25 175 800 640 96 40 525 480 2 25 DMT DVI HD...

Страница 41: ...ares that the products Model Numbers OLMU K4940 4970 OLME K4950 4970 Conforms with the provisions of Council Directive 2004 108 EC on Electromagnetic Compatibility EN55022 2010 Radiated and C onducted...

Страница 42: ...imension OLMU K4940 OLMU K4970 80 81 1 4 1 4 2 5 2 5 238 8 600 238 8 1077 58 607 8 400 103 9 103 9 90 6 101 5 OLME K4950 OLME K4970 0 9 0 9 0 9 0 9 237 8 600 237 8 1075 58 605 8 400 103 0 103 0 93 5 1...

Отзывы: