▶
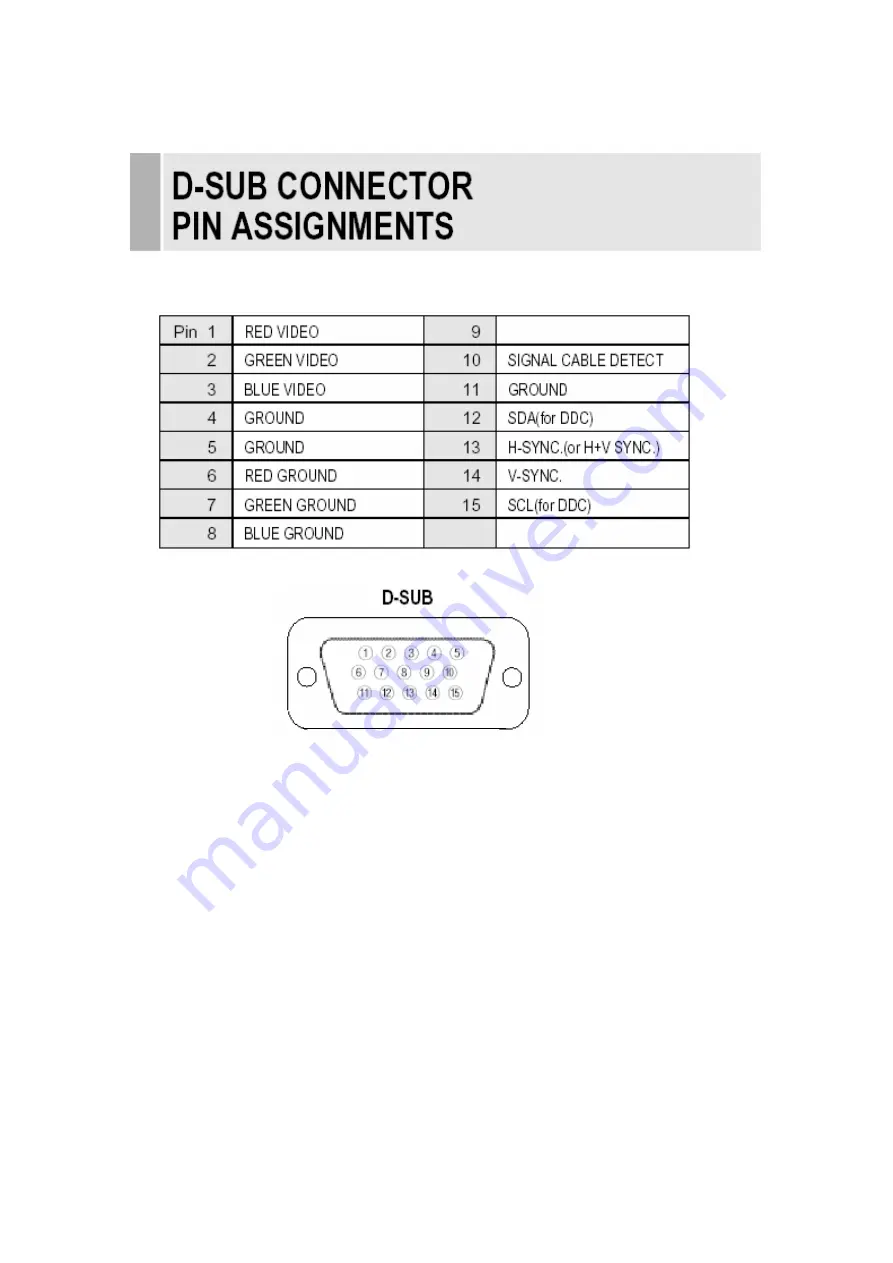
PIN ASSIGNMENTS
ACCESSORY
1. POWER CORD
2. REMOCON
3. USER’S MANUAL
4. A/V CABLES(Option)
5. Batteries (TYPE AAAX2)
INSTRUCTION MANUAL
⋯⋯⋯⋯⋯⋯⋯⋯⋯⋯⋯⋯⋯⋯⋯⋯⋯⋯⋯⋯⋯⋯⋯⋯⋯⋯⋯⋯⋯
15
Страница 1: ...32 INCH TFT LCD MONITOR LS3200 INSTRUCTION MANUAL Please read this manual thoroughly before use and keep it handy for future reference...
Страница 2: ...TATEMENT 5 CONNECTING WITH EXTERNAL EQUIPMENT 6 RESOLUTION 8 CONTROLS AND FUNCTIONS 9 REMOTE FUNCTIONS 19 REAR VIEW 21 STAND SLOPE 22 D SUB CONNECTOR PIN ASSIGNMENTS 23 POWER MANAGEMENT 24 SPECIFICATI...
Страница 3: ...of power available consult your dealer or local power company 9 This product is equipped with a 3 wire grounding type plug having a third grounding pin This is a safety feature If you are unable to in...
Страница 4: ...structions since improper adjustment of other controls may result in damage and will often require extensive work by a qualified technician to restore normal operation E If the product has been droppe...
Страница 5: ...entilation holes are provided on the cabinet to prevent the temperature from rising Do not cover the unit or place anything on the top of unit AVOID HEAT Avoid placing the unit in direct sunshine or n...
Страница 6: ...locate the receiving antenna Increase the separation between the equipment and receiver Connect the equipment into an outlet on a circuit different from that to which the receiver is connected Consult...
Страница 7: ...ping output for VIDEO 2 5 Y C IN SVHS Y C separated signal input 6 Y C OUT SVHS Y C separated signal looping output 7 8 AUDIO 1 2 IN Stereo Audio Signal Input this input is for AV1 Y C or AV2 9 10 AUD...
Страница 8: ...5 MENU Activates and exits the On Screen Display 6 VOL Increases or decreases the level of audio volume 7 8 AUTO Auto geometry adjustment in PC Source 9 EXIT Exit the On Screen Display 10 0 1 2 3 9 N...
Страница 9: ...B SOURCE Change input Source one by one PC VIDEO S VIDEO TV SCART C MENU Activates and exits the On Screen Display This button can also be used to move previous menu or status OSD MENU MAIN Input Sour...
Страница 10: ...the volume Adjust menu settings 1 SELF TEST DISPLAY When there is no connection at PC the On Screen Display will show for 3 seconds 2 OSD MENU DESCRIPTION Input Source Select PC or AV1 AV2 SVIDEO 9 IN...
Страница 11: ...ess or dimness of the image H position PC Mode Only Move image horizontally on screen right or left V position PC Mode Only Move image vertically on screen up or down Clock PC Mode Only Adjust the ver...
Страница 12: ...ion of the sound Select preferred Sound setting flat music movie speech and Adjust the level of the Sound frequency in user mode Balance Loudspeaker Only Adjust the balance of left and right speaker s...
Страница 13: ...ight or left V Position Move the OSD position to up or down Transparency Select the OSD background OSD Timer Select the OSD display timing Language Select a language among English Fran ais Deutsch Esp...
Страница 14: ...C Mode Color Temp Adjust color temperature to 9300 6500 user note 9300 is factory default Red Adjust red color for user Green Adjust green color for user Blue Adjust blue color for user 13 INSTRUCTION...
Страница 15: ...Utility Recall Select to reset all setting to the factory default values Lock Select ON or OFF ON Control key lock OFF Control key unlock Exit Exit Turn off OSD Menu INSTRUCTION MANUAL 14...
Страница 16: ...PIN ASSIGNMENTS ACCESSORY 1 POWER CORD 2 REMOCON 3 USER S MANUAL 4 A V CABLES Option 5 Batteries TYPE AAAX2 INSTRUCTION MANUAL 15...
Страница 17: ...rd performs this signaling system through not sending horizontal vertical or sync signal This monitor enters an appropriate mode through identifying each of the three modes of the signaling system POW...
Страница 18: ...ZONTAL 44 53KHz VERTICAL 44 66Hz INPUT SIGNAL VIDEO Analog 0 7Vp p 75 SYNC Separate TTL Level S VIDEO AV Composite Sound L R PC Stereo Sound ACTIVE DISPLAY AREA W x H 697 7mm X 392 3mm DIMENSIONS W x...
Страница 19: ...INSTRUCTION MANUAL 19...