
3
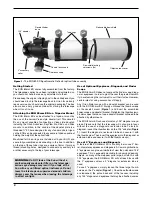
Figure 2.
The Rack and Pinion Focuser adjustments
Focus tension setscrew
Focus lock
thumb knob
off, exposing the 2" diameter focuser drawtube. Now, insert
your 2" diagonal into the drawtube and secure with the three
thumbscrews loosened previously. Insert a 2" eyepiece into the
diagonal, secure it in place with the thumbscrew on the diago-
nal, and you’re ready to observe. The EON 80 focuser features
brass compression rings to securely hold your eyepieces and
diagonal in place without marring the 1.25" or 2" nosepiece
walls.
2" Rack and Pinion Focuser
The EON 80mm ED comes equipped with a solid 2" dual
speed Rack and Pinion (R&P) focuser. The R&P design allows
for smooth, precise focusing without any slippage that typical
Crayford focuser designs can experience. And backlash has
been minimized by using a large Rack gear cut on a diago-
nal bias to fully mesh the Pinion gear at all times. The focuser
includes a 10:1 reduction gear for super precise focusing. The
black knobs are the course focus, and the gold knob is the fine
focus. For every one full turn of the course knob, the fine knob
will turn 10 times.
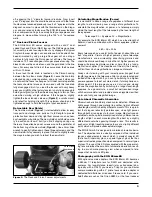
A focus lock thumb knob is located on the Pinion housing
between the two focus knobs (
Figure 2
). Leave this knob fully
unlocked during normal operation, and only lock it when you
do not want the focus to change at all. Under normal operation
the focus should not move on its own, even with this lock knob
fully disengaged. But if you load the focuser with very heavy
gear, you might find the factory tension is not strong enough to
hold against gravity and the wheels may begin to turn on their
own when aiming at high altitudes. If this happens, slightly
tighten the focus tension setscrew (
Figure 2
) a small amount,
and retest for holding strength. This setscrew should only be
tightened enough to hold the weight of your equipment.
Retractable Dew Shield
The front dew shield (
Figure 1
) is retractable to allow for easy
transport and storage, and pulls out to full length to provide
protection from dew and stray light from sources such as near-
by streetlights or buildings. The dew shield should hold secure-
ly in position on its own, but if you find it slipping during use,
there are three allen head set screws around the perimeter of
the bottom ring of the dew shield (
Figure 2
). Use a 2mm Allen
wrench to gently tighten down these three setscrews, and the
dew shield will stay securely in place. It’s best to slightly loosen
them again when you wish to retract the dew shield.
Calculating Magnification (Power)
It is desirable to have a range of eyepieces of different focal
lengths, to allow viewing over a range of magnifications. To
calculate the magnification, or power, of a telescope, simply
divide the focal length of the telescope by the focal length of
the eyepiece:
Telescope F.L. ÷ Eyepiece F.L. = Magnification
For example, the EON 80mm ED, which has a focal length of
560mm, used in combination with a 25mm eyepiece, yields a
power of
560 ÷ 25 = 22.4x.
Every telescope has a useful limit of power of about 50x per
inch of aperture. Claims of higher power by some telescope
manufacturers are a misleading advertising gimmick and
should be dismissed. Keep in mind that at higher powers, an
image will always be dimmer and less sharp (this is a funda-
mental law of optics). The steadiness of the air (the “seeing”)
will limit how much magnification an image can tolerate.
Always start viewing with your lowest-power (longest focal
length) eyepiece in the telescope. After you have located and
looked at the object with it, you can try switching to a higher-
power eyepiece to ferret out more detail, if atmospheric con-
ditions permit. If the image you see is not crisp and steady,
reduce the magnification by switching to a longer-focal-length
eyepiece. As a general rule, a small but well-resolved image
will show more detail and provide a more enjoyable view than
a dim and fuzzy, overmagnified image.
Note About Chromatic Aberration
Chromatic aberration literally means color distortion. Whenever
light passes through one material to another, light of different
wavelengths (color) is bent by different amounts. This is a prob-
lem that plagues refractor-type telescopes, since light passes
through both air and glass to form an image. Most astronomi-
cal objects emit a spectrum comprised of many different wave-
lengths of light, so each wavelength will be bent by a slightly
different amount when passing through a lens. This results in
each color of light reaching precise focus at a slightly different
point, which will provide unacceptable images.
The EON 80mm ED is designed to minimize chromatic aberra-
tion. The objective lens is actually comprised of two individual
lenses, called elements, one of which is made of special ED
(Extra-low Dispersion) glass, a special type of glass that has
superior refractive properties when compared to normal types
of glass. The use of this ED glass coupled with the proper mat-
ing lens minimizes the amount of chromatic aberration, result-
ing in a much more pleasing view when compared to tele-
scopes that do not use ED glass.
Photography with the EON 80mm ED
With optional camera adapters, the EON 80mm ED becomes
a 560mm f/7 telephoto lens for DSLR and dedicated astro
cameras. For long-distance terrestrial or astronomical pho-
tography with a DSLR, you need a T-ring for your particular
camera model along with a 2" prime focus camera adapter or
dedicated field flattener or reducer. Please note: If you use a
field flattener such as the Orion #8893, or the focal reducer


