background image

5

•  We recommend using the 

camera’s self-timer setting to take 
your picture, as this will allow 
a few seconds for any camera 
shaking caused by pressing the 
shutter button to settle down 
before the exposure begins. If 
the camera is shaking during 
the exposure the resulting image 
will be blurry. Many smartphone 
camera apps also have a self-
timer feature.

For Smartphones

The smartphone bracket included 
with the SteadyPix Pro is compatible 
with phones measuring up to 3.15" 
(~80mm) in width and any length.
1.  Rotate the smartphone bracket 

post adjustment knobs (M) 
counterclockwise to raise the 
bracket posts (N) as needed to 
fit the width of your particular 
smartphone.

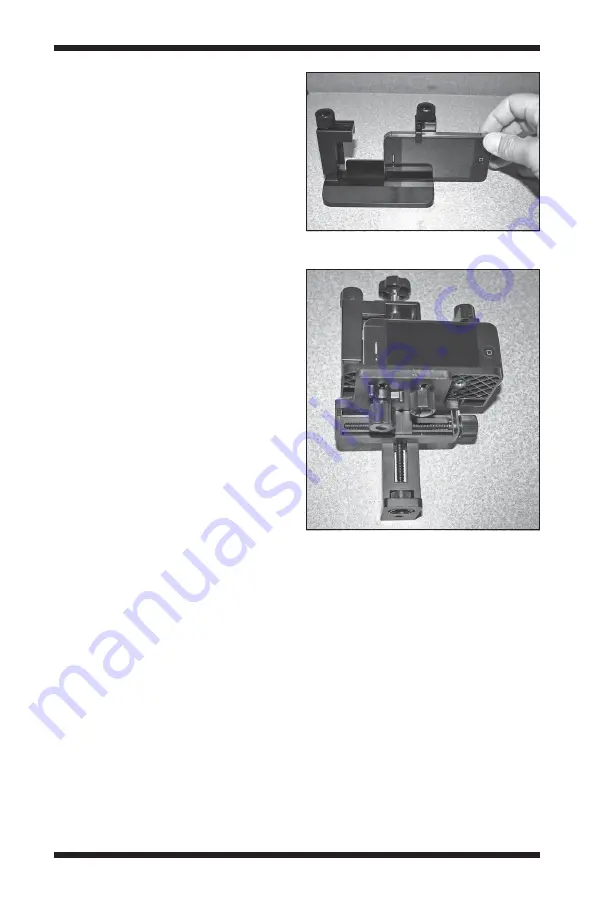
2.  Slide your smartphone into the 

bracket (O) from the right side 
as shown in 

Figure 4, with the 

phone’s LCD screen facing toward 
you. Make sure that the phone’s 
camera lens is not blocked by 
the bracket. Then tighten the post 
adjustment knobs (M) to lock the smartphone in place.

3.  Mount the smartphone bracket on the SteadyPix Pro camera platform 

using the camera mounting bolt (H) and camera lock knob (I) and one 
bracket attachment knob (P) into the two left-most holes in the base of the 
smartphone bracket (O) (

Figure 5). (Depending on where your phone’s 

camera lens is located, you may need to use the two right-most holes.)

Figure 5. 

Attach the smartphone bracket 

to the SteadyPix camera platform. 

Figure 4. 

Slide your smartphone from 

right to left into the bracket.

Содержание 5306

Страница 1: ...restrial shots or nighttime astrophotos through the telescope s optics with jaw dropping results These instructions provide a brief outline of how to set up and use the SteadyPix Pro Please read them carefully prior to using it for the first time INSTRUCTION MANUAL IN 512 Rev A 11 13 Corporate Offices 89 Hangar Way Watsonville CA 95076 USA Toll Free USA Canada 800 447 1001 International 1 831 763 ...

Страница 2: ...ows the camera to move in synchrony with the eyepiece if the telescope is electronically driven to track celestial objects To get the best pictures with the SteadyPix Pro we recommend using telescope eyepieces with long eye relief of 15mm or more Long eye relief will allow the camera to see the whole field of view in the eyepiece Refer to Figure 1 to familiarize yourself with the various parts of ...

Страница 3: ...ital cameras the lens expands outward when the power is turned on setting the camera back from the telescope eyepiece will reduce the possibility that the lens will contact the eyepiece causing damage to either or both of them 5 Now turn on your camera and look at its LCD display Move the camera forward toward the eyepiece until the LCD screen shows a full image You may also need to make small adj...

Страница 4: ... with the locking thumbscrew s Figure 3 Now you re ready to aim focus and shoot TIPS Before attaching the SteadyPix Pro with camera attached to the telescope focus the object you want to photograph in the telescope eyepiece using the telescope s focuser You may still have to tweak the focus a bit once the SteadyPix and camera are installed but at least you ll be close to the focus point Figure 3 T...

Страница 5: ... needed to fit the width of your particular smartphone 2 Slide your smartphone into the bracket O from the right side as shown in Figure 4 with the phone s LCD screen facing toward you Make sure that the phone s camera lens is not blocked by the bracket Then tighten the post adjustment knobs M to lock the smartphone in place 3 Mount the smartphone bracket on the SteadyPix Pro camera platform using...

Страница 6: ...amera position until the LCD displays the largest image Then tighten the lock knobs to fix the camera in that position Figure 7 Now you re ready to mount the assembly on the telescope and start shooting pictures Mounting the SteadyPix Pro on a Tripod The SteadyPix Pro can be mounted on any camera tripod equipped with a 20 post This is useful when photographing through a small monocular where the w...

Страница 7: ...teadyPix Pro for terrestrial photography One is to consider using a telescope with an Alt Az short for altitude azimuth mount on a sturdy tripod An Alt Az mount will allow simple up down left right motions of the telescope so that you can easily adjust and aim the camera Equatorial mounts mounts designed to track the movement of stars in the sky are not recommended as they will be needlessly heavy...

Страница 8: ...r surface even during a full Moon The Sun Photographing our nearest star the Sun is always interesting but it must be done with caution You must use a properly fitted solar filter covering the front opening of the telescope or serious instantaneous eye damage could occur with even a momentary glimpse of the Sun The intense radiation emitted by the Sun could also damage your camera Furthermore if t...

Страница 9: ...t deep sky objects star clusters nebulas and galaxies afocally with a point and shoot digital camera That s because most of them are extremely faint Deep sky objects usually require use of a tracking mount and exposures of several seconds or more which isn t always possible with typical point and shoot cameras Some smartphone apps do have the ability to integrate a number of images into a final lo...

Страница 10: ...ls or workmanship for a period of one year from the date of purchase This warranty is for the benefit of the original retail purchaser only During this warranty period Orion Telescopes Binoculars will repair or replace at Orion s option any warranted instrument that proves to be defective provided it is returned postage paid Proof of purchase such as a copy of the original receipt is required This...

Отзывы: