Orion 21REDP Скачать руководство пользователя страница 11

11

Installation and User's Guide
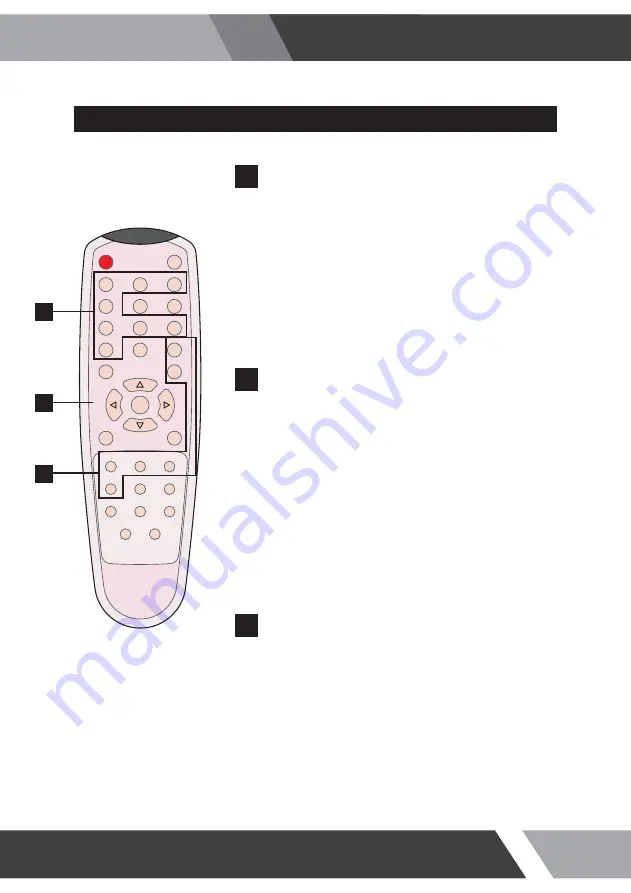
REMOTE CONTROLLER

MODE SELECT MENU

VIDEO1

Select VIDEO1 mode

VIDEO2

Select VIDEO2 mode

S-VIDEO

Select S-VIDEO mode

VGA (RGB)

Select VGA mode

DVI

Select DVI mode

HDMI1

Select HDMI1 mode

COMPONENT

Select COMPONENT mode

HDMI2

Select HDMI2 mode

POWER

Turn ON / OFF the monitor

MUTE

Turn ON / OFF the sound

AUTO

Auto adjust position of the screen (in VGA mode)

COLOR TEMPERATURE

Select color temperature of the screen

SCAN MODE

Select the scan mode of the screen

VOL- / VOL+

Increase / Decrease the volume level

MENU / EXIT

Activate and exit the OSD menu

STILL

Freeze the current image

KEY LOCK

Locking the button (Prevent operation)

S. SET

Select between main and PIP audio input

PIP

Activates PIP/PBP mode

P. INPUT

Select an input source for PIP mode

P. LOCATION

Select a location for PIP mode

P. SIZE

Select a size for PIP mode

P. SWAP

Swap between main and PIP input 

POWER

MUTE

VIDEO1

VIDEO2

S-VIDEO

VGA

AUTO

COLOR TEMP

DVI

HDMI1

COMPONENT

HDMI2

S.SET

SCAN MODE

PIP

MENU/EXIT

P.INPUT

P.LOCATION

P.SWAP

STILL

P.SIZE

KEY LOCK

VOL-

VOL+

A

B

C

A

OSD CONTROL MENU

B

PIP CONTROL MENU

C

Содержание 21REDP

Страница 1: ...User s Guide All contents of this document may change without prior notice and actual product appearance may differ from that depicted herein PREMIUM WIDE ASPECT RATIO LED SERIES 18 23 inches http www...

Страница 2: ...ot follow this instruction it may cause the slight damage to the user or cause some damages to the monitor Warning Keep away the monitor from the direct sunlight and a heating appliance Never push obj...

Страница 3: ...he wall outlet and never touch it When smoking and noising from the monitor unplug the product from the wall outlet and contact a service center Unplug this product from the wall outlet when It does n...

Страница 4: ...the monitor and people The openings must not be blocked by curtain rug or other similar surface Before carrying the monitor tum it off and Unplug the signal cables and the power code From the wall out...

Страница 5: ...rees below eyes Too close installation may cause having weak sight Do not press the LCD panel with hands or the sharpened material hardly Do not use the chemical liquid for cleaning It may cause fadin...

Страница 6: ...rning the equipment off and on the user is encouraged to try to correct the interference by one or more of the following measures NOTE Reorient or relocate the receiving antenna Increase the separatio...

Страница 7: ...2 FCC STATEMENT 3 1 Parts 3 2 How to Install 32 7 TROUBLESHOOTING 6 LIMITED WARRANTY 8 3 INSTALLATION 5 1 Mode Setting 5 2 Menu Setting VIDEO S VIDEO COMPONENT Mode 5 3 Menu Setting VGA Mode 5 4 Menu...

Страница 8: ...8 Installation and User s Guide 3 INSTALLATION 3 1 Parts LCD Monitor VGA Cable Trigger Cable Power Cable Remote Controller Battery User Manual Adapter Adapter is attached to the back of product...

Страница 9: ...o adjustment of RGB source Decrease the level of volume and move the previous menu Increase the level of volume and select rhe OSD menu Turns the power ON or OFF There will be a few seconds delay befo...

Страница 10: ...al input looping out 8 COMPONENT 3 TRIGGER COMPONENT Y Pb Pr signal stereo audio input TRIGGER signal input 9 AUDIO VIDEO 2 4 HDMI Stereo audio input for VIDEO 2 HDMI signal 1 2 input 10 AUDIO VIDEO 1...

Страница 11: ...MODE Select the scan mode of the screen VOL VOL Increase Decrease the volume level MENU EXIT Activate and exit the OSD menu STILL Freeze the current image KEY LOCK Locking the button Prevent operation...

Страница 12: ...mode HDMI1 Select HDMI1 mode COMPONENT Select COMPONENT mode HDMI2 Select HDMI2 mode VIDEO1 VIDEO2 S VIDEO RGB PC DVI HDMI 1 HDMI 2 COMPONENT MOVE ENTER INPUT Use SOURCE button and then button to move...

Страница 13: ...of color SHARPNESS Adjust sharpness of screen COLOR TEMP Switch color temperature of screen PICTURE CONTRAST 60 BRIGHTNESS 50 COLOR 50 TINT 50 SHARPNESS 50 PEAKING CONTROL 50 COLOR TEMP MEDIUM RED 50...

Страница 14: ...EEN SETUP RGB SETUP SETUP CYCLE TRIGGER MODE SELECT 1080P Default setting is 50 and adjustable from range of 0 to 100 Default setting is MEDIUM and switch to WARM USER and COOL color temperature optio...

Страница 15: ...VER Press the MENU EXIT key to access menu 1 Use the arrow to highlight a selection 2 Press the SELECT to choose an item 3 4 Use the arrow to highlight a selection 5 Use the arrow to adjust the settin...

Страница 16: ...AGE Inputs can be set to VIDEO1 VIDEO2 S VIDEO RGB PC DVI HDMI1 HDMI2 and COMPONENT mode Default setting is ENGLISH and language setting can be set to ITALIAN FRENCH SPANISH and GERMAN SETUP INPUT LAN...

Страница 17: ...ND MUTE BUTTON LOCK NOISE REDUCTION OSD TIME PICTURE SCREEN SETUP RGB SETUP SETUP CYCLE TRIGGER DEFAULT LINE SHIFT ON ON OFF OFF ENGLISH VIDEO1 MOVE ADJUST ENTER MENU EXIT VER 15s SETUP INPUT LANGUAGE...

Страница 18: ...TUP SETUP CYCLE TRIGGER DEFAULT LINE SHIFT ON ON OFF OFF ENGLISH VIDEO1 MOVE ADJUST ENTER MENU EXIT VER 15s LINE SHIFT SETUP INPUT LANGUAGE SOUND MUTE BUTTON LOCK NOISE REDUCTION OSD TIME PICTURE SCRE...

Страница 19: ...EO RGB PC PICTURE SCREEN SETUP RGB SETUP SETUP CYCLE TRIGGER DVI HDMI 1 OFF HDMI 2 OFF COMPONENT OFF OFF OFF OFF OFF OFF OFF MOVE ADJUST ENTER MENU EXIT VER 10s CYCLE SETUP CYCLE TIME CYCLE VIDEO1 VID...

Страница 20: ...FF and switch to ON trigger mode TRIGGER DWELL Default setting is 10s and adjustable from range of 10 to 60s TRIGGER TRIGGER MODE TRIGGER INPUT TRIGGER DWELL PICTURE SCREEN SETUP RGB SETUP SETUP CYCLE...

Страница 21: ...itch color temperature of screen PICTURE CONTRAST 60 BRIGHTNESS 50 COLOR 50 TINT 50 SHARPNESS 50 PEAKING CONTROL 50 COLOR TEMP MEDIUM RED 50 GREEN 50 BLUE MOVE ADJUST ENTER MENU EXIT VER 50 PICTURE SC...

Страница 22: ...0 BLUE MOVE ADJUST ENTER MENU EXIT VER 50 PICTURE SCREEN SETUP RGB SETUP SETUP CYCLE TRIGGER MODE SELECT 1080P SCREEN PIP Activates PIP PBP mode SCREEN SCAN MODE PIP PIP INPUT PIP SWAP PIP SIZE PIP R...

Страница 23: ...PIP mode VIDEO1 VIDEO2 S VIDEO PIP SWAP Swap between main and PIP input PIP SIZE Select a size for PIP mode SMALL NORMAL LARGE PIP R T Select a location for PIP mode R B L B SETUP Press the MENU EXIT...

Страница 24: ...O REPEAT OFF OFF MOVE ADJUST ENTER MENU EXIT VER 100 0 0 0 H POSITION Adjust horizontal position of monitor V POSITION Adjust vertical position of monitor CLOCK Adjust clock of monitor PHASE Adjust ph...

Страница 25: ...P H POSITION V POSITION CLOCK PHASE AUTO ADJUST POWER SAVING PICTURE SCREEN SETUP RGB SETUP SETUP CYCLE TRIGGER AUTO REPEAT OFF OFF MOVE ADJUST ENTER MENU EXIT VER 100 0 0 0 RGB SETUP H POSITION V POS...

Страница 26: ...VER 10s CYCLE SETUP Press the MENU EXIT key to access menu 1 Use the arrow to highlight a selection 2 Press the SELECT to choose an item 3 4 Use the arrow to highlight a selection 5 Use the arrow to...

Страница 27: ...only to 21 23 inches 1600X1200 60 HD 1920X1080 60 VGA DVI Mode RESOLUTION VERTICAL FREQUENCY Hz MODE 720X480 30 720X576 25 SDTV 480p EDTV 480i EDTV 576i 720X480 60 SDTV 576p 720X576 60 HDTV 720p 1280X...

Страница 28: ...r SHARPNESS Adjust sharpness of screen COLOR TEMP Switch color temperature of screen PICTURE CONTRAST 60 BRIGHTNESS 50 COLOR 50 TINT 50 SHARPNESS 50 PEAKING CONTROL 50 COLOR TEMP MEDIUM RED 50 GREEN 5...

Страница 29: ...BLUE MOVE ADJUST ENTER MENU EXIT VER 50 PICTURE SCREEN SETUP RGB SETUP SETUP CYCLE TRIGGER MODE SELECT 1080P Default setting is 50 and adjustable from range of 0 to 100 PEAKING CONTROL PICTURE CONTRAS...

Страница 30: ...selected item This function of each menu is listed page 16 Please refer to page 16 for SETUP menu SETUP Press the MENU EXIT key to access menu 1 Use the arrow to highlight a selection 2 Press the SELE...

Страница 31: ...VER 10s CYCLE SETUP Press the MENU EXIT key to access menu 1 Use the arrow to highlight a selection 2 Press the SELECT to choose an item 3 4 Use the arrow to highlight a selection 5 Use the arrow to...

Страница 32: ...lay Dual Composite Display Dual Composite Display Filter Type 3D Comb Filter 3D Comb Filter 3D Comb Filter Deinterlacing Y Y Y Trigger Source Switching Y NO NC Y NO NC Y NO NC Noise reduction Y Y Y Au...

Страница 33: ...llation that results in damage to mounts adapters display equipment or personal injury In the event of missing and or damage equipment or technical questions the following information can help in the...

Страница 34: ...signal right for the connected port Control the BRIGHTNESS The screen doesn t show up When the following troubles are occurred follow the trouble shooting Before contacting a service center The screen...

Страница 35: ...35 Installation and User s Guide MEMO...

Страница 36: ......

Отзывы: