background image

7

400mm

= 40x

10mm

Your telescope comes with two eyepieces: one with 20mm 
focal length for low power, wide field viewing, and the other 
with 10mm focal length for higher-power observation. Other 
eyepieces can be used to achieve higher or lower powers. It is 
quite common for an observer to own five or more eyepieces 
to access a wide range of magnifications. 
We recommend starting a viewing session by inserting your 
lowest-power (longest focal length) eyepiece to locate and 

center the target object. Low magnification yields a wide field 
of view, which shows a larger area of sky in the eyepiece. This 
makes finding and centering an object much easier. Trying to 
find and center objects with a high power (narrow field of view) 
eyepiece is like trying to find a needle in a haystack! Once 
you’ve centered the object in the eyepiece, you can switch to 
a higher magnification (shorter focal length) eyepiece, if you 
wish. This is recommended for small and bright objects, like 
planets and double stars. The Moon also takes higher mag-
nifications well. The best rule of thumb with eyepiece selec-
tion is to start with a low power, wide-field eyepiece, and then 
work your way up in magnification. If the object looks better, 
try an even higher magnification eyepiece. If the object looks 
worse, then back off the magnification a little by using a lower-
power eyepiece.

Magnification Limits 

Every telescope has a useful magnification limit of about 2x 
per millimeter of aperture. This translates to a limit of 200x for 
the SkyScanner 100 Reflector, and 180x for the StarMax 90 
Mak-Cass. Some telescope manufacturers will use mislead-
ing claims of ultra-high magnifications: “See distant galaxies 
at 640X!” While such magnifications are technically possible, 
the actual image at that magnification would be a dim, indis-
tinct blur. Low and moderate magnifications are what give the 
best views. A small, but bright and crisply detailed image is 
always better than a dim, blurry, over-magnified one.

Altitude and Azimuth (Aiming the Telescope) 

Your TableTop telescope’s base permits motion along two 
axes: altitude (up/down) and azimuth (left/right) (

Figure 3

). 

Both motions can be made simultaneously and in a continu-
ous manner for easy aiming. This way you can point to any 
position in the night sky, from horizon to horizon. 
Both the altitude and azimuth axes have adjustable tension. 
You want sufficient friction of motion to keep the telescope 
from rotating too freely in each axis, which can make it dif-
ficult to land on and stay aimed at an object you wish to view. 
However, if you apply too much tension the telescope will be 
difficult to move smoothly and in small increments needed to 

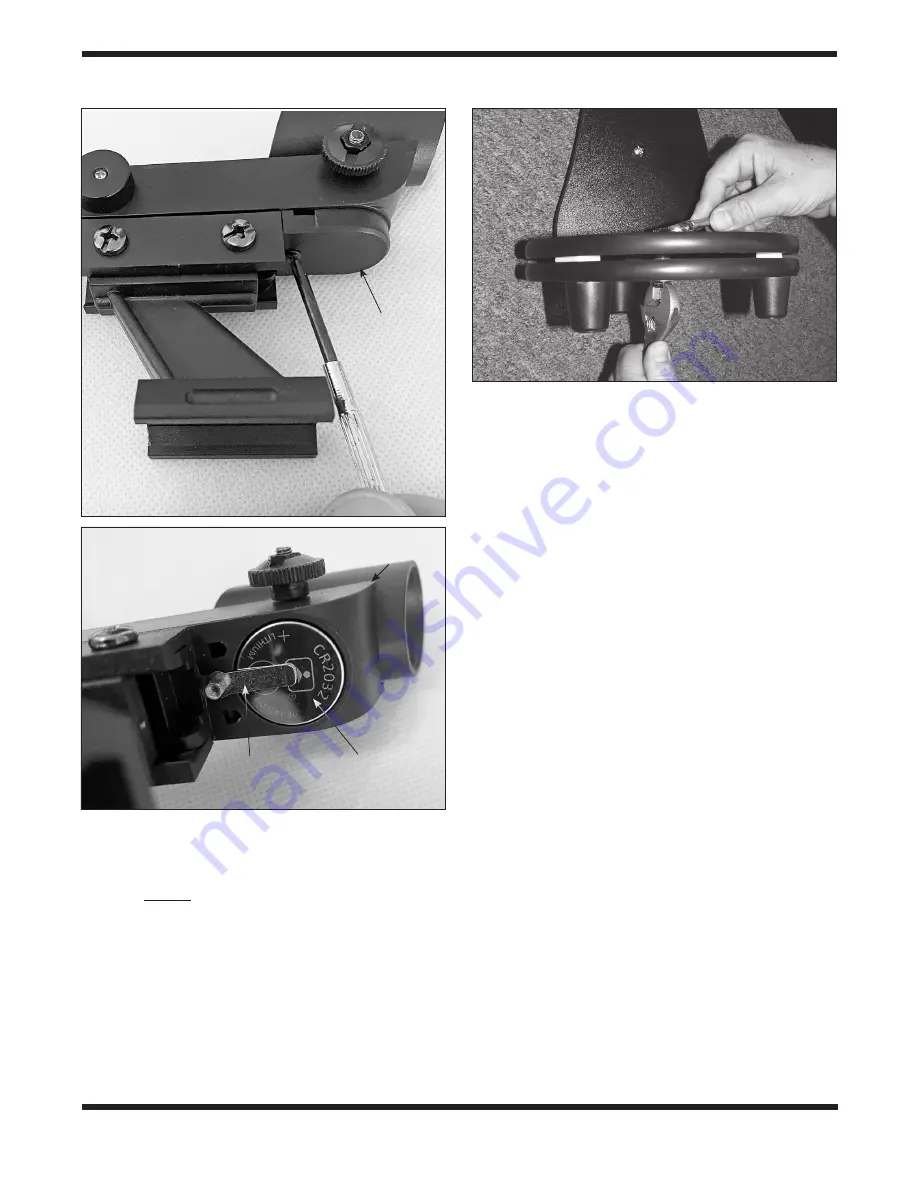
Figure 10. 

To replace the EZ Finder II’s CR2032 3V lithium 

battery, 

A

) first remove the small Phillips screw to unlock the battery 

cover,

 B)

 remove the old battery and replace it with the positive (+) 

side facing the retaining clip.

Retaining clip

Battery

Battery cover

Figure 11. 

Making optional adjustments to the azimuth tension.

A

B

Содержание 10012 SkyScanner

Страница 1: ...A N Y Español Francais Deutsche uPour obtenir le manuel d utilisation complet veuillez vous rendre sur le site Web OrionTele scopes eu fr et saisir la référence du produit dans la barre de recherche vCliquez ensuite sur le lien du manuel d utilisation du produit sur la page de description du produit uWenn Sie das vollständige Handbuch einsehen möchten wechseln Sie zu OrionTelescopes de und geben S...

Страница 2: ...nder II reflex sight the eyepiece and in the case of the StarMax 90 the diagonal These compact telescopes are designed for grab and go portability Whether you set yours on a pic nic table the hood of your car or on an optional tripod for your viewing session we re sure you and your family and friends will love scanning the night sky for its many hidden treasures The following instructions will hel...

Страница 3: ...lescope it is suggested that you save the internal packaging In the unlikely event the product needs to be returned the shipping materials can be reused to ensure it arrives safely at its destination Make sure all the parts listed in the Parts List and shown in Figures 1 and 2 are present Figure 2 Components of the StarMax 90 TableTop Mak Cass telescope EZ Finder II Moon filter 20mm eyepiece 10mm ...

Страница 4: ...t the star diagonal into the visual back adapter The diagonal deflects the light exiting the telescope by 90 degrees providing a more convenient angle for viewing through the eyepiece Once the diagonal is secured in the visual back adapter with the two thumbscrews insert an eyepiece into the diagonal and secure it with the thumbscrew on the diagonal Figure 5B Tabletop or Optional Tripod One of the...

Страница 5: ...nder scope you must remove the small tab sticking out from the battery compartment Doing so will allow the pre installed 3V CR 2032 button cell battery to make contact with the finder scope s electronic circuitry to power the finder s red LED illuminator The tab can then be discarded Turn the power knob clockwise until you hear the click indicating that power has been turned on Look through the ba...

Страница 6: ...ntil it clicks off Replacing the Battery Replacement 3 volt lithium CR 2032 batteries are available from many retail outlets To replace the dead battery use a small Phillips head screwdriver to remove the battery cover Figure 10A Then carefully pull back on the retaining clip and shake out the old battery Do not over bend the retaining clip Then slide the new battery under the retaining clip with ...

Страница 7: ... a useful magnification limit of about 2x per millimeter of aperture This translates to a limit of 200x for the SkyScanner 100 Reflector and 180x for the StarMax 90 Mak Cass Some telescope manufacturers will use mislead ing claims of ultra high magnifications See distant galaxies at 640X While such magnifications are technically possible the actual image at that magnification would be a dim indis ...

Страница 8: ...ediately see faint nebulas gal axies and star clusters or even very many stars for that mat ter Your eyes take about 30 minutes to reach perhaps 80 of their full dark adapted sensitivity As your eyes become dark adapted more stars will glimmer into view and you ll be able to see fainter details in objects you view in your telescope To see what you re doing in the darkness use a red filtered flashl...

Страница 9: ...et Figure 13 MoonMap 260 With locations and names of over 260 features on the Moon such as craters mountains valleys seas and more the Orion MoonMap 260 is a great tool for beginning astronomers This detailed map will even show you where various space craft have landed on the Moon s surface The whole family will enjoy looking at the Moon with the telescope then using the MoonMap 260 to learn the n...

Страница 10: ...he most luminous object in the sky excluding the Sun and the Moon It is so bright that sometimes it is visible to the naked eye during full daylight Ironically Venus appears as a thin crescent not a full disk when at its peak brightness Because it is so close to the Sun it never wanders too far from the morning or evening horizon No surface markings can be seen on Venus which is always shrouded in...

Страница 11: ... Vixen style dovetail with clamp knob Optical tube mounting adapter Vixen style dovetail bar two 20 threaded holes on bottom Eyepieces 20mm 4 element Bertele design 1 25 multi coated 10mm 4 element Bertele design 1 25 multi coated Magnification with supplied eyepieces 62 5x 20mm and 125x 10mm Diagonal Mirror star diagonal 90 1 25 Finder scope EZ Finder II Reflex Sight 3V lithium ion battery includ...

Страница 12: ...nting saddle Vixen style dovetail with clamp knob Optical tube mounting adapter Vixen style dovetail bar two 20 threaded holes on bottom Eyepieces 20mm 4 element Bertele design 1 25 multi coated 10mm 4 element Bertele design 1 25 multi coated Magnification with supplied eyepieces 20x 20mm and 40x 10mm Finder scope EZ Finder II Reflex Sight 3V lithium ion battery included Moon filter Neutral densit...

Страница 13: ...ack Is the primary mir ror reflection more centered in the secondary mirror now You may need to loosen a different screw then tighten the other two to better center the primary mirror in the secondary It s a matter of trial and error The goal is to center the primary mirror reflection in the secondary mirror as in Figure 14A by adjusting these three screws in this fashion Do not adjust the center ...

Страница 14: ...er 100 Reflector s primary mirror very often if ever and you will never need to clean the primary mirror of the StarMax 90 Mak Cass since it is inside a closed tube Covering the telescope with the dust cap when it is not in use will help prevent dust from accumu lating on the mirrors When bringing the telescope inside after an evening s viewing it is normal for moisture to accumulate on the mirror...

Страница 15: ...cap there is no reason to remove the inner cap This is an older cap design that was intended to allow removal of the inner cap to produce a smaller aper ture which would cut down on brightness when observing the Moon for example But using a Moon filter such as the one included with your telescope is a much more effective means of reducing lunar brightness The inner cap is not intended to be remove...

Страница 16: ...he original retail purchaser only During this war ranty period Orion Telescopes Binoculars will repair or replace at Orion s option any warranted instru ment that proves to be defective provided it is returned postage paid Proof of purchase such as a copy of the original receipt is required This warranty is only valid in the country of purchase This warranty does not apply if in Orion s judgment t...

Отзывы: