4
5
•
Internet connection required
to display on-line help and
downloading image processing
software
•
USB 1.0 or High Speed USB 2.0
port
Software and Driver
Installation
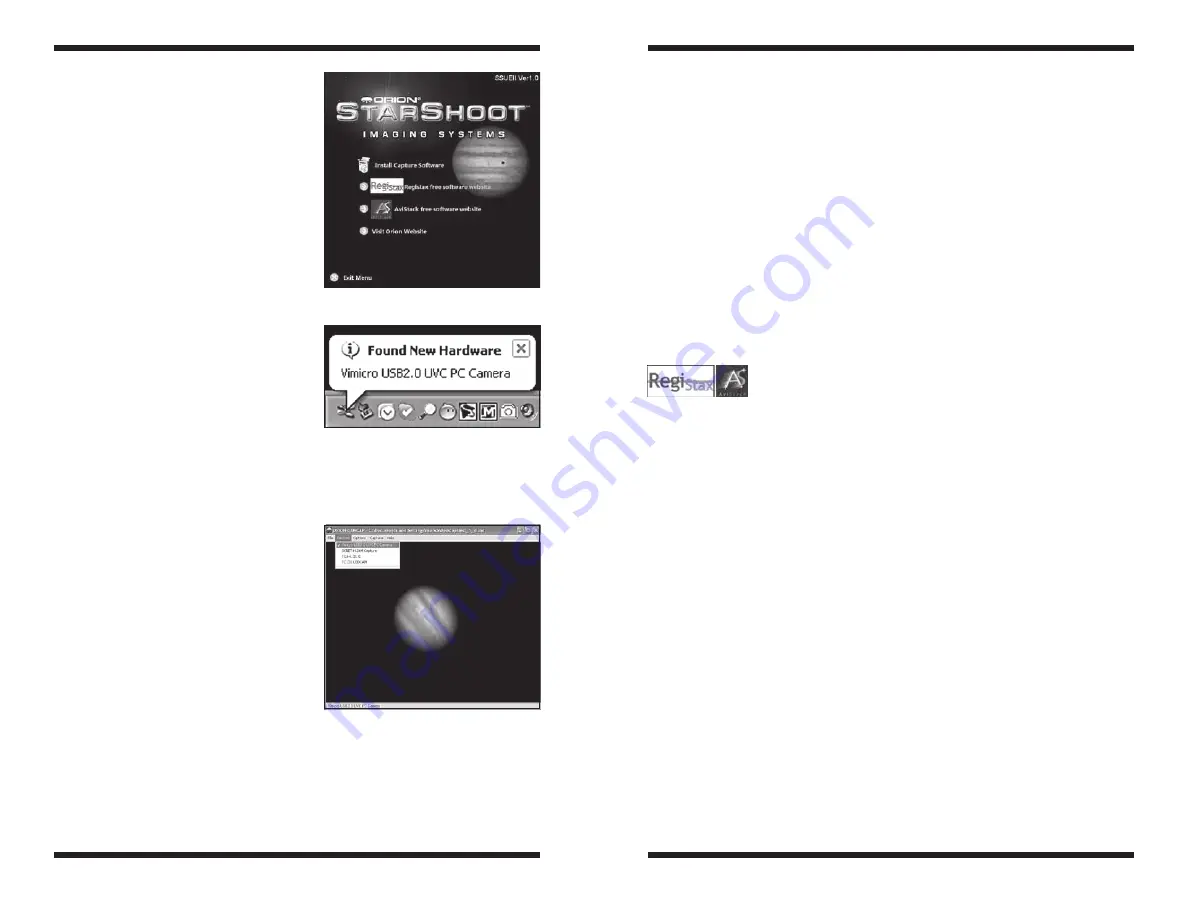
Before the camera can be used, image
capture software must be installed onto
your computer. Turn on your computer
and allow the Windows operating
system to load as normal. Insert the
included CD-ROM into your computer’s
CD-ROM drive, and the Launcher will
appear (
Figure 2
). This allows you to
install the Orion image capture software
(Orion AmCap),.
Capture Software Installation
1. Click
Install Capture Software.
2. The
Orion AmCap Setup Wizard
appears. Click
Next
.
3. Select a destination folder and Click
Next
.
4. Click
Next
again to start the instal-
lation.
5. When the wizard is complete, click
close
. This has installed the capture
software.
6. When installation is complete click
the
Finish
button.
7. Plug in the camera into your
computer’s USB port. A
Found
New Hardware
notification will
appear in your Windows task bar
(
Figure 3
).
8. Wait a few moments and the camera will automatically install on your
computer. When
Device Installed Successfully
notification appears
you will be ready to use the camera.
9. Open Orion AmCap from the icon on your desktop. The
Live Video
Window
should appear (
Figure 4
). The software will recognize many
cameras so check that Vimicro USB2.0 UVC
PC Camera
is selected
from the device menu.
Image Processing Software
Website links are provided in the launcher to download popular free image
processing software to be used with your AVI files to enhance your astro
images.
Image Processing Software such as RegiStax or AviStack; can Align and
Stack(combine) hundreds of individual images into a single resultant image
and perform some additional image processing to bring out subtle details or
to make the image appear more pleasing overall (
Figure 11
).
Both software applications are a recommended addition to any astro-imagers
arsenal of image processing software.
Image Processing Software Installation
Return the launcher and select RegiStax or AviStack to be directed to a
website to download the latest software.
For detailed information on the image processing software consult the
websites of each software Provider. Tutorials and user groups can be found
online also.
Getting Started During Daylight
We recommend using the SSUEII for the first time during the day. This way,
you can become familiar with the camera and its functions without having to
stumble around in the dark. Set up your telescope and mount so the optical
tube is pointing at an object at least a couple of hundred feet away. Insert an
eyepiece and focus as you normally would.
To obtain first images with the SSUEII, follow these step-by-step instructions:
1. Plug the camera into your computer’s USB port.
2. Double click the Orion AmCap icon now installed on your computer’s
desktop.
3. Orion AmCap will automatically connect directly to your camera with a
Live Video
Window
. Your
Live Video
Window
will only show light and
dark before the camera is coupled to your telescope.
4. The native resolution of the camera sensor is 640x480 and can be set
from the options menu. To change to resolution select Video Capture Pin
Figure 3.
When initially connecting
the SSUEII to a computer, a Found
New Hardware notification will appear
and automatically install the camera to
your computer.
Figure 4.
The live video window.
Figure 2.
The launcher provides an
easy menu for software installation.


