background image

5

onto the bracket. Retighten the thumbscrews to secure
the EZ Finder II in place.

12. Insert the 25mm Explorer II eyepiece into the focuser

drawtube and secure it in place with the thumbscrews.

4. Getting Started

Balancing the Telescope

To insure smooth movement of the telescope on both axes of
the equatorial mount, it is imperative that the optical tube be
properly balanced. We will first balance the telescope with
respect to the R.A. axis, then the Dec. axis.

1. Keeping one hand on the telescope optical tube, loosen

the R.A. lock knob. Make sure the Dec. lock knob is
locked, for now. The telescope should now be able to
rotate freely about the R.A. axis. Rotate it until the coun-
terweight shaft is parallel to the ground (i.e., horizontal).

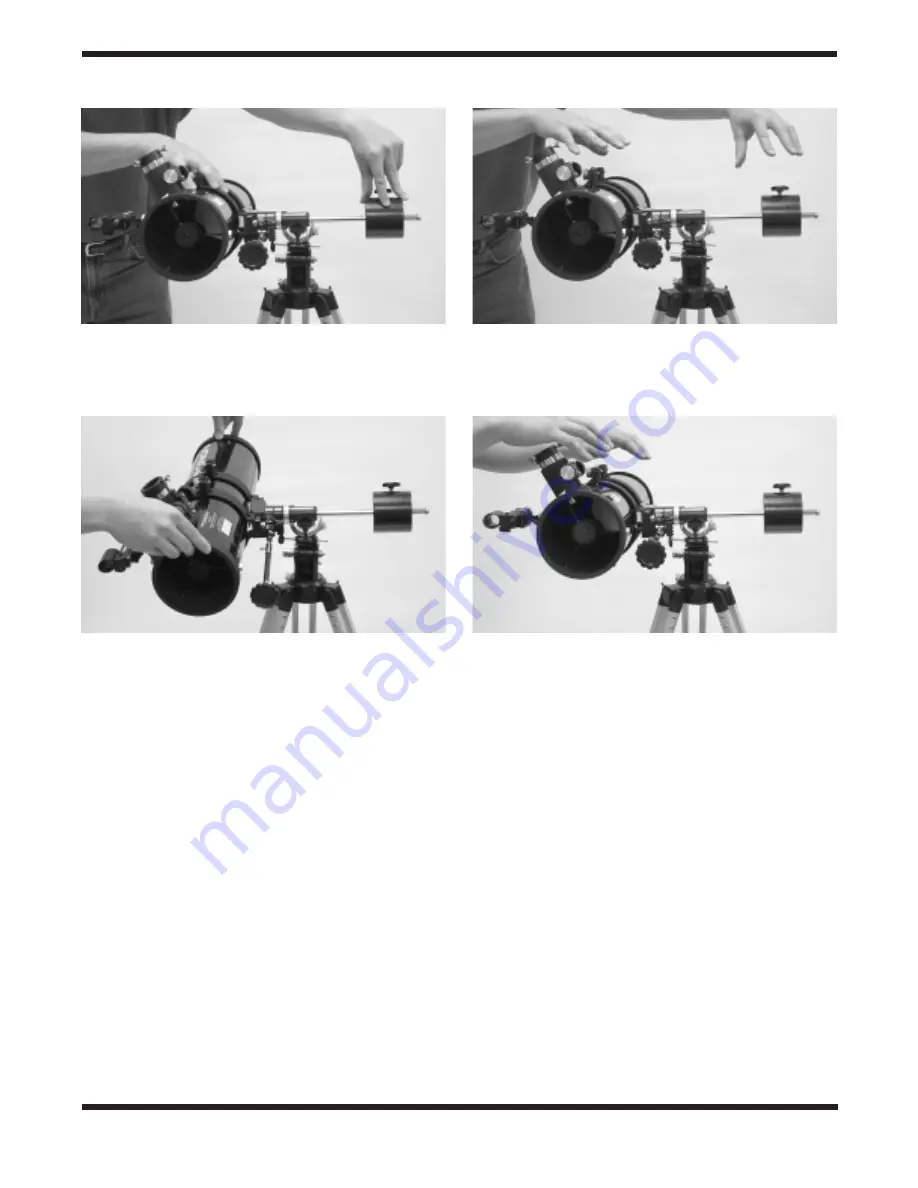
2. Now loosen the counterweight lock knob and slide the

weight along the shaft until it exactly counterbalances the
telescope (Figure 3a). That’s the point at which the shaft

remains horizontal even when you let go of the telescope
with both hands (Figure 3b).

3. Retighten the counterweight lock knob. The telescope is

now balanced on the R.A. axis.

4. To balance the telescope on the Dec. axis, first tighten

the R.A. lock knob, with the counterweight shaft still in the
horizontal position.

5. With one hand on the telescope optical tube, loosen the

Dec. lock knob. The telescope should now be able to
rotate freely about the Dec. axis. Loosen the tube ring
clamps a few turns, until you can slide the telescope tube
forward and back inside the rings (this can be aided by
using a slight twisting motion on the optical tube while
you push or pull on it) (Figure 3c).

6. Position the telescope so it remains horizontal when you

carefully let go with both hands. This is the balance point
(Figure 3d). Before clamping the rings tight again, rotate
the telescope so the eyepiece is at a convenient angle for
viewing. When you are actually observing with the tele-

Figure 3a. 

Proper orientation of the equatorial mount requires

that the telescope tube be balanced on both the R.A. and Dec.
axes. With the R.A. lock knob released, slide the counterweight
along the counterweight shaft until it just counterbalances the tube.

Figure 3b. 

When you let go with both hands, the tube should not

drift up or down.

Figure 3c. 

With the Dec. lock knob released, loosen the tube

ring lock clamps a few turns and slide the telescope forward or back
in the tube rings.

Figure 3d. 

When the tube is balanced about the Dec. axis, it will

not move when you let go.

Содержание ShortTube 4.5 EQ 9849

Страница 1: ...l Consumer Optical Products Since 1975 Customer Support 800 676 1343 E mail support telescope com Corporate Offices 831 763 7000 P O Box 1815 Santa Cruz CA 95061 INSTRUCTION MANUAL Orion ShortTube 4 5 EQ 9849 Equatorial Reflecting Telescope ...

Страница 2: ...g circle Right ascension slow motion control cable Latitude adjustment T bolt Tripod leg Leg lock knob Declination slow motion control cable Declination lock knob Declination setting circle Counterweight shaft Counterweight Counterweight lock knob Latitude lock T bolt not shown Azimuth lock knob Accessory tray bracket Accessory tray Tripod leg ...

Страница 3: ...ews should be tightened securely to eliminate flexing and wobbling but be careful not to over tighten or the threads may strip Refer to Figures 1 and 2 during the assembly process During assembly and anytime for that matter Do not touch the surfaces of the telescope mirrors or the lenses of the EZ Finder II or eyepieces with your fingers The optical surfaces have delicate coatings on them that can...

Страница 4: ...d the counterweight shaft into the equatorial mount at the base of the declination axis until tight 7 Remove the screw and washer on the bottom of the counterweight shaft and slide the counterweight onto the shaft Make sure the counterweight lock knob is ade quately loosened to allow the counterweight shaft to pass through the hole Position the counterweight about halfway up the shaft and tighten ...

Страница 5: ...s first tighten the R A lock knob with the counterweight shaft still in the horizontal position 5 With one hand on the telescope optical tube loosen the Dec lock knob The telescope should now be able to rotate freely about the Dec axis Loosen the tube ring clamps a few turns until you can slide the telescope tube forward and back inside the rings this can be aided by using a slight twisting motion...

Страница 6: ...your finger It s a non magnifying aiming device that superimposes a tiny red dot on the sky showing exactly where the telescope is pointed The EZ Finder II works by projecting a tiny red dot it s not a laser beam onto a lens mounted in the front of the unit When you look through the EZ Finder II the red dot will appear to float in space helping you locate even the faintest of deep space objects Th...

Страница 7: ...aligned with the Earth s rotational polar axis a process called polar alignment Polar Alignment For Northern Hemisphere observers approximate polar alignment is achieved by pointing the mount s R A axis at the North Star or Polaris It lies within 1 of the north celes tial pole NCP which is an extension of the Earth s rotation al axis out into space Stars in the Northern Hemisphere appear to revolv...

Страница 8: ...d just turn the R A slow motion control cable clockwise The Dec slow motion control cable is not needed for tracking Objects will appear to move faster at higher magnifications because the field of view is narrower Optional Electronic Drives for Automatic Tracking An optional DC electronic drive can be mounted on the R A axis of the equatorial mount to provide hands free tracking Objects will then...

Страница 9: ...telescope on the R A axis until the counter weight shaft is horizontal parallel to the ground Then loosen the Dec lock knob and rotate the telescope until it is pointing straight overhead The counterweight shaft is still horizontal Then retighten both lock knobs Similarly to point the telescope directly south the counter weight shaft should again be horizontal Then you simply rotate the scope on t...

Страница 10: ...en the three small alignment setscrews in the cen ter hub of the 3 vaned spider several turns Now hold the mir ror holder stationary be careful not to touch the surface of the mirrors while turning the center screw with a Phillips head screw driver Figure 9 Turning the screw clockwise will move the secondary mirror toward the front opening of the optical tube while turning the screw counter clockw...

Страница 11: ...e very center of the out of focus circle like the hole in a donut If the hole appears off center the telescope is out of collimation If you try the star test and the bright star you have selected is not accurately centered in the eyepiece the optics will always appear out of collimation even though they may be perfectly aligned It is critical to keep the star centered so over time you will need to...

Страница 12: ... dark adapted sensitivity As your eyes become dark adapted more stars will glimmer into view and you ll be able to see fainter details in objects you view in your telescope To see what you re doing in the darkness use a red filtered flashlight rather than a white light Red light does not spoil your eyes dark adaptation like white light does A flashlight with a red LED light is ideal or you can cov...

Страница 13: ...omfort and also helps to bring out subtle features on the lunar surface B The Sun You can change your nighttime telescope into a daytime Sun viewer by installing an optional full aperture solar filter over the front opening of the ShortTube 4 5 EQ The primary attraction is sunspots which change shape appearance and location daily Sunspots are directly related to magnetic activity in the Sun Many o...

Страница 14: ...f paint have virtually no effect on the visual performance of the telescope The large primary mirror and the elliptical secondary mirror of your telescope are front surface aluminized and over coated with hard silicon dioxide which prevents the aluminum from oxidizing These coatings normally last through many years of use before requiring re coating which is easily done To clean the secondary mirr...

Страница 15: ...15 ...

Страница 16: ...warranted instrument that proves to be defective provided it is returned postage paid to Orion Warranty Repair 89 Hangar Way Watsonville CA 95076 If the product is not registered proof of purchase such as a copy of the original invoice is required This warranty does not apply if in Orion s judgment the instrument has been abused mishan dled or modified nor does it apply to normal wear and tear Thi...

Отзывы: