ORION TELESCOPES & BINOCULARS AstroView 6 EQ 9827 Скачать руководство пользователя страница 4

4

screws up through the holes in the bracket, then thread them
into the holes in the tray.

5. Next, tighten the wingnuts at the top of the tripod legs, so
the legs are securely fastened to the equatorial mount. Use
the larger wrench and your fingers to do this.

6. Orient the equatorial mount as it appears in Figure 1, at a
latitude of about 40°, i.e., so the pointer next to the latitude
scale is pointing to the line at “40”. To do this, loosen one of
the latitude adjustment T-bolts and then tighten the other lati-
tude adjustment T-bolt until the pointer and the “40” line up.
The declination (Dec.) and right ascension (R.A.) axes many
need re-positioning (rotation) as well. Be sure to loosen the
RA and Dec. lock levers before doing this. Retighten them
once the equatorial mount is properly oriented.

7. Thread the counterweight shaft into the equatorial mount at
the base of the declination axis until tight. Make sure the cast-
ing at the top of the bar is threaded clockwise as far as it will
go before attaching the shaft.

8. Remove the knurled “toe saver” retaining screw on the bot-
tom of the counterweight shaft and slide both counterweights
onto the shaft. Make sure the counterweight lock knobs are
adequately loosened so the metal pin inside the counter-
weight is recessed enough to allow the counterweight shaft to
pass through the hole. Position the counterweights about
halfway up the shaft and tighten the lock knobs. Replace the
toe saver on the end of the bar. The toe saver prevents the
counterweights from falling on your foot if the lock knobs hap-
pen to come loose.

9. Attach the two tube rings to the equatorial head using the
hex head screws that come installed in the rings. Remove the
screws, then push them, with the washers still attached, up
through the holes in the top of the equatorial mount and
rethread them into the bottom of the tube rings. Tighten the
screws securely with the smaller wrench. Open the tube rings
by loosening the knurled ring clamps.

10. Lay the telescope optical tube in the tube rings at about
the midpoint of the tube’s length. Rotate the tube in the rings
until the focuser is at a convenient level for you to view. Close
the rings over the tube and tighten the knurled ring clamps fin-
ger-tight to secure the telescope in position.

11. Now attach the two slow-motion control cables to the R.A.
and Dec. worm gear shafts of the equatorial mount by posi-
tioning the small screw on the end of the cable over the
indented slot on the worm gear shaft. Then tighten the screw.
Use the short slow-motion control for the R.A. axis, it will stick
out sideways from the mount. The longer slow-motion control
is for the Dec. axis; attach it to the Dec. worm gear shaft so
that it extends toward the front of the optical tube as shown in
Figure 1.

12. Install the polar axis finder scope into its housing inside the
R.A. axis of the equatorial mount. First loosen the three
thumbscrews on the housing, which is located at the rear of
the R.A. axis (see Figures 5 and 8). Insert the front end of the
polar finder (the end without the eyeguard) into the housing so
only about 1" of the polar finder extends from the back of the
housing. Do this slowly and with a twisting motion to prevent

the internal O-ring from becoming unseated. If it does become
unseated, you can remove the entire housing from the mount
to locate the O-ring and reseat it. This is done by rotating the
entire housing counterclockwise. Once the polar axis finder
scope is in the housing, tighten the three thumbscrews. These
thumbscrews will be used later to align the finder with the
mount’s R.A. axis.

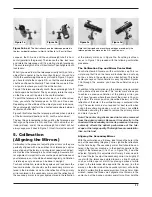
Installing the Finder Scope

To place the finder scope in the finder scope bracket, first
unthread the two black nylon screws until the screw ends are
flush with the inside diameter of the bracket. Place the O-ring
that comes on the base of the bracket over the body of the
finder scope until it seats into the slot on the middle of the
finder scope. Slide the eyepiece end (narrow end) of the finder
scope into the end of the bracket’s cylinder that does not have
the adjustment screws while pulling the chrome, spring-loaded
tensioner on the bracket with your fingers (Figure 2b). Push
the finder scope through the bracket until the O-ring seats just
inside the front opening of the bracket cylinder. Now, release
the tensioner and tighten the two black nylon screws a couple

Finder scope

Finder scope
bracket

Nylon 
thumbscrews

Focusing lock ring

Figure 2b:

Pull back on the
tensioner and slide
the finder scope
into its bracket until
the O-ring is
seated in the
bracket ring

Figure 2a:

The 6x26 Correct-Image finder scope

Tensioner

Содержание AstroView 6 EQ 9827

Страница 1: ...Providing Exceptional Consumer Optical Products Since 1975 Customer Support 800 676 1343 E mail support telescope com Corporate Offices 831 763 7000 P O Box 1815 Santa Cruz CA 95061 Orion AstroView 6 EQ 9827 Equatorial Reflecting Telescope ...

Страница 2: ...Small counterweight Toe Saver Counterweight lock knobs Tripod leg Accessory tray bracket Accessory tray Finder scope Finder scope bracket Eyepiece Focus knob Tube rings Optical tube Right ascension slow motion control Right ascension lock lever Polar axis finder covered Latitude scale Latitude adjustment T bolts Leg lock knob ...

Страница 3: ...s the lenses of the finder scope or eyepieces with your fingers The optical sur faces have delicate coatings on them that can easily be dam aged if touched inappropriately 1 Lay the equatorial mount on its side Attach the tripod legs one at a time to the mount using the leg attachment screws Line up the holes in the top of the leg with the holes in the base of the mount and insert the screw so it ...

Страница 4: ...ring clamps fin ger tight to secure the telescope in position 11 Now attach the two slow motion control cables to the R A and Dec worm gear shafts of the equatorial mount by posi tioning the small screw on the end of the cable over the indented slot on the worm gear shaft Then tighten the screw Use the short slow motion control for the R A axis it will stick out sideways from the mount The longer ...

Страница 5: ...ope is now balanced on both axes Now when you loosen the lock lever on one or both axes and manually point the telescope it should move without resistance and should not drift from where you point it 3 Using Your Telescope Focusing the Telescope You should now try to familiarize yourself with focusing the tel escope First insert the 25mm eyepiece in the focuser and point the telescope in the gener...

Страница 6: ...hrough the finder scope the images appear somewhat out of focus you will need to refocus the finder scope for your eyes Loosen the lock ring located behind the objective lens cell on the body of the finder scope see Figure 2a Back the lock ring off by a few turns for now Refocus the finder scope on a distant object by threading the objective lens cell in or out of the finderscope body Precise focu...

Страница 7: ...l axis out into space Stars in the Northern Hemisphere appear to revolve around Polaris To find Polaris in the sky look north and locate the pattern of the Big Dipper Figure 6 The two stars at the end of the bowl of the Big Dipper point right to Polaris Observers in the Southern Hemisphere aren t so fortunate to have a bright star so near the south celestial pole SCP The star Sigma Octantis lies a...

Страница 8: ...d for accurate polar alignment once the finder is properly aligned Alignment of the polar finder is best done during the day before going out into the field at night Aligning the Polar Axis Finder Scope Aligning the polar axis finder scope so that it will accurately point at the true north pole is a two step procedure First the polar finder must be rotated in its housing so that the small circle i...

Страница 9: ...ian by the calculated amount If your local longitude has a value greater than the closest standard time meridian you are west of the standard time meridian by the calculated amount For example if you are in Las Vegas which has a longitude of 115 the closest stan dard time meridian is 120 The difference between these two numbers is 5 Since Las Vegas longitude value is less than the standard time me...

Страница 10: ...ting Circle 1 Identify a bright star in the sky near the celestial equator Dec 0 and look up its coordinates in a star atlas 2 Loosen the R A and Dec lock levers on the equatorial mount so the telescope optical tube can move freely 3 Point the telescope at the bright star whose coordinates you know Lock the R A and Dec lock levers Center the star in the telescope s field of view with the slow moti...

Страница 11: ...f cen ter as in Figure 10b proceed with the following collimation procedure The Collimation Cap and Mirror Center Mark Your AstroView 6 EQ comes with a collimation cap This is a simple cap that fits on the focuser drawtube like a dust cap but has a hole in the center and a silver bottom This helps center your eye so that collimation is easy to perform Figures 10b through 10e assume you have the co...

Страница 12: ...e primary mirror It will need adjustment if as in Figure 10d the secondary mirror is cen tered under the focuser and the reflection of the primary mir ror is centered in the secondary mirror but the small reflec tion of the secondary mirror with the dot of the collimation cap is off center The tilt of the primary mirror is adjusted with three spring loaded collimation thumbscrews on the back end o...

Страница 13: ...ion even though they may be perfectly aligned It is critical to keep the star centered so over time you will need to make slight corrections to the telescope s position in order to account for the sky s apparent motion 6 Astronomical Observing Site Selection Pick a location away from streetlights and bright yard light ing Avoid viewing over rooftops and chimneys as they often have warm air current...

Страница 14: ...k adaptation like white light does A flashlight with a red LED light is ideal or you can cover the front of a regular flashlight with red cellophane or paper Beware too that nearby porch and streetlights and automobile headlights will spoil your night vision Eyepiece Selection By using eyepieces of varying focal lengths it is possible to attain many magnifications with the AstroView 6 EQ The tele ...

Страница 15: ...itan VENUS At its brightest Venus is the most luminous object in the sky excluding the Sun and the Moon It is so bright that sometimes it is visible to the naked eye during full daylight Ironically Venus appears as a thin crescent not a full disk when at its peak brightness Because it is so close to the Sun it never wanders too far from the morning or evening horizon No surface markings can be see...

Страница 16: ...raphy can be success fully attempted with the AstroView 6 EQ Moon Photography This is perhaps the simplest form of astrophotography as no motor drive is required All that is needed is a T Ring for your specific camera model Attach the T ring to your camera body and then thread the T Ring on to the focuser drawtube Now you are ready to shoot Point the telescope toward the Moon and center it within ...

Страница 17: ... eyepiece you re ready to shoot Deep sky objects are quite faint and typically require expo sures on the order of 10 minutes To hold the camera s shutter open this long you will need a locking shutter release cable Set the camera s shutter to the B bulb setting Depress the locking shutter release cable and lock it You are now expos ing your first deep sky object While exposing through the camera l...

Страница 18: ...ow remove the mirror from the mirror cell Do not touch the surface of the mirror with your fingers Lift the mirror carefully by the edges Set the mirror in a clean soft towel Fill a clean sink free of abrasive cleanser with room temperature water a few drops of liquid dishwashing detergent and if possible a capfull of rubbing alcohol Submerge the mirror aluminized face up in the water and let it s...

Страница 19: ...19 ...

Страница 20: ...y Watsonville CA 95076 If the product is not registered proof of purchase such as a copy of the original invoice is required This warranty does not apply if in Orion s judgment the instrument has been abused mishan dled or modified nor does it apply to normal wear and tear This warranty gives you specific legal rights and you may also have other rights which vary from state to state For further wa...

Отзывы: