6
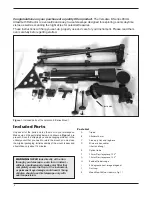
proper tension – not too tight and not too loose — you should
be able to move the instrument without having to adjust the ten-
sion knobs each time. The friction will be sufficient to allow the
instrument to move but also to stay put when you let go of it
to observe. To make finer directional adjustments to the instru-
ment, turn the hand knobs on the micro-motion cables.
The azimuth axis is rotatable 360 degrees and the altitude axis
has 180 degrees of motion.
Tripod Height Adjustment
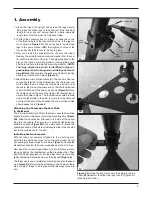
There is a leg extension segment on each tripod leg to allow
quick height adjustment. Simply loosen the winged leg lock
knobs half a turn or so, extend the leg to the desired length,
then retighten the winged knobs.
Tripod Feet
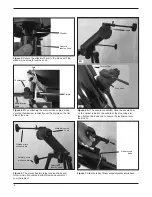
Note that at the bottom of each tripod leg is a rubber foot. If
desired, the foot can be retracted by rotating it clockwise to
expose a metal spike, when needed for extra grip on slippery
surfaces. If the spikes are not needed, rotate the rubber foot
counterclockwise until the spike is recessed in the foot and no
longer protruding.
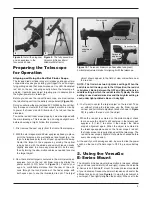
Accessory Tray
The triangular accessory tray acts as a tripod leg brace as well
as a storage rack for 1.25
"
telescope eyepieces or accessories.
The four holes in the tray accommodate the barrels of 1.25
"
accessories.
3. Astronomical Observing
For many, this will be your first foray into the exciting world of
amateur astronomy. The following information and observing
tips will help get you started.
Choosing an Observing Site
When selecting a location for observing, get as far away as
possible from direct artificial light such as street lights, porch
lights, and automobile headlights. The glare from these lights
will greatly impair your dark-adapted night vision. Set up on
a grass or dirt surface, not asphalt, because asphalt radiates
more heat. Heat disturbs the surrounding air and degrades the
images seen through the telescope. Avoid viewing over roof-
tops and chimneys, as they often have warm air currents rising
from them. Similarly, avoid observing from indoors through an
open (or closed) window, because the temperature difference
between the indoor and outdoor air will cause image blurring
and distortion.
If at all possible, escape the light-polluted city sky and head for
darker country skies. You’ll be amazed at how many more stars
and deep-sky objects are visible in a dark sky!
“Seeing” and Transparency
Atmospheric conditions vary significantly from night to night.
“Seeing” refers to the steadiness of the Earth’s atmosphere at
a given time. In conditions of poor seeing, atmospheric turbu-
lence causes objects viewed through the telescope to “boil.” If
you look up at the sky and stars are twinkling noticeably, the
seeing is poor and you will be limited to viewing at lower magni-
fications. At higher magnifications, images will not focus clearly.
Fine details on the planets and Moon will likely not be visible.
In conditions of good seeing, star twinkling is minimal and imag-
es appear steady in the eyepiece. Seeing is best overhead,
worst at the horizon. Also, seeing generally gets better after
midnight, when much of the heat absorbed by the Earth during
the day has radiated off into space.
Especially important for observing faint objects is good “trans-
parency”—air free of moisture, smoke, and dust. All tend to scat-
ter light, which reduces an object’s brightness. Transparency is
judged by the magnitude of the faintest stars you can see with
the unaided eye (5th or 6th magnitude is desirable).
Cooling the Telescope
All optical instruments need time to reach “thermal equilibri-
um.” The bigger the instrument and the larger the temperature
change, the more time is needed. Allow at least 30 minutes for
your telescope to acclimate to the temperature outdoors before
you start observing with it.
Let Your Eyes Dark-Adapt
Don’t expect to go from a lighted house into the darkness of the
outdoors at night and immediately see faint nebulas, galaxies,
and star clusters—or even very many stars, for that matter. Your
eyes take about 30 minutes to reach perhaps 80% of their full
dark-adapted sensitivity. As your eyes become dark-adapted,
more stars will glimmer into view and you’ll be able to see faint-
er details in objects you view in your telescope.
To see what you’re doing in the darkness, use a red-filtered
flashlight rather than a white light. Red light does not spoil your
eyes’ dark adaptation like white light does. A flashlight with a red
LED light is ideal. Beware, too, that nearby porch, streetlights,
and car headlights will ruin your night vision.
Eyepiece Selection
Magnification, or power, is determined by the focal length of
the telescope and the focal length of the eyepiece being used.
Therefore, by using eyepieces of different focal lengths, the
resultant magnification can be varied. It is quite common for
an observer to own five or more eyepieces to access a wide
range of magnifications. This allows the observer to choose
the best eyepiece to use depending on the object being viewed
and viewing conditions. Your VersaGo E-Series 90mm refractor
comes with 25mm and 10mm eyepieces, which will suffice nice-
ly to begin with. You can purchase additional eyepieces later if
you wish to have more magnification options.
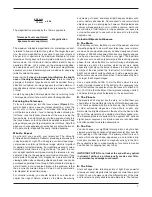
Magnification is calculated as follows:
For example, the VersaGo E-Series 90mm has a focal
length of 600mm, which when used with the supplied 25mm
eyepiece yields:
= 24x
600 mm
25 mm
Содержание 52590
Страница 9: ...9 This page left blank intentionally...
Страница 10: ...10 This page left blank intentionally...
Страница 11: ...11 This page left blank intentionally...


