ORION TELESCOPES & BINOCULARS 07942d Скачать руководство пользователя страница 5

5

to an Orion GoTo telescope mount. After turning on the power 
to the mount, an “Initialization” routine for the hand controller 
must be performed, followed by a GoTo “Alignment” routine, 
which precisely orients the mount with the coordinate grid of the 
sky. Only after the “Alignment” is done can the SynScan hand 
controller’s GoTo function be used to accurately pinpoint celes-
tial objects.
A flowchart of the “Full Feature” operation is shown here:

Initialization

Alignment

Observing or

other operations

Locate a celestial

object automatically

2. Easy Tracking Mode

The Easy Tracking mode is suitable for quick setup for visual 
observing of brighter celestial objects, such as planets, the 
Moon, or the Sun. If the user does not turn on the tracking func-
tion, the Easy Tracking mode can also be used for observing 
terrestrial objects.
In Easy Tracking mode, the hand controller must be connected 
to an Orion GoTo telescope mount. The mount must be set in a 
proper “Home Position” (refer to 

Section 2.1 

for details) before 

turning on the power. After turning on the power to the mount, 
you’ll complete an “Initialization” routine on the hand controller. 
Then you can choose to skip the “Alignment” routine and start 
the tracking function directly (refer to 

Section 5.4 

for selecting 

the tracking rate). Users will need to locate a celestial object in 
the sky, and then use the hand controller to manually point the 
telescope to the target. The object locating function may still be 
used but it will not yield a highly accurate result.
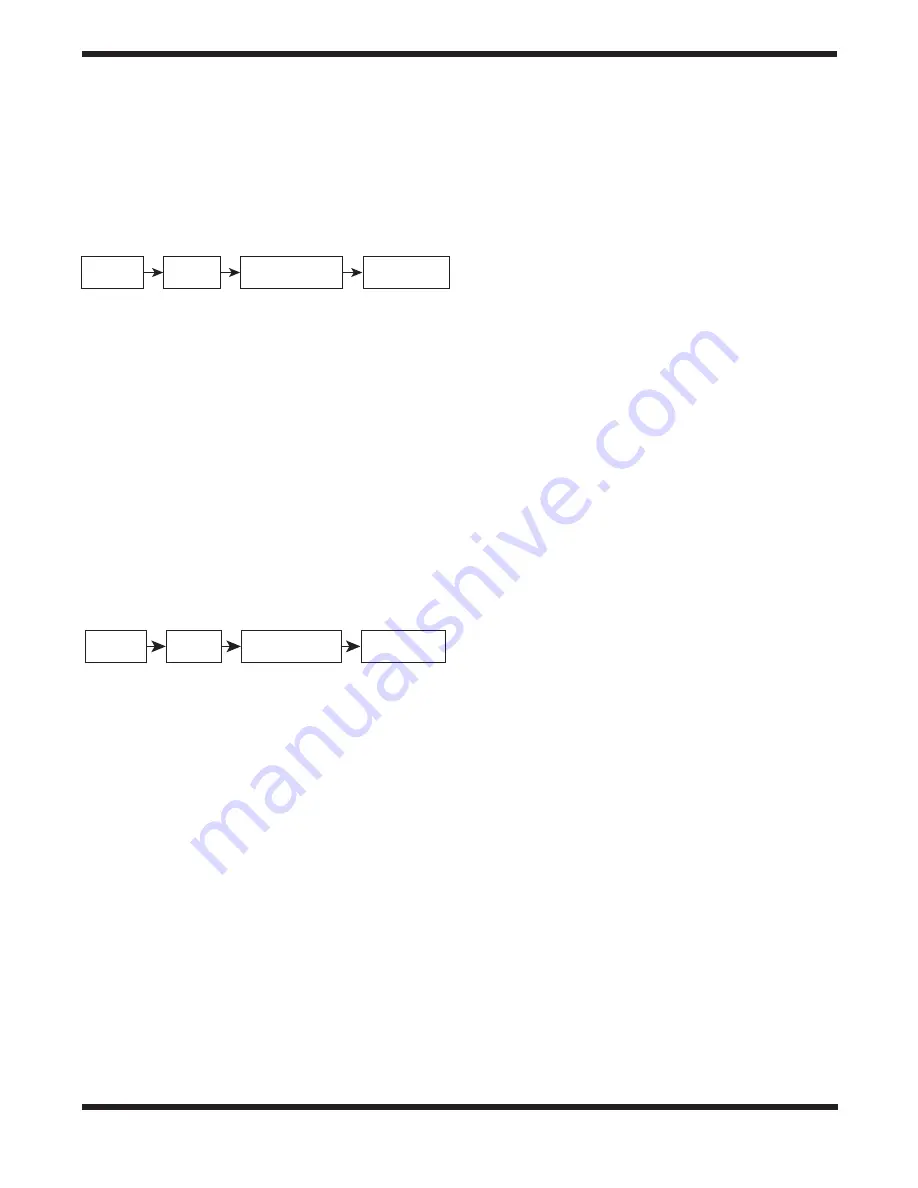
A flow chart of the “Easy Tracking” operation is shown here:

Initialization

Start

Tracking

Observing or

other operations

Locate a celestial

object automatically

2. Initialization

2.1 Setting the Mount’s Home Position

Before powering on the telescope mount, it should be set to the 
“home position.” The home position is different for equatorial and 
alt-azimuth mounts.

1. Home Position of an Equatorial Mount

•  Level the tripod head.
•  Point the R.A. axis toward the North Celestial Pole (in Northern 

Hemisphere) or the South Celestial Pole (in Southern 
Hemisphere).

•  Orient the counterweight shaft so it points downward.
•  Point the telescope in the general direction of the North 

Celestial Pole (in Northern Hemisphere) or the South Celestial 
Pole (in Southern Hemisphere).

2. Home Position of an Alt-azimuth Mount

To operate the SynScan hand controller in “Full Feature” mode, 
no particular home position is required.
To operate the SynScan in “Easy Tracking” mode, the mount should 
be set up as close as possible to the following home position:

•  Level the mount base.
•  Level the telescope’s tube (parallel to ground) and point it 

toward true North (not magnetic North).

2.2 Initializing the Hand Controller

Once the mount has been set to the home position, turn the 
mount’s power switch to ON and start the initialization process 
via the SynScan hand controller.

1. Selecting the Operating Mode of the Mount

A SynScan V5 hand controller with firmware version 4.05.06 
or later supports both an equatorial mount and an alt-azimuth 
mount. It automatically detects the model of the mount to which 
it connects and selects the appropriate operation mode accord-
ingly.
For an Equatorial/Alt-azimuth dual-mode mount, such as the 
Orion Atlas Pro AZ/EQ-G, the SynScan hand controller will 
request that the user select the operating mode you wish to use:
•  The LCD screen will display “Operating Mode” in the first line.
•  Use the scrolling keys at the bottom left and right of the keypad 

to choose Equatorial mode (EQ Mode) or Alt-azimuth mode 
(AZ Mode).

•  Press ENTER to confirm the selection.

2. Firmware Version Display

The hand controller will display the firmware version.
•  Press ENTER to proceed to the next step. Press ESC to return 

to the previous step.

•  You can slew the mount with the direction keys at this step.

3. Solar Warning Message

The hand controller will scroll a warning message about the 
dangers of viewing the Sun with a telescope without a properly 
fitted solar filter.
•  Press ENTER to confirm you have read the warning messages 

and proceed to the next step. Press ESC to return to the 
previous (firmware version display) step.

•  You can slew the mount with the direction keys at this step.

4. Auto-homing (HDX110 EQ-G Mount only)

The “Auto-Homing” feature automatically establishes a home 
position for the telescope. This capability applies only to mounts 
equipped with the Auto-homing feature, such as the Orion 
HDX110 EQ-G mount. Here’s the procedure:
•  The LCD screen will display “Auto-Home?” in the first line, and 

display “1) YES 2) NO” in the second line.

•  Press “2” to skip this step and proceed to the next step, or …
•  Press “1” to start the auto-homing routine on the mount. 

Once completed, the screen will display “Home Position 
Established.” Press ENTER to proceed to the next step.

•  During the auto-homing routine, pressing the ESC key will 

stop the mount’s movement. The screen will display “Home 
Position NOT Established.” Press ENTER to proceed to the 
next step.

Содержание 07942d

Страница 1: ...ence du produit dans la barre de recherche vCliquez ensuite sur le lien du manuel d utilisation du produit sur la page de description du produit uWenn Sie das vollständige Handbuch einsehen möchten wechseln Sie zu OrionTelescopes de und geben Sie in der Suchleiste die Artikelnum mer der Orion Kamera ein vKlicken Sie anschließend auf der Seite mit den Produktdetails auf den Link des entsprechenden ...

Страница 2: ... Time 15 5 15 Display Version Information 15 5 16 Display Power Voltage 15 5 17 Display Polaris Position 15 5 18 Display Polar Alignment Error 15 5 19 Changing Polar Scope Illumination Level 15 5 20 Language Configuration 15 6 Advanced Functions 16 6 1 Identifying Objects 16 6 2 Synchronizing Encoders 16 6 3 Parking the Telescope 16 6 4 Pointing Accuracy Enhancement PAE 16 6 5 Camera Control 17 6 ...

Страница 3: ...ckly master SynScan s intuitive features and functionality 1 1 Keypad Layout and Connection Ports The hand controller s two line liquid crystal display LCD is backlit for comfortable viewing The contrast of the text and the brightness of the red backlight are both adjustable There are four categories of control keys on the hand controller Figure 1a 1 Mode keys 2 Direction keys 3 Scroll keys 4 Dual...

Страница 4: ...ter equipped with astronomy software such as Starry Night Pro see Section 7 Connecting SynScan to a Computer A serial cable was included with your Orion GoTo mount or tele scope 1 2 Slewing with the Direction Keys The four large direction keys Figure 1a allow the mount to be slewed electronically as follows The Left and Right keys control the movements of the Right Ascension R A axis for an equato...

Страница 5: ...eature mode no particular home position is required To operate the SynScan in EasyTracking mode the mount should be set up as close as possible to the following home position Level the mount base Level the telescope s tube parallel to ground and point it toward true North not magnetic North 2 2 Initializing the Hand Controller Once the mount has been set to the home position turn the mount s power...

Страница 6: ...Press ENTER to confirm your choice and proceed to the next step Date Time Daylight SavingTime Enter the date in the format mm dd yyyy using the numeric keypad Press ENTER to confirm your choice Enter your current local time using the 24 hour time mode e g 2 00 p m 14 00 Press ENTER to view the time you entered If the time is incorrect press ESC to go back to the previous screen If the time is corr...

Страница 7: ...hree possible methods A 1 star alignment is the least accurate but may be sufficient for casual observing 3 Star Alignment 1 At the prompt of Choose 1st Star use the scroll keys to browse through a list of star names and choose one you re familiar with Press ENTER The mount will then automatically slew the telescope toward that star 2 After the mount stops the hand controller will display Use arro...

Страница 8: ...might find the Brightest Star Align ment to be the easier of the two methods The 2 Star method is for users who know the names of at least some stars in the night sky To assist you in performing the alignment by either method we have included in Appendix G a set of star charts with the names of some bright stars indicated for easy reference Rules for choosing alignment stars It is recommended that...

Страница 9: ...e star is not visible in the eyepiece field of view press ENTER If the first alignment star was not a planet the SynScan hand controller will now display Alignment Successful Press ENTER to skip extra messages and complete the alignment process If the first alignment star was a planet the SynScan hand controller will display Choose 2nd Star Repeat from Step 2 to complete the alignment process If t...

Страница 10: ...r side of the meridian from the alignment star Deviated significantly in declination from the alignment star Rules for choosing an alignment star Choose an alignment star with smaller declination It will help to obtain higher resolution in R A movement in the telescope s eyepiece If there is cone error in the telescope mount setup or if you are unsure about it choose an alignment star that is clos...

Страница 11: ... time Rise transit time Transit setting time Set size Size and associated constellation Constellation 5 Press the ENTER key to proceed to the next step The screen will display View Object 6 Press the ENTER key to slew the mount toward the target or press the ESC key to return to the previous step When the mount stops the SynScan hand controller will beep and then return to the previous step The mo...

Страница 12: ...shortcut key The screen will display User Object 2 Press the scroll keys until New Object is displayed on the screen then press the ENTER key The screen will display Coord Type 1 RA DEC 2 Mount Press 1 to enter R A Dec coordinates for a celestial object press 2 to enter Alt azimuth coordinates for a land object If RA DEC is chosen the screen will display the coordinates to which the telescope is c...

Страница 13: ...h compensation is only active for computerized GoTo slewing not for manual slewing with the direction buttons 5 4 Tracking Rate The mount can track at several different rates which you select depending on the type of object s you ll be observing or photo graphing 1 Access MENU Tracking and press the ENTER key 2 Use the scroll keys to browse the various options and press the ENTER key to pick one S...

Страница 14: ...put and proceed The screen will display Lower XXX X at the bottom row fill in the data in a similar way 5 8 Enable Disable Auxiliary Encoder Some Orion telescopes and mounts are equipped with auxiliary encoders on their primary axes to support manually moving the scope without upsetting the mount s GoTo alignment status Users may turn off the auxiliary encoder to obtain the best point ing accuracy...

Страница 15: ... 00 at the top and put Polaris at the HH MM position of the large circle 1 To do this access the menu UTILITY FUNCTION Show Information Polaris Pos and press the ENTER key The screen will display Polaris Position in P Scope HH MM Use the scroll keys to display Polaris HA HH MM where HA stands for Hour Angle Press the ESC key to exit 5 18 Display Polar Alignment Error Checking the polar alignment e...

Страница 16: ...d after an observing session you can park the telescope to keep the alignment data PAE data and PEC data and start your next observing session without having to redo the GoTo alignment and calibration Parking 1 Access the menu UTILITY FUNCTION Park Scope and press the ENTER key 2 The screen will display Park to Use the scroll keys to choose one of the following parking positions and press the ENTE...

Страница 17: ...n the hand controller As long as the mount is not moved once parked the alignment will not need to be performed again when it is subse quently powered on 6 5 Camera Control The SynScan hand controller can control a DSLR camera to do astrophotography It can accept eight different sets of exposure parameters and then control the camera to take the exposure sets without manual intervention To use the...

Страница 18: ...For best results the true field of view should not exceed 10 arcminutes For mounts that support PPEC such as the Atlas Pro AZ EQ G and HDX110 EQ G mounts an autoguiding camera can be used instead of manual guiding for the PEC training process In such cases it is recommended to turn on the autoguider for at least one minute before starting the PEC training process The total time for the PEC trainin...

Страница 19: ...ops slewing Remember to end the centering operation with Up and Right direction keys Press the ENTER key to proceed to the next step 5 The screen will now display the polar alignment error in altitude Mel dd mm ss You can then use the data to determine whether or not to adjust the altitude of the R A axis Press the ENTER key again to proceed to the next step 6 The mount will slew to a new position...

Страница 20: ...orientation 3 Access the menu UTILITY Astro Time Lapse Configuration Exposure Time to set the exposure time of the camera 4 Access the menu UTILITY Astro Time Lapse Configuration Repeat Times to set the number of photos to be taken 5 Access the menu UTILITY Astro Time Lapse Configuration Shoot to commence taking photos 6 The LCD will display remaining photos and remaining time of the ongoing expos...

Страница 21: ...e application determine whether an update is needed Check the Auto detect COM port to let the application detect the proper serial port that will connect to the SynScan hand controller Or uncheck it to manually choose the COM port Select one from the COM port drop down list Click the HC Version button to check the versions of the hardware firmware and database Click the Update button to start load...

Страница 22: ...g the SynScan GPS module into the RJ 12 serial port located at the bottom center of the SynScan hand controller Place the GPS module on a horizontal surface Accessing Menus 2 Access the menu UTILITY FUNCTION GPS and press the ENTER key 3 The screen will now display GPS fixing as the GPS module is attempting to fix on the GPS satellites 4 After the SynScan GPS module fixes on the satellites the scr...

Страница 23: ...23 Appendix A Standard Time Zones of the World ...

Страница 24: ...gn Error UTILITY FUNC OBJECT LIST NGC Catalog IC Catalog Messier Catalog Caldwell Catalog SAO Catalog Double Stars Variable Stars Deep Sky Tour PAE Correction Clear PAE Data Home Position Current Pos Custom Pos User Object Recall Object New Object Set Star Name Named Stars Solar System Note Applicable to Equatorial mounts Applicable to Altazimuth mounts Applicable only to certain types of mounts a...

Страница 25: ...Scan hand controller to locate a few objects on the other side of the meridian If the pointing accuracy is still good then the mount system has small or no cone error If the pointing accuracy becomes poor on the opposite side of the meridian from the alignment stars and most of the error is on the R A axis that is the object can be brought back to the center of the eyepiece using the left or right...

Страница 26: ...n brings Polaris closer to the center of the eyepiece This will reveal the direction in which you should adjust the telescope on the saddle or the mounting bar to reduce the cone error 12 Use a shim or other method on the proper side of the saddle or mounting bar to raise the telescope slightly Look into the eyepiece while applying the shim if possible Reduce the distance between Polaris and the c...

Страница 27: ...ell Double Star Variable Star Named Star Planets Pointing Accuracy Up to 5 arc minutes RMS Tracking Rate Sidereal Rate Solar Rate Lunar Rate PEC SPEC or PPEC Database 42000 Objects LCD 18 Characters x 2 Lines Adjustable Contrast and Backlight Keypad Rubber Adjustable backlight GPS SynScan GPS Modular Optional PC Connection RS 232C USB 9600bps No parity check 8 data bits 1 start bit 1 stop bit Powe...

Страница 28: ...r T A U R U S B e t e l g e u s e L i t t l e D i p p e r P o i n t e r s P o l a r i s U R S A M A J O R C a s t o r C a p e l l a P r o c y o n C Y G N U S L E O M I N O R H E R C U L E S O P H I U C H U S S C O R P I U S CENTAURUS C A N C E R SEXTANS CRATER Alphard CORVUS M i z a r O R I O N C O R O N A B O R E A L I S S E R P E N S C A P U T C A N E S V E N A T I C I K e y s to n e COMA BERENI...

Страница 29: ... D i p p e r P o l a r i s U R S A M A J O R C O M A B E R E N I C E S C Y G N U S P I S C E S P I S C E S P E G A S U S L E O M I N O R HERCULES OPHIUCHUS SCORPIUS TELESCOPIUM C O R O N A B O R E A L I S SERPENS CAPUT SERPENS CAUDA CORONA AUSTRALIS Rasalhague C A N E S V E N A T I C I S A G I T T A AQUILA SCUTUM A r c t u r u s E Q U U L E U S D E L P H I N U S C A P R I C O R N U S M ICROSCOPIUM...

Страница 30: ...R I D A N U S PHOENIX PISCIS AUSTRINUS CAPRICORN U S MICROSCOPIUM AQUARIUS O P H I U C H U S V U L P E C U L A S A G I T T A H E R C U L E S U R S A M I N O R C E P H E U S C A S S I O P E I A C A M E L O P A R D A L I S G E M I N I D R A C O A lg o l Hyades Great Square of Pegasus B ig D ip pe r V e g a R o s a lh a g u e A l t a i r T A U R U S A l d e b a r a n B e t e l g e u s e A R I E S T R...

Страница 31: ...ONOCEROS Alphard LEPUS COLUMBA CAELUM B O Ö T E S U R S A M I N O R C E P H E U S C A S S I O P E I A C A M E L O P A R D A L I S GEMINI M i r f a k H YDRA PYXIS ANTLIA M I N O R C A N I S MAJOR CANIS D R A C O A lg o l Rigel M ir a H y a d e s B i g D i p p e r T A U R U S Ald e b a r a n Betelgeuse A R I E S T R I A N G U L U M L i t t l e D i p p e r P o l a r i s U R S A M A J O R B E R E N I ...

Страница 32: ...he original retail purchaser only During this warranty period Orion Telescopes Binoculars will repair or replace at Orion s option any warranted instrument that proves to be defec tive provided it is returned postage paid Proof of purchase such as a copy of the origi nal receipt is required This warranty is only valid in the country of purchase This warranty does not apply if in Orion s judgment t...

Отзывы: