background image


- 9 -

5 Test Operation 

Let's try to operate a motor/an actuator and confirm that the use unit is correctly set. After confirming that there is no danger 
in the surrounding area even when the motor/actuator starts running suddenly, operate it according to the following 
procedures. 

5.1  Test Operation by "Motion Creator" Function of the 

IMC


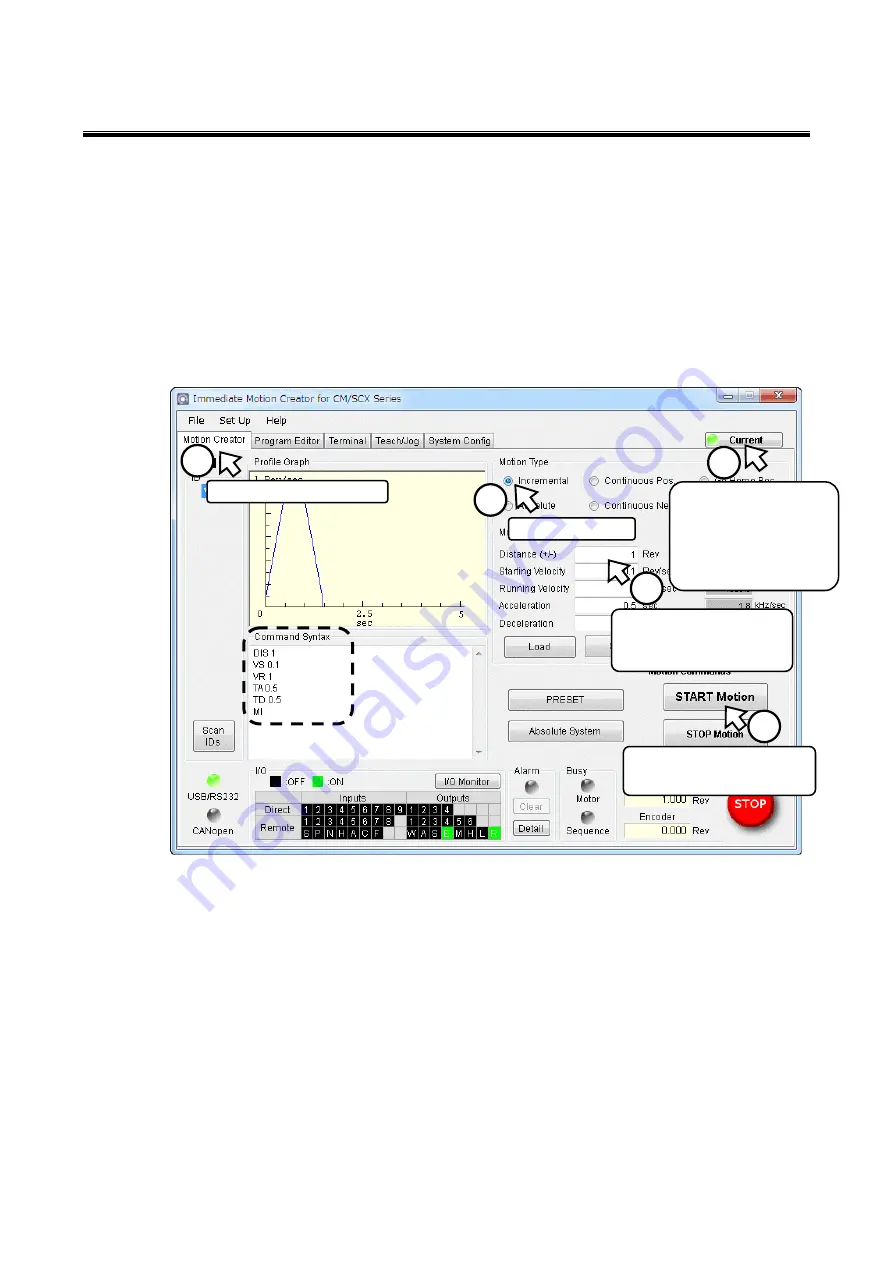
At first, let’s check the unit for motion parameters. Click the "Motion Creator" tab on the 

IMC

 window. The units for motion 

parameters are shown according to the user unit (ex. if the "mm" has been set, the unit for distance should have become 
"mm" and the unit for velocity should have become "mm/sec.") 

Operate the motor/actuator according to the following instruction when the 

IMC

 has been launched


Did the motor/actuator move according to what you set? 

Ex.1) The motor shaft should rotate one revolution in the clockwise direction. 
Ex.2) The motor shaft should rotate one revolution in the clockwise direction and the ball screw should travel 10 mm if 

the ball screw is connected. (Since a ball screw with a lead of 10 mm/rev is assumed, the motor shaft should rotate 
one revolution when setting to 10 mm in "Distance") 

Ex.3) The actuator starts to move in the forward direction, and will move 10 mm.


Add a "minus (-)" in front of the value in "Distance," and then click the [START Motion] button again. This time, the 
motor/actuator should move the same distance in opposite direction and then stop. Change distance, velocity, acceleration 
and deceleration time, and see difference in motions.


Now, look at the command syntax area in the lower left of the screen. 
You can see the letters such as DIS 1, VS 0.1, VR 1 and others. These are the commands that are actually sent to the 

SCX11

For instance, the travel amount is "DIS" (abbreviation for Distance), the starting velocity is "VS" (abbreviation for Velocity 

for Start) and the running velocity is "VR" (abbreviation for Velocity for Running). Each line corresponds to the operation 
parameter that was input in 

. "MI" in the last line is abbreviation for Move Incremental, which is the command for starting 

an operation. The 

IMC

 sends the command to the 

SCX11

 on behalf of you. 

Let's try executing these commands in the next page. 

Select the [Motion Creator] tab.

Change the value in the area for 
"Distance." 

(Ex1: 1) 


(Ex2, 3: 10)


Click the [START Motion] button 
while looking at the motor shaft or 
actuator. 

Select [Incremental].

Other than 

AR

NX

: Check if 

the [Current] LED picture is 
green (the motor is excited) 


AR/NX

: Click the [Current] 

button. The LED turns green. 
(Motor is now excited.) 

3

5

Содержание SCX11

Страница 1: ...get to know the product quickly Please read the separately supplied operating manual for more detailed information It will be necessary to connect the SCX11 to a computer for initial setup and test op...

Страница 2: ...ng to injury or damage to equipment Installation Install the device in an enclosure in order to prevent injury Connection Keep the device s input power voltage within the specified range to avoid fire...

Страница 3: ...Startup manual Operating manual CANopen EDS file USB driver NET Framework 2 0 Connector set 1 set packed in a bag RS 232C connector 3 pins 1 CANopen connector 4 pins 1 Power connector 3 pins 1 I O con...

Страница 4: ...R CCW Pin assignment for Driver connector 26 pins See the driver manual for pulse input circuit and pin assignment on the driver The following example shows photo coupler pulse input type drivers 1 pu...

Страница 5: ...and CON signals 14 PLS CW 15 DIR CCW 1 PLS CW 2 DIR CCW Pin assignment for Driver connector 26 pins 6 GND 13 5 24 V OUT 7 CON Pulse PLS Direction DIR signals SCX11 DIR DIR PLS PLS PLS CW PLS CW DIR CC...

Страница 6: ...llation click Close 2 The installation of the USB Serial Port is then asked for by Windows 3 Click Next After successful installation click Close Windows XP 1 The installation of the FT232R USB UART i...

Страница 7: ...2 You wish to set the travel distance in 0 01 mm increments while using a ball screw with a 10mm lead The user unit becomes mm the distance per one revolution becomes 10 and the motor resolution becom...

Страница 8: ...C has been launched The setting is completed The parameters have been written to the SCX11 Memo The rotation direction of the DG Series and DGII Series hollow rotary actuators are opposite to the CW C...

Страница 9: ...or starts to move in the forward direction and will move 10 mm Add a minus in front of the value in Distance and then click the START Motion button again This time the motor actuator should move the s...

Страница 10: ...accepted and the CURRENT parameter of the SCX11 is 1 the motor current is ON If CURRENT 0 is indicated the motor current is OFF Enter CURRENT 1 and press the Enter key The response with CURRENT 1 wil...

Страница 11: ...d select 115200 bps from the drop down list For an operator using RS 232C set the RS232 Baud rate 5 Click the SAVE and RESET to enable the change At that time the IMC also changes the baud rate of com...

Страница 12: ...nsor less mechanical home seeking operation is required see Sensorless Mechanical Home Seeking Operation for HOMETYP 12 section in 8 2 5 Mechanical Home Seeking Settings for the SCX11 and driver are r...

Отзывы: