3
z
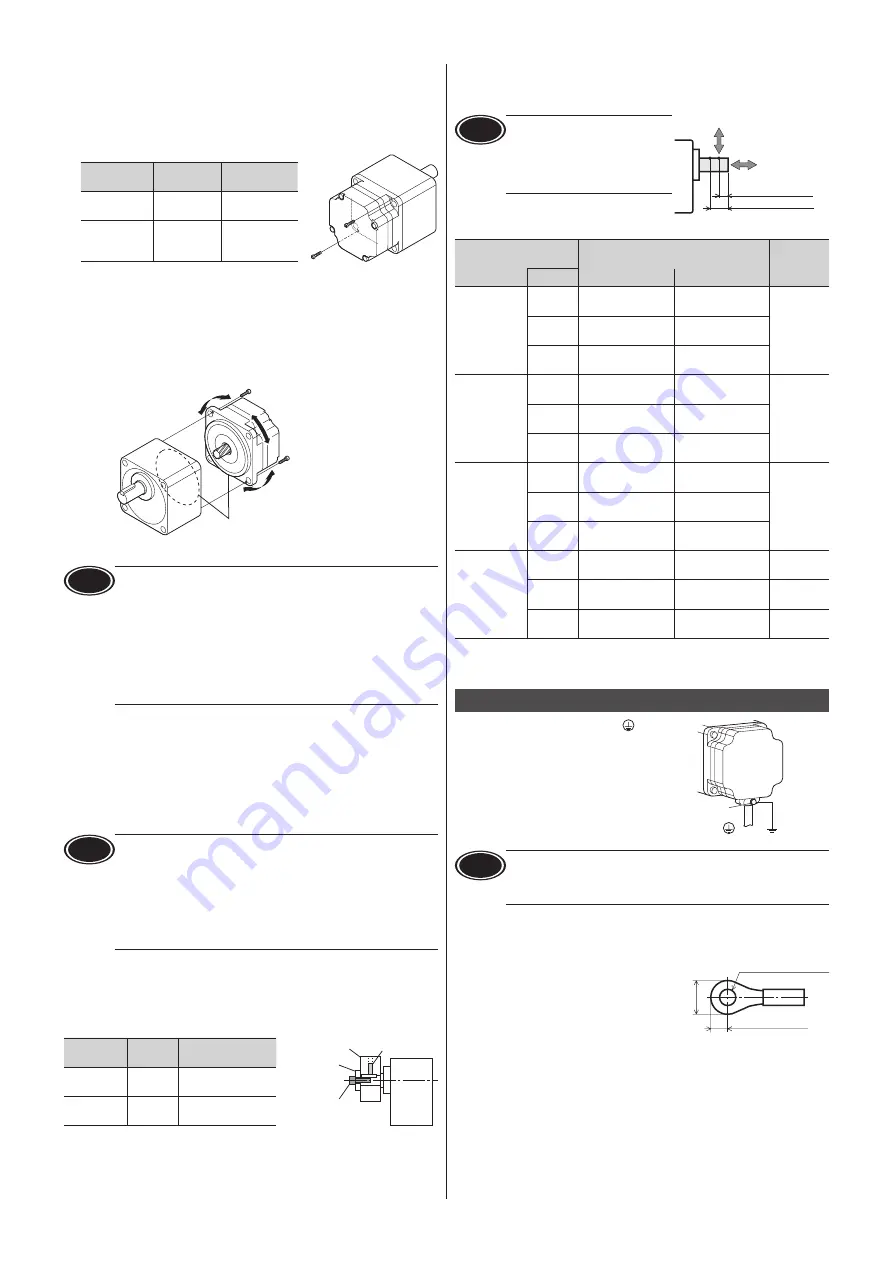
Removing/Installing the gearhead
See the following steps to replace the gearhead or to change the cable position.
1.
Removing the gearhead
Remove the hexagonal socket head screws assembling the motor and
gearhead and detach the motor from the gearhead.
•
Assembly hexagonal socket head screw
Model
Screw size
Tightening
torque
BLM230
BLM460S
M2.6
0.4 N·m
(3.5 lb-in)
BLM5120
BLM6200S
BLM6400S
M3
0.6 N·m
(5.3 lb-in)
2.
Installing the gearhead
Using the pilot sections of the motor and gearhead as guides, install the
gearhead to the motor and tighten the hexagonal socket head screws.
Confirm that no gaps remain between the motor flange surface and the end
face of the gearhead pilot section.
At this time, the motor cable position can be changed to a desired 90°
direction. When installing the gearhead, slowly rotate it clockwise/
counterclockwise to prevent the pinion of the motor output shaft from
contacting the side panel or gear of the gearhead.
Install using pilot sections as guides
Change the cable position to
a desired 90° direction.
Note
•
Do not forcibly assemble the motor and gearhead. Also, do not
let metal objects or other foreign matter enter the gearhead.
The pinion of the motor output shaft or gear may be damaged,
resulting in noise or shorter service life.
•
Do not allow dust to attach to the pilot sections of the motor and
gearhead. Also, assemble the motor and gearhead carefully by
not pinching the O-ring at the motor pilot section. If the O-ring is
crushed or severed, grease may leak from the gearhead.
•
The hexagonal socket head screws assembling the motor and
gearhead are used to attach the motor and gearhead temporarily.
Be sure to use the supplied mounting screw set to install the motor.
■
■
Installing a load
When installing a load on the motor (gearhead), pay attention to the following
points.
•
Align the centerline of the motor output shaft (gearhead output shaft) with
the centerline of the load.
•
A key slot is provided on the output shaft of each combination type • parallel
shaft gearhead. Form a key slot on the load side and secure the load using the
supplied parallel key.
Note
•
When coupling the motor (gearhead) with a load, pay attention to
centering, belt tension, parallelism of pulleys, etc. Also, firmly secure
the tightening screws of the coupling or pulleys.
•
When installing a load, do not damage the motor output shaft
(gearhead output shaft) or bearing. Forcing in the load by driving
it with a hammer, etc., may break the bearing. Do not apply any
excessive force to the output shaft.
•
Do not modify or machine the motor (gearhead) output shaft. The
bearing may be damaged or motor (gearhead) may break.
When using the output shaft end tapped hole of a gearhead
(
GFV4G
,
GFV5G
,
GFV6G
only)
Use a tapped hole provided at the end of
the output shaft as an auxiliary means for
preventing the transfer mechanism from
disengaging.
Fixed screw
Screw
Spacer
Transmission
parts
Gearhead
model
Screw
size
Effective depth of
screw
GFV4G
No.10-
24UNC
10 mm (0.39 in.)
GFV5G
GFV6G
No.12-
24UNC
12 mm (0.47 in.)
■
■
Permissible radial load and permissible axial load
The radial load and the axial load on the output shaft of the motor (gearhead)
must be kept under the permissible values listed below.
Note
Failure due to fatigue may occur
when the motor (gearhead)
bearings and output shaft are
subject to repeated loading by
a radial or axial load that is in
excess of the permissible limit.
10 mm (0.39 in.)
20 mm (0.79 in.)
Distance from output shaft end
Axial load
Radial load
Model
Permissible radial load [N (lb.)]
∗1
Distance from tip of gearhead output shaft
Permissible
axial load
[N (lb.)]
Gear ratio
10 mm (0.39 in.)
20 mm (0.79 in.)
BLM230
5
100 (22)
[90 (20)]
150 (33)
[110 (24)]
40 (9)
10
to
20
150 (33)
[130 (29)]
200 (45)
[170 (38)]
30
to
200
200 (45)
[180 (40)]
300 (67)
[230 (51)]
BLM460S
5
200 (45)
[180 (40)]
250 (56)
[220 (49)]
100 (22)
10
to
20
300 (67)
[270 (60)]
350 (78)
[330 (74)]
30
to
200
450 (101)
[420 (94)]
550 (123)
[500 (112)]
BLM5120
5
300 (67)
[230 (51)]
400 (90)
[300 (67)]
150 (33)
10
to
20
400 (90)
[370 (83)]
500 (112)
[430 (96)]
30
to
200
500 (112)
[450 (101)]
650 (146)
[550 (123)]
BLM6200S
BLM6400S
∗2
5
to
20
550 (123)
[500 (112)]
800 (180)
[700 (157)]
200 (45)
30
,
50
1000 (220)
[900 (200)]
1250 (280)
[1100 (240)]
300 (67)
100
,
200
1400 (310)
[1200 (270)]
1700 (380)
[1400 (310)]
400 (90)
∗1
The values assume a rated speed of 3000 r/min or below. The values in [ ] are based
on a rated speed of 4000 r/min.
∗2
The gear ratio of the
BLM6400S
is 5:1 to 50:1.
Grounding
Connect the Protective Earth Terminal
on the
motor to the ground near the motor.
Minimize the wiring length of the ground cable.
Protective
Earth
Terminal
Grounding
Note
Be sure to ground the motor and driver. Failure to do so may result
in electric shock or damage to the product.
Static electricity may cause damage to the product if the protective
earth terminals are not grounded.
■
■
Ground terminal
•
Applicable crimp terminal:
Round crimp terminal with insulation cover
•
Thread size of terminal: M4
•
Tightening torque: 1.2 N·m (10.6 lb-in)
•
Applicable lead wire:
AWG18 to 14 (0.75 to 2.0 mm
2
)
[mm (in.)]
4.8 (0.19) or less
9.5 (0.37) or less
Ø4.1 (0.16) or more
■
■
Precautions about static electricity
Static electricity may cause the driver to malfunction or suffer damaged.
Be sure to ground the motor and driver to prevent them from being damaged
by static electricity.


