background image

EN

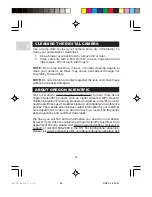
CLEANING THE DIGITAL CAMERA

Use a damp cloth to clean your camera body; dry immediately. To
clean your camera lens / viewfinder:

1. Use a blower or a lens brush to remove dirt or dust.
2. Wipe carefully with a soft cloth to remove fingerprints and

other stains. Do not touch with fingers.

NOTE:

 Do not use benzene, thinner, or similar cleaning agents to

clean your camera, as these may cause permanent damage not
covered by the warranty.

NOTE:

 Do not scratch hard objects against the lens or LCD as these

surfaces are easily damaged.

ABOUT OREGON SCIENTIFIC

Visit our website (www.oregonscientific.com) to learn more about
Oregon Scientific products such as digital cameras; MP3 players;
children's electronic learning products and games; projection clocks;
health and fitness gear; weather stations; and digital and conference
phones. The website also includes contact information for our customer
care department in case you need to reach us, as well as frequently
asked questions and customer downloads.

We hope you will find all the information you need on our website,
however if you'd like to contact the Oregon Scientific Customer Care
department directly, please visit www2.oregonscientific.com/service/
support or call 949-608-2848 in the US. For international enquiries,
please visit www2.oregonscientific.com/about/international/default.asp

35

PV100 Eng R7 a OP

9/9/04, 2:45 PM

36

Содержание PV 100

Страница 1: ...Model PV 100 User Manual Manuale d uso Manuel d utilisation PV100 Eng Cover R7 a OP 9 9 04 2 45 PM 1 ...

Страница 2: ...s 4 Attaching the Strap 4 Memory Storage 5 Installing the SD Card 5 Removing the SD Card 6 Basic Photography 6 Preparing the Camera 6 Taking Basic Pictures 7 Displaying or Deleting Last Image Taken 7 Selecting a Flash Mode 7 Zooming 8 Using the Self Timer 9 Basic Functions and Settings 10 Camera Modes 10 Setup Menu 11 P Counter Picture Counter 11 Set Clock 11 Set City 12 Show Time 12 Language 12 B...

Страница 3: ...ew 21 Zooming into Playback Images 21 Scrolling a Magnified Image 21 Deleting a Playback Image 22 Movie Playback 22 Deleting a Playback Movie 22 Playback Menu 22 Deleting Multiple Images or Movies 23 Protecting Images or Moviese 24 Specifying Digital Print Order Format DPOF 24 Slideshow 25 Rotating Images 26 Connecting to External Devices 26 Connecting to a TV 26 Installing Software Drivers Window...

Страница 4: ...Specifications 32 Important Notice 34 Statement of Responsibility 34 Notes on Copyright 34 General Warnings 34 Cleaning the Digital Camera 35 About Oregon Scientific 35 Trademark Information 36 FCC Statement 36 EN PV100 Eng contents R7 a OP 9 9 04 2 45 PM 3 ...

Страница 5: ...al card to store many of your favourite pictures and movies Your camera is designed to give you many years of reliable service Other features Include Photo preview on jumbo 3 5 inch TFT display Auto focus lens Self timer Movie capture and playback Video output USB 1 1 interface Macro White Balance and Exposure compensation settings Spot Evaluative Center Light Meter modes User interface available ...

Страница 6: ...nector 3 Camera Stand Connector 4 Battery SD Card Compartment 5 Left LED Flash Light Status 6 Right LED Auto Focus Status 7 Mode Switch 8 Zoom In Zoom Out Buttons 9 4 Way Direction Controller 10 Strap loop 11 DISP OK Button 12 RESET 13 MENU Button BACK VIEW 1 Record Mode 2 Playback Mode MODE SWITCH FRONT VIEW 1 3 2 4 5 6 7 8 9 10 2 1 3 4 5 6 7 8 10 11 12 13 9 1 2 2 PV100 Eng R7 a OP 9 9 04 2 45 PM...

Страница 7: ...S When you unpack your digital camera make sure to keep all the packing materials in a safe place in case you need to later return it for servicing In the box you will find AC adaptor Li Ion rechargeable battery Carrying pouch USB cable Video cable User manual CD ROM 3 PV100 Eng R7 a OP 9 9 04 2 45 PM 4 ...

Страница 8: ...s fully charged the right LED turns off NOTE In a non controlled environment many factors can affect battery life such as temperature use of the flash photo review LCD display brightness levels and so on 1 Pass the thin loop of the strap through the camera s strap ring 2 Pass the other end of the strap through the loop 3 Tighten by pulling the loop ATTACHING THE STRAP Your camera comes with a rech...

Страница 9: ...TYPE Internal DESCRIPTION Files are stored in the camera s internal memory External NOTE When the SD card is installed all images and movies taken are automatically stored on the card Images and movies stored in the camera s internal memory can be viewed directly from the camera TV using a video output cable or transferred to the PC via a USB connection They cannot be transferred or copied to the ...

Страница 10: ...witch to the desired setting Record Mode or Playback Mode The Mode Switch is used to either record or playback images or movies taken 4 In Record Mode press the DISP OK button to toggle between 3 levels of display information settings A LCD with photo information displayed B LCD without photo information displayed but Date Time and battery icon is displayed C Turn off LCD ICON DESCRIPTION Adequate...

Страница 11: ...ory is full no more images can be stored The camera will beep and the words Internal Memory Full or Memory Card Full will appear on the LCD DISPLAYING OR DELETING LAST IMAGE TAKEN 1 Set the camera to Playback Mode 2 Use and press or to view the last image taken 3 You may choose to delete the image by pressing and DISP OK to confirm deletion The Trash icon is shown on the LCD 4 Press DISP OK again ...

Страница 12: ...default setting ZOOMING Your digital camera comes with a 2x digital zooming function this is described as x2 in the camera By default the zooming is not enabled 1 In Record or Playback Mode increase zooming by pressing The Digital Zoom icon on the LCD indicates the current zoom level 2 To decrease the zooming press Camera Mode Zooming Options Movie Mode Zooming Options x1 0 x1 1 x1 2 x1 3 x1 4 x1 ...

Страница 13: ...sh to cancel the Self Timer function at this stage press again and the icon on the LCD will disappear 3 Press the SHUTTER RELEASE button Audible beeps can be heard and the Self Timer lamp will start blinking The number displayed next to the LCD s Self Timer icon will appear and start counting down from 10 seconds to 0 seconds 4 Press the SHUTTER RELEASE button again anytime during count down betwe...

Страница 14: ...external memory card Record Mode Playback Mode 1 Press MENU to access the menu screens where setting options can be specified To switch between Primary and Secondary Menus highlight the top menu fields 2 Use and press or to switch between Record or Playback modes and the Setup menu 3 Use and press or to navigate through the Record or Playback Mode and setup options 4 Use and press or to select set...

Страница 15: ...Time of the camera When accessed a new Set Clock configuration screen will appear Use and press or to adjust the values of each field below A Current Date Field adjust the current date of the camera B Date Format choose from the following date formats D M Y date month year MENU OK Primary Menu Field currently accessed Highlighted Setting Total No of Menu Pages Current Menu Page Secondary Menu Fiel...

Страница 16: ...ome Time values specified in the Set Clock setting If your city is not selectable choose another city within your time zone instead SHOW TIME You can choose to display either the Home Time default setting or World Time on your camera NOTE icon is shown on the LCD if World Time is selected However no icon is displayed if Home Time is selected LANGUAGE Choose your menu language English default setti...

Страница 17: ...ons are Continue and New default setting NOTE All files are stored within a designated folder The initial folder is always numbered at 100 A Under the Continue default option the internal file counter is first set to 0001 Every subsequent picture is assigned an incremental File Number NOTE The internal file counter increments by 1 regardless of the media unless it is reset B Under the New option t...

Страница 18: ...es all data from the memory device chosen Files will not be recoverable RESET You can reset all camera settings to factory default Refer to the Setup Menu table to see the defaults for each setting NOTE The reset function can reset all the settings to factory default except for the current time and date LCD BRIGHT LCD BRIGHTNESS You can adjust the LCD brightness level to compensate for different l...

Страница 19: ...vies at 10 frames per second The duration of the movie will depend on the battery life and memory available MENU OK NOTE In Movie Mode you can only adjust the white balance EV and ISO In Camera Mode default setting all settings will apply SIZE Image size represents picture resolution The resolution is directly related to the number of pixels of the camera As such 3 0 Mega pixel can be arranged as ...

Страница 20: ...ality and resolution the larger the memory space it occupies on the memory card WHITE BALANCE You can take pictures according to light conditions by setting the camera s white balance function By using this the images will have the correct balance of colour DESCRIPTION Normal Image Good clarity and resolution 1280 x 1024 1 3 Mega Pixel Basic Image Basic quality and resolution 640 x 480 VGA ICON TY...

Страница 21: ...deal for general picture taking Central Centre weighted Averages the exposure of the entire scene but gives extra weight to the centre Use for backlit subjects default setting Spot Only the small area at the centre of the screen determines the exposure Ideal for highlighting the main subject OPTIONS ICONS SETTINGS Auto default setting Sunlight Use outside in sunlight Shade Use outside in the shade...

Страница 22: ... rating 200 Use for normally lit scenes EV EXPOSURE COMPENSATION SETTING Exposure compensation is required when there is an extreme difference in brightness between the background and the subject Use this setting to manually brighten or darken an image Default setting is 0 0 2 0 1 7 1 3 1 0 0 7 0 3 0 0 0 3 0 7 1 0 1 3 1 7 2 0 EV SHOOTING MOVIES The Movie Mode enables you to take movies The length ...

Страница 23: ...ming Begin Recording Movie Stop Recording Movie SETTINGS OPTIONS Auto default Sun light Shade Yellow F L Fluorescent Lamp White F L Fluorescent Lamp Tungsten Auto default 50 100 200 2 0 1 7 1 3 1 0 0 7 0 3 0 0 default 0 3 0 7 1 0 1 3 1 7 2 0 White Balance ISO EV Movie Mode On Screen Display Total Available Time for Recording Movie Mode P 20 Memory Type P 5 Current Elapsed Recording Time hh mm ss B...

Страница 24: ...e SD card MMC is inserted Playback Mode will only show images and movies stored on the card To access data stored within the internal memory the SD MMC card must first be removed IMAGE PLAYBACK MOVIE PLAYBACK Size p 15 Memory Type p 5 Protect Mode Indicator p 24 Battery Level Indicator p 6 File No p 13 Folder number Current Date p 11 Current Time p 11 Total Recorded Time Movie Mode p 20 Memory Typ...

Страница 25: ... x1 0 x1 5 x2 0 x2 5 x3 0 x3 5 x4 0 x4 5 x5 0 1 Wait until the icons disappear from the playback image 2 Press to zoom in any image The icon appears as well as the current magnification level 3 To zoom out of the image press 4 Press DISP OK to exit zooming mode SCROLLING A MAGNIFIED IMAGE While an image is magnified only a portion of the image will be visible Press the SHUTTER RELEASE button to en...

Страница 26: ...LEASE button again to stop playback The movie will return to Movie Playback LCD screen NOTE All zooming functions are disabled during Movie Playback mode DELETING A PLAYBACK MOVIE To delete the movie currently being viewed stop the playback press and confirm Protected movies indicated with cannot be deleted and must be unprotected first 1 In playback mode press DISP OK Thumbnails of images will ap...

Страница 27: ...he OSD displays up to nine thumbnail images similar to the Multi Frame Review setting Use to navigate 2 Highlight an image then press DISP OK to confirm your selection 3 The icon will then appear to indicate that the image is set for deletion To cancel the deletion press DISP OK again 4 Repeat Step 2 to set multiple images or movies for deletion 5 Follow the rest of the LCD on screen options to co...

Страница 28: ...or protection 5 Follow the rest of the LCD on screen options to confirm protection MENU OK ALL IMAGES OR MOVIES 1 When All Images is selected select the Set Protect All to On to confirm the protection of all images and movies 2 To unprotect all images and movies select the Set Protect All to Off SPECIFYING DIGITAL PRINT ORDER FORMAT DPOF The DPOF option in the Playback Menu is used to specify the ...

Страница 29: ...ted image When done press DISP OK once again 4 Repeat Step 2 to select more images for printing or change the previously specified numbers 5 Press DISP OK and follow the rest of the LCD on screen op tions to confirm the DPOF setting SPECIFYING DPOF OF ALL IMAGES 1 When All Images is selected all images will be set to the same specified printing number 2 Use to press or to set the number of prints ...

Страница 30: ...low connector to the yellow AV input terminal of your TV 4 Turn the TV and camera on Make sure to switch the TV to the appropriate AV channel display NOTE LCD is automatically turned off when the camera is connected to a TV When set to On the slideshow immediately replays when the final image is displayed Repeat SETTINGS DESCRIPTIONS Specifies the amount of time the camera will display an image be...

Страница 31: ... letter of the CD ROM drive 3 Follow the on screen instruction to complete the installation of the camera drivers and software When done click on the Finish button on screen to restart the PC NOTE The Macintosh does not require software driver installation TRANSFERRING FILES FROM CAMERA TO PC OR MACINTOSH NOTE Only the images and movies stored in the camera s current memory device SD card or inter...

Страница 32: ...p to the Trash icon before disconnecting NOTE Before unplugging your camera from your computer wait at least 15 seconds after the transfer is completed to prevent any data loss that may occur 4 On a PC the camera will appear as a Removable Disk drive on My Computer On the Mac it will appear as a drive icon on the desktop i e Untitled 5 Double click on the Removable Disk drive Two folders DCIM and ...

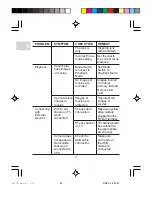
Страница 33: ...Oregon Scientific and may vary depending on the subject shooting conditions capture modes and SD card memory capacity TROUBLESHOOTING PROBLEM SYMPTOM Power will not turn on No Power CHECK THIS REMEDY Batteries are exhausted Replace with new batteries Batteries are inserted incorrectly Insert the batteries correctly ADDENDUM MEMORY CAPACITY SIZE AND QUALITY The table below indicates the number of i...

Страница 34: ... set to No Flash Mode Enable flash by changing it to another setting Mode Switch is set to Playback or Movie Mode Change the Mode Switch to Camera Mode Flash has not finished charging Wait until the Status Lamp stops blinking Image taken appears too dark or blurred Check your Flash Mode Turn on the flash by changing the Flash Mode The subject is too far away Move closer to the subject Power turns ...

Страница 35: ...ed Check cable connection Make sure yellow video cable is plugged into the TV s AV terminal Check channel on TV TVchannel should be switched to the appropriate AV channel Cannot delete images or movies Connecting with External Devices Camera does not appear as Removable Disk when connected to a PC Check the USB cable connection Make sure both ends of the USB cable are connected The lens is dirty C...

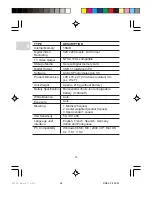
Страница 36: ...Image size File Format Type auto focus Focus range 1m to infinity normal 20 30cm macro F number 2 8 8 0 Focal length 8 4mm 35mm equivalent Lens 2x Digital zoom Macro 20 30cm Normal 1m to infinity Shooting distance Approx 1m 3m Temperature Approx 0 C 40 C 3 5 TFT LCD Flashlight Distance Operation Environment Display PROBLEM SYMPTOM CHECK THIS REMEDY Camera or PC is not turned on Turn on the camera ...

Страница 37: ...ones 2 Center weighted central 9 zones 3 Spot central 1 zones Exposure Metering 50 100 200 ISO Sensitivity English French Spanish Germany Italian and Portuguese Language user interface Windows 98SE ME 2000 XP Mac OS 9 x 10 1 10 2 PC Compatibility 16MB Internal Memory 320 x 240 pixels AVI format Digital Video Recording NTSC PAL compatible TV Video Output Secure Digital memory card USB 1 1 interface...

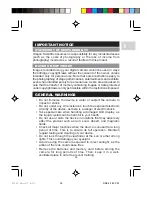
Страница 38: ... device in water or subject the camera to impact or shock Do not under any circumstances touch the exposed electronic circuitry of the device as there is a danger of electric shock Take special care when handling a damaged LCD display as the liquid crystals can be harmful to your health Do not use or store the device in locations that may adversely affect the product such as rain snow desert and m...

Страница 39: ...fic com to learn more about Oregon Scientific products such as digital cameras MP3 players children s electronic learning products and games projection clocks health and fitness gear weather stations and digital and conference phones The website also includes contact information for our customer care department in case you need to reach us as well as frequently asked questions and customer downloa...

Страница 40: ...is device complies with Part 15 of the FCC Rules Operation is subject to the following two conditions 1 This device may not cause harmful interference and 2 This device must accept any interference received including interference that may cause undesired operation This equipment has been tested and found to comply with the limits for a Class B digital device pursuant to Part 15 of the FCC Rules Th...

Страница 41: ...ted Consult the dealer or an experienced radio TV technician for help CAUTION Modification The FCC requires the user to be notified that any changes or modifications made to this device that are not expressly approved by Oregon Scientific Inc may void the user s authority to operate the equipment Interface cable Use the shielded cable sold or provided by Oregon Scientific Inc for your equipment Us...

Страница 42: ... 2004 Oregon Scientific All rights reserved 086 003527 021 PV100 Eng Back R7 a OP 9 9 2004 2 45 PM 1 ...

Отзывы: