background image

35

36

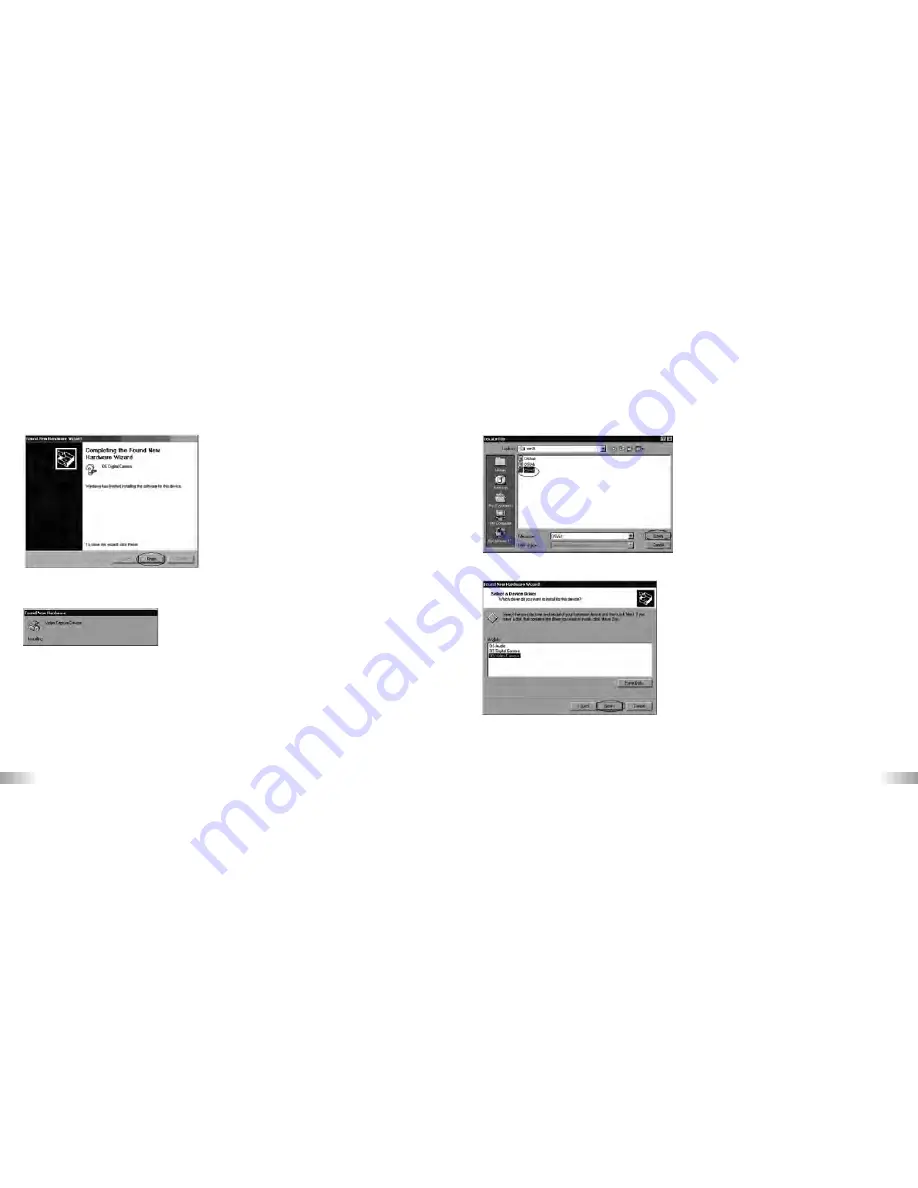
10. Your hardware is now installed. Click finish.

11. Once you click finish the Video Capture Device will begin installing. Repeat the

above steps until that has been installed. 

12. When in the Win2000 folder in the CD remember to select OSVid, not OSUsb. 

13. Click Next after selecting the OS Video Camera. 

14. Once you have finished installation your camera will be ready to use as a webcam.

Содержание ATC3K

Страница 1: ......

Страница 2: ...a TV 36 XIII Troubleshooting 37 Dear customer Thank you for purchasing the ATC3K by Oregon Scientific At Oregon Scientific we understand that action outdoor and adventure sports enthusiasts as well as everyday enthusiasts take great pride and satisfaction in recording and viewing first person footage captured by our hands free action cam For this reason the ATC3K was designed and engineered with e...

Страница 3: ...onsible for injuries or property damage incurred during participation of any high risk sport activity not endorsed or recommended by Oregon Scientific Should the camera malfunction under these circumstances it would not be covered by the warranty The warranty will cover manufacturing defects Notes on copyright Users are asked to note that the transfer of memory containing photos or data protected ...

Страница 4: ...rease applied before use underwater or in wet conditions Using the camera in cold weather We recommend using Energizer e2 lithium batteries in cold weather Don t use the camera in extreme temperatures as this may cause the camera to malfunction Attention Non rechargeable batteries are not to be recharged Rechargeable batteries are to be removed from the camera before being charged Rechargeable bat...

Страница 5: ...l last one Auto Shut Off 30 minutes Battery 2 x 1 5V AA alkaline batteries included Dimensions 40mm diam x 110mm length Operation system Win 2000 XP Vista and Apple Mac X 10 4 and below IV Computer System Requirements Minimum System Requirements Pentium III 800 MHz or higher Windows 2000 Windows XP Windows Vista and Apple Mac X 10 4 and below 128 MB RAM 800 MB Free hard disk space SVGA 800 x 600 r...

Страница 6: ...7 SD card not included 28 Battery door 29 Batteries included V Camera Description 1 Lens 2 Camera grip 3 Screw 4 Nut 5 Handlebar grip 6 Helmet grip 7 O ring 8 USB cable 9 AV cable 10 Rubberized patch 11 Velcro patch 12 Short velcro strap 13 Long velcro strap 14 Silicon rubber head strap 15 Bolt 16 Mount lock and tripod mount 8 7 2 3 15 16 17 10 12 13 14 11 7 8 9 4 5 6 1 20 21 22 23 24 18 19 25 26 ...

Страница 7: ...the webcam stand 3 Adjust the angle of the camera VI Camera Mounting Description The camera can be mounted in a number of ways using the straps and the velcro patch provided Please follow the methods of mounting as suggested below Fixing the position of the camera a With the base of the camera facing you turn the clip clockwise to tighten its position b With the base of the camera facing you turn ...

Страница 8: ...may be damaged if the SD card is inserted or removed while the camera is on 12 VII Camera Usage Battery Installation Use Caution the edge of the base clip may be sharp When unscrewing the cover make sure the clip is in the same direction as the lens Observe the following precautions when unscrewing the cover of the camera 1 Unscrew the cover at the end of the unit 2 Place your finger on the lip wh...

Страница 9: ...cording one beeping sound The time elapsed will be shown on the LCD screen 3 Press and hold the Movie shutter button again for 2 seconds to stop recording two beeping sounds The length of the video footage will show on the LCD screen for 2 seconds after which the remaining time will be shown the remaining time is an estimate only 4 Press the Menu button to select the desired resolution 640 x 480 3...

Страница 10: ...natively you can hold Menu down for 2 seconds This will exit menu mode Press Menu button Icon Title Description High resolution 640x480 pixels Sound Delete the last video footage Delete all video footage Date and Time 30 frames per second Low battery SD card Large video format less storage capability Sound recording Erases the last video footage taken Erases all video footage stored in the camera ...

Страница 11: ...e LCD screen shows the correct icon Press the Confirm button to confirm your selection 320 X 240 pixel VGA Item Picture size fps QVGA 640 X 480 pixel 30 30 Privacy Mode This mode allows the user to disable the sound features The privacy icon will be flashing and the current mode it is in will not be shown Press Menu to go onto the next menu mode Sound Recording Or press Confirm to enter the privac...

Страница 12: ...camera press the Menu button until the LCD screen shows Press the Confirm button to verify Note It may take a few minutes to delete multiple files at one time Setting Date Time Clock Set Shift to the Date icon in the Menu mode by pressing the Menu button repeatedly When the Date icon is flashing press the Confirm button to change the date and time Setting the Year 1 Press the Menu button to adjust...

Страница 13: ... be displayed on the LCD screen The remaining time on the SD card will also be displayed on the LCD screen All of the video footage will now be saved onto the SD card Note 1 If there is an error on the SD memory card the SD card icon and the letters Err will be displayed on the LCD screen In this case turn off the camera and remove the SD card 2 The SD card is equipped with a Write Protect switch ...

Страница 14: ...ter folder 6 Open the 100ATC3K folder in the DCIM folder to start selecting your desired video files Copy the desired video to your PC Folder Composition Removable disk Internal Memory SD Memory Card DCIM 100ATC3K AVI_0001 AVI_0002 AVI_0003 X Webcam installation Warning This hardware has not passed Windows Logo testing Users may install the webcam feature but do so at their own risk By installing ...

Страница 15: ...options 3 Next select Browse my computer for driver software advanced 4 After following step 3 you should select browse CD drive then click next 5 When the Windows Security pop up window appears click Install this software anyway to continue installing ...

Страница 16: ...n Windows XP Note Before installing the software please ensure the CD is in the CD drive 1 With the USB cable inserted and camera on select C on the LCD screen A pop up window will appear Select No not this time then click next 2 Select Install from a list or specific location Advanced then click next ...

Страница 17: ...a is now complete Repeat these steps again to install the OS Video Camera and to complete the webcam installation 6 Once you have installed the webcam enter My Computer and double click on the OS Video Camera icon this will open a new window and show the real time view of your ATC3K Your camera is now ready to be used as a webcam Webcam Installation on Windows 2000 Note Before installing the softw...

Страница 18: ...his device so that I can choose a specific driver 3 On the next window select Other devices then click next 4 On the next window click have disk then select the CD drive 5 Select Win2000 from the CD drive then select the icon named OSUsb before clicking Open ...

Страница 19: ...33 34 6 Ensure the path name is correct then click OK 7 Select OS Digital Camera then click next 8 When the next window appears click Next 9 At this window click the Yes button ...

Страница 20: ...ure Device will begin installing Repeat the above steps until that has been installed 12 When in the Win2000 folder in the CD remember to select OSVid not OSUsb 13 Click Next after selecting the OS Video Camera 14 Once you have finished installation your camera will be ready to use as a webcam ...

Страница 21: ... Webcam USB mode 1 To use the Webcam function whilst the mode is in F press Menu This will change the mode to C Press Confirm to select Once selected the computer will recognize the camera as a webcam 2 While in either mode to change to the other users must disconnect from their PC and reconnect going through the entire selection procedure again 3 The camera will use power from the computer Note 1...

Страница 22: ...cturer of your USB card I can t capture video footage Ensure there is enough space on the internal memory of ATC3K or the SD card the display will tell you how much time there is left for video recording Ensure the SD card is not locked The letters Err will be displayed if the SD card is locked The remaining time is not accurate The remaining time is an estimate The remaining time depends not only...

Страница 23: ...y approved by the party responsible for compliance could void the user s authority to operate the equipment NOTE This equipment has been tested and found to comply with the limits for a Class B digital device pursuant to Part 15 of the FCC Rules These limits are designed to provide reasonable protection against harmful interference in a residential installation This equipment generates uses and ca...

Отзывы: