background image

OREC RM60W 

“only the English version of this maual can be used as a reference.” 


INTRODUCTION 


Forword to the user 

Read this manual before any use of your mower, only the herein instructions shall help you to achieve an efficient 

and safe work. 

A safe use will only result from the manner you will use the machine in accordance with the restrictions described 

in this manual. Thus, you must know and follow all the safety measures in this manual and those relating to the 

use of your tractor. 

The mower that you have just bought has been designed and manufactured for your entire satisfaction. As any 

other mechanical machine, it requires a proper maintenance and must be kept clean. Grease the machine like 

indicated. Follow the rules and safety indications as described in this manual and as showed on the preventive 

instruction stickers. 

About maintenance, always mind that your OREC dealer has the skills, the genuine parts and the necessary tools 

to solve the possible problems. 

Use only the OREC original parts : “ non genuine ” parts will not assure you of a correct and safe working and are 

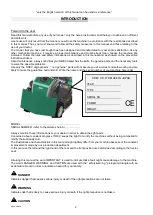
likely to make the guarantee null and void. Write the name and the serial number of your machine hereunder : 


MODEL :.................................................................................. 

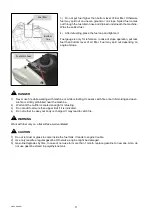
SERIAL NUMBER  (refer to the pictures herein) :................... 


Always mention these informations to your dealer in order to obtain the right parts. 

Concerned about constant progress, OREC keeps the right to modify the machines without being compelled to 

modify those already sold. 

The illustrations and characteristics in this manual might lightely differ from your machine because of the constant 

improvements made by our  production department. 

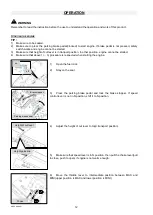
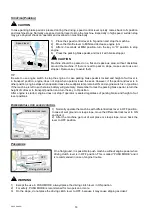
In this manual, the left and the right hand or the rear and the front position are determined according to the tractor 

seat. 


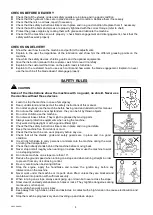
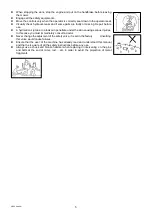
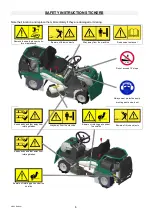
All along this manual the word IMPORTANT is used to indicate that a fault might cause damage to the machine. 

The words DANGER, WARNING, and CAUTION are used with the “ safety/warning ” pictogram (triangle with an 

exclamation mark) in order to indicate a hazard for your safety. 


DANGER


Indicates danger that causes serious injury or death if the right precautions are not taken. 


WARNING


Indicates risk that is likely to cause serious injury or death if the right precaution is not taken. 


CAUTION


OREC CO.,LTD MADE IN JAPAN 

YEAR                     


TYPE                     

SERIAL NO,                 

CE


POWER                   

WEIGHT                   


Содержание RABBIT RM60W

Страница 1: ...anual carefully before any use of the machine keep it as a reference For any question about this manual please report to your OREC dealer or to the distributor of your country OREC CO LTD 548 22 HIYOS...

Страница 2: ...of a correct and safe working and are likely to make the guarantee null and void Write the name and the serial number of your machine hereunder MODEL SERIAL NUMBER refer to the pictures herein Always...

Страница 3: ...38 MEASUREMENT OF VIBRATIONS 38 LIMITED WARRANTY 39 NOTES 39 SPECIFICATIONS Model RMK60W Engine KAWASAKI FS541V Transmission Hydrostatic Forward speed 0 9 km h Reverse speed 0 7 km h Cutting width 705...

Страница 4: ...machine before having read and understood this manual Do not use the machine near bystanders they can be hit by thrown objects Do not let children use the machine Do not wear loose clothes They might...

Страница 5: ...leak can penetrate under the skin causing serious injuries In this case you must immediately consult a doctor Never change the adjusment of the safety valve it is set in the factory Unsetting this val...

Страница 6: ...re of thrown objects Stay away from the machine Read owner s manual Do not exceed 15 slope Always wear protective equip ment against noise dust Keep hands and feet away from rotating blades Stay away...

Страница 7: ...lever Blade Clutch Lever Diff lock lever Speed Auto cruise lever Brake Pedal Seat Driving clutch lever Fuse BOX Pilot lamp GREEN Hour meter Parking brake light Steering wheel Fuel Tank Buttery BOX Br...

Страница 8: ...OFF Blade clutch lever cannot be activated when height of cut lever is in transport position DIFFERENTIAL LOCK LEVER Normally operate the machine with differential lock lever in OFF position Shift th...

Страница 9: ...engien switch remains I CAUTION Switch off the engine switch when engine is stopped Or start the engine again If engine is left stopped battery power may be lowered DRIVING CLUTCH LEVER Normally opera...

Страница 10: ...Place the machine on flat surface and remove the oil gauge 2 Edge of oil cap is designed as oil gauge Wipe the oil gauge with cloth and insert it to check the oil level If oil level is not between up...

Страница 11: ...fueling It causes catch fire or burn Smoking and open air fire is strictly prohibited near the machine 2 Wait until the muffler is cooled enough for refueling 3 Do not add fuel more than upper limit i...

Страница 12: ...4 Make sure that above 1 3 procedure is respected when starting the engine 1 Open the fuel cock 2 Stay on the seat 3 Press the parking brake pedal and lock the brake stopper If speed control lever is...

Страница 13: ...ouble of cell motor If engine is warm enough start the engine with throttle lever at intermediate position TIP Warming up the engine can circurate the oil inside the engine and it is better for engine...

Страница 14: ...ne stops when operator leave the seat pilot lamp remains ON and engine switch is in I position If the machine is left in such status battery will get empty Remember to lock the parking brake pedal ret...

Страница 15: ...de may touch the bridge and it may cause tipping over 4 Keep the differential lock lever to ON and do not move it on the bridge 5 On the truck keep the engine off and fuel cock closed and remove the k...

Страница 16: ...object Check the field condition prior to the mowing work CAUTION 1 Wear protective cloth boots hat helmet protective grasses and gloves 2 Check the field in advance and remove stone stamp wire or can...

Страница 17: ...lever operate offset R When lever is pulled offset will be closed Offset lever is adjustable in 3 position closed half open and full open Choose offset deck position suitable for the field CAUTION 1...

Страница 18: ...section and filling up It is possible to inspect the oil by removing the transmission plug behind the transmission If oil reach the lowest level of the plug proper volume is filled Replacement 1 Oil s...

Страница 19: ...it for 30 seconds then add oil up to FULL level 4 After the engine oil is filled make sure that oil cap is securely fixed OIL FILTER REPLACEMENT CAUTION Do not use tool to fit oil filter and fit it by...

Страница 20: ...sorp the water caused by condensation Replacement CAUTION 1 In case of HST oil replacement wait until HST oil tank and HST unit is cooled down They are still very hot just after the engine is stopped...

Страница 21: ...oil Black Bad Oxidated and degrade Change the oil Recommended oil VG46 or SAE10W30 Oil quantity 500 ml VG46 oil is used when it is shipped from factory Refill the same type of oil Never mix different...

Страница 22: ...strongly to avoid damage of element 2 When hitting paper element pay attention not to damage the paper 3 When drying paper element may be damaged if it is blown by hot air Blow with light warm air or...

Страница 23: ...before every use 1 It is recommended to move up the seat to blow the air to remove grass and dust Use of high pressure washer is not recommended which may cause engine trouble by water 2 Also remove g...

Страница 24: ...removed for adjustment place them in original position 8 Do not overwork during the first 2 3 hours in order to make each part in good condition 9 Remember to realize maintenance after each use regul...

Страница 25: ...n spring is about 120mm free length of spring is 80mm BLADE BELT ADJUSTMENT UNDER SEAT BRACKET Visually inspect the damage on blade belt If there is crack of wear replace the belt to new one BLADE HOL...

Страница 26: ...just offset belt in right and left BLADE BRAKE ADJUSTMENT 1 Blade stops in 5 seconds when the brake clutch lever is moved to OFF position If not loosen the lock nut and adjust it by mov ing the adjust...

Страница 27: ...2 After the adjustment lock the parking brake pedal and place driving clutch lever at OFF position and push the machine forward backward to make sure if machine does not start moving on slope CAUTION...

Страница 28: ...If blade belt is tensioned too much Move the adjust nut toward A After the adjustment securely tighten the lock nut TIP Length of spring Cutting height at maximum L about 120mm Cutting height at lowe...

Страница 29: ...djustment securely tighten the lock nut TIRE PRESSURE ADJUSTMENT Refer to table below to check the pressure of tires Tire size Pressure kPa Front wheel 3 50 7 120 Rear wheel 16x7 00 8 140 CAUTION Pay...

Страница 30: ...ime Replacing only the particular blade may cause vibration CAUTION 1 Ask skilled person with proper tool to replace the blades 2 Bag nut is consumable parts In case of sharpening the blades replace t...

Страница 31: ...T BLADE REPLACEMENT TIP Blade rotates left on cutter unit L and rotates right in cutter unit R Therefore on M12 bag nut on cutter unit R left hand screw is used to avoid loosening And on M12 bag nut o...

Страница 32: ...h the remaining gasoline Keep the place well ventilated WARNING Servicing the machine with grass or dust remaining on the machine they might be choked and cause engine overheat CAUTION 1 Storing the m...

Страница 33: ...C RM60W 33 5 Operate the machine for short time and check if abnormal sound and abnormal temperature are found or not 6 For warming up each part of machine operate the machine lightly for first 2 3 ho...

Страница 34: ...r O O O Oil Engine oil Oil filter Quantity quality leak or mixing of obstacle replacing period Oil O O O FIlter O O O Engine oil First 5h later at every 50h Filter at every 100h Fuel Fuel hose filter...

Страница 35: ...er and engine rotation is not smooth Select proper oil depending on weather Ingintion coil or unit is not good Replace ignition coil or unit Spark plug is not good Check the gap between terminal and a...

Страница 36: ...to new one Grass remains around knife neck guard Clean around the knife neck guard Blade shaft is bent Replace the blade shaft Blade belt is broken Replace the belt to new one Blade stay is bent Repla...

Страница 37: ...3 9 49 to 53 9 72 6 to 82 4 12 44 1 to 53 9 83 4 to 93 2 93 2 to 107 9 93 2 to 107 9 122 6 to 137 3 14 63 7 to 78 5 117 7 to 132 4 132 4 to 147 1 147 1 to 166 7 205 9 to 225 6 16 88 3 to 107 9 152 to...

Страница 38: ...oustic power level 105 18 dB A Granted acoustic power level 106 dB A Conformity assesment 2000 14 EC Annex V Notified body n 0088 Lloyd s Register Quality Assurance 71 Fenchurch street London EC3S 4BS...

Страница 39: ...ed repaired or replaced The part s must be returned with freight prepaid and must be accompanied with a proof of the purchase The part s must be packed with the greatest of care to ensure their protec...

Отзывы: