Installing Place
5-8
Oracle® Retail Place Installation Guide
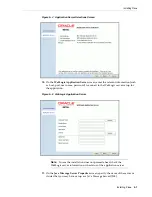
Figure 5–6
Java Message Server Properties Screen
12.
Click
Next
. The
Database Selections
screen appears.
13.
On the
Database Selections
screen, click
Oracle
, and then click
Next
.
Figure 5–7
Database Selections Screen
14.
On the
Database Properties
screen, enter the following database information for
the
Place Front End
,
Actual History
,
Application
,
Audit
, and
Plan Front End
databases:
■
Database server address
– Enter the address of the database server.
■
Database server port
– Enter the server port number associated with your
database.
■
Database name
– Enter the name used to identify your database.
Содержание Retail Place 12.2
Страница 1: ...Oracle Retail Place Installation Guide Release 12 2 November 2008 ...
Страница 4: ......
Страница 8: ...viii ...
Страница 22: ...Creating the Database Links 3 4 Oracle Retail Place Installation Guide ...
Страница 28: ...Setting Up the Maximum Message Size 4 6 Oracle Retail Place Installation Guide ...
Страница 54: ...Troubleshooting Installation Issues 5 26 Oracle Retail Place Installation Guide ...
Страница 62: ...Setting Up a Foreign JMS Server on WebLogic Server 6 8 Oracle Retail Place Installation Guide ...


