background image

5

6

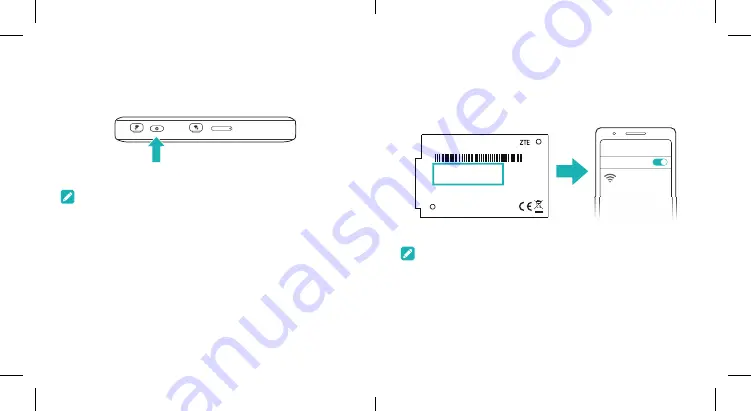
5. Access the Internet

• 

WiFi:

 The default WiFi SSID and password can be found on 

the device label. Connect to the WiFi network with your 

mobile device and then access the Internet.

Model:MU5001

WiFi SSID1:

WiFi SSID2:

WiFi Key:

IMEI:

Made in China 

Device Manager Website:

Password:


Wi-Fi

XXXXXXXX

NOTE:

You can touch the screen to view the default WiFi SSID 

and password.

4. Start your Device

Press and hold the power button until the screen lights up and 

then the device will connect to the Internet automatically.

NOTE:

If the battery is extremely low, you may be unable to power on 

the device. Please charge your device first.

Содержание ZTE MU5001

Страница 1: ...ZTE MU5001 5G Modem Let s go Getting started with your device ...

Страница 2: ... the back cover and view the label in the battery slot to get the default information The following figure is for reference only Model MU5001 WiFi SSID1 WiFi SSID2 WiFi Key IMEI Made in China Device Manager Website Password 2 Instal the Battery 1 Open the back cover ...

Страница 3: ...tery 3 Put the cover back 3 Insert the nano SIM Card 1 Insert the tip of the tray eject tool into the hole 2 Pull out the card tray and place the nano SIM card on the tray as shown Carefully slide the tray back into place ...

Страница 4: ...Fi SSID2 WiFi Key IMEI Made in China Device Manager Website Password Wi Fi XXXXXXXX NOTE You can touch the screen to view the default WiFi SSID and password 4 Start your Device Press and hold the power button until the screen lights up and then the device will connect to the Internet automatically NOTE If the battery is extremely low you may be unable to power on the device Please charge your devi...

Страница 5: ... WiFi SSID2 WiFi Key IMEI Made in China Device Manager Website Password 2 Launch your Internet browser Enter the Device Manager Website IP address in the address bar 3 Input the Password and then click Login 4 After the 5G Mobile Hotspot configuration web page is opened you can change the default settings NOTE You can also change some settings by touching the screen USB Type C cable Connect to you...

Страница 6: ...USB Type C jack Charge the device or connect to the USB port of a computer Network signal strength 5G 4G Network type New SMS Battery power level Settings Touch to configure the device settings WiFi Touch to configure the WiFi settings 1 Show the number of connected users Connected with your computer via a network cable USB Connected with your computer via a USB Type C cable Touch Screen Icons and...

Страница 7: ...se only one network adapter in your PC Do not use any proxy server Troubleshooting Problem Recommended Action The connection between your device and a PC through a USB cable cannot be established automatically If the driver of your device is abnormal reinstall the software You need to uninstall the software first The connection between your device and a client through WiFi cannot be established En...

Страница 8: ...s the right to make modifications on print errors or update specifications in this guide without prior notice Disclaimer Images and screenshots used in this guide may differ from the actual product Content in this guide may differ from the actual product or software Trade marks Optus and the Optus logos are trade marks of Optus Other trade marks and trade names are those of their respective owners...

Страница 9: ...rated inside and outside the device Do not use it until it becomes dry Handle the device carefully Do not drop bend or strike it Otherwise the device may be damaged Warning and Notice To the User If inadequately shielded some electronic devices for example the electronic system of vehicles may be affected by the electromagnetic interference caused by the device Consult the manufacturers of such de...

Страница 10: ... dismantle and repair the device A humidity between 5 and 95 is recommended Do not connect the charger while using the device for a long period Failing to do so will trigger the protection mechanism of the battery and the battery will not be charged If you want to charge the battery please reconnect the charger Do not connect the charger while using the device for a long period or use the device a...

Страница 11: ...YESCOR5183 1428782 10 21 ...

Отзывы: