background image

English 17

SETUP AND INSTALLATION

Remote setup

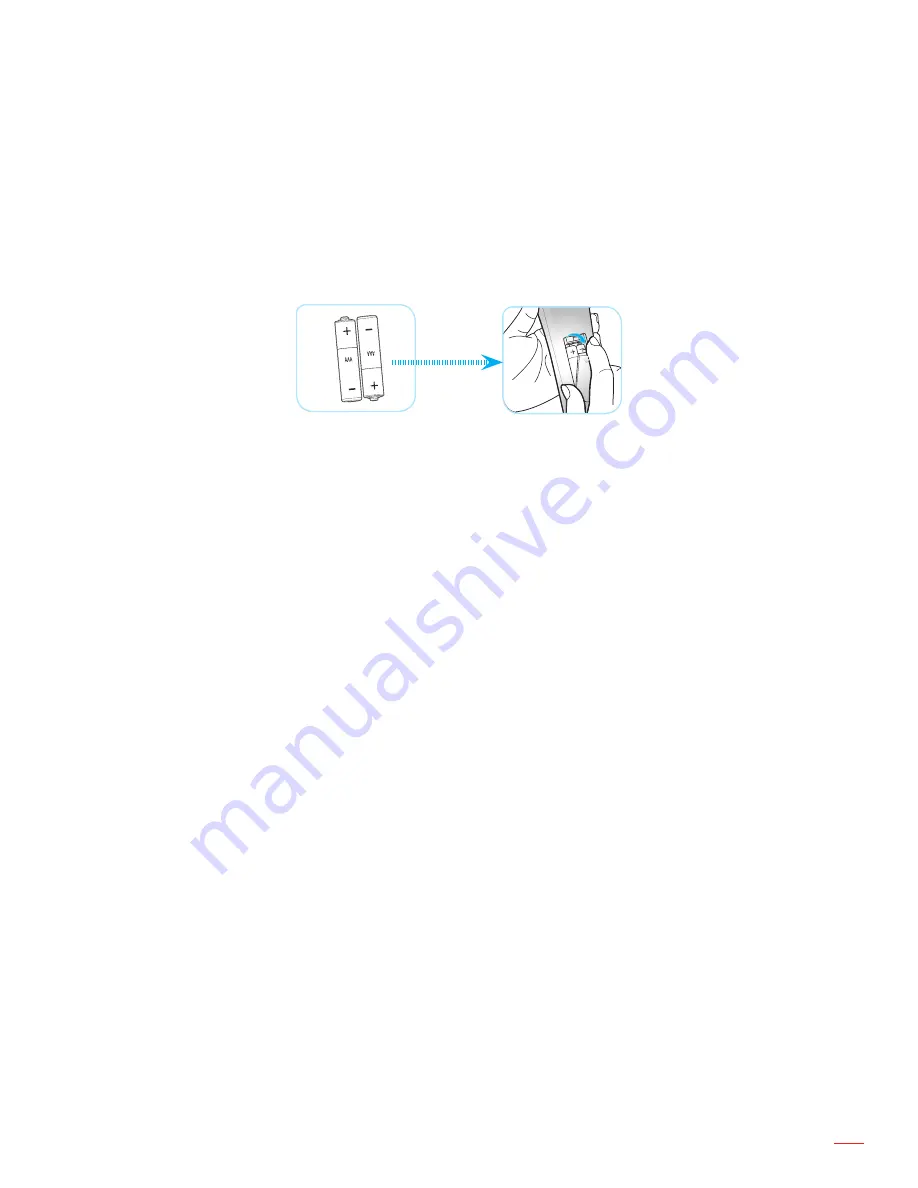
Installing / replacing the batteries

Two AAA size batteries are supplied for the remote control.

1. 

Remove the battery cover on the back or the remote.

2. 

Insert AAA batteries as illustrated.

3. 

Replace back cover on remote.

Notee:


Replace only with the same or equivalent type batteries.

CAUTION

Improper use of batteries can result in chemical leakage or explosion. Be sure to follow the instructions below.


‡

Do not mix batteries of different types. Different types of batteries have different characteristics.


‡

Do not mix old and new batteries. Mixing old and new batteries can shorten the life of new batteries or 

cause chemical leakage in old batteries. 


‡

Remove batteries as soon as the are depleted. Chemicals that leak from batteries that come in contact 

with skin can cause a rash. If you find any chemical leakage, wipe thoroughly with a cloth.


‡

The batteries supplied with this product may have a shorter life expectancy due to storage conditions.


‡

If you will not be using the remote control for an extended period of time, remove the batteries.


‡

When you dispose of the batteries, you must obey the law in the relative area or country.

Effective range

Infra-Red (IR) remote control sensor is located on the rear side of the projector. Ensure to hold the remote control 

at an angle within 30 degrees perpendicular to the projector’s IR remote control sensors to function correctly. The 

distance between the remote control and the sensor should not be longer than 7 meters (~ 23 feet).


‡

Make sure that there are no obstacles between the remote control and the IR sensor on the projector 

that might obstruct the infra-red beam.


‡

Make sure the IR transmitter of the remote control is not being shined by sunlight or fluorescent lamps 

directly.


‡

Please keep the remote controller away from fluorescent lamps for over 2 m or the remote controller 

might become malfunction.


‡

If the remote control is close to Inverter-Type fluorescent lamps, it might become ineffective from time 

to time.


‡

If the remote control and the projector are within a very short distance, the remote control might 

become ineffective.


‡

When you aim at the screen, the effective distance is less than 5 m from the remote control to the 

screen and reflecting the IR beams back to the projector. However, the effective range might change 

according to screens.

Содержание W515ST-M

Страница 1: ...User manual DLP Projector...

Страница 2: ...11 Remote 12 SETUP AND INSTALLATION 13 Installing the projector 13 Connecting sources to the projector 15 Adjusting the projector image 16 Remote setup 17 USING THE PROJECTOR 19 Powering on off the pr...

Страница 3: ...ter settings menu 61 3D Setup 62 MAINTENANCE 63 Replacing the lamp 63 Replacing the lamp continued 64 Cleaning the dust filter 65 ADDITIONAL INFORMATION 67 Compatible resolutions 67 Image size and pro...

Страница 4: ...esult in fire or electric shock Do not use under the following conditions In extremely hot cold or humid environments i Ensure that the ambient room temperature is within 5 C 40 C ii Relative humidity...

Страница 5: ...atteries from remote control before storage If the battery batteries are left in the remote for long periods they may leak Do not use or store the projector in places where smoke from oil or cigarette...

Страница 6: ...right This publication including all photographs illustrations and software is protected under international copyright laws with all rights reserved Neither this manual nor any of the material contain...

Страница 7: ...technician for help Notice Shielded cables All connections to other computing devices must be made using shielded cables to maintain compliance with FCC regulations Caution Changes or modifications n...

Страница 8: ...regions Please consult your dealer for detailed information Standard accessories Carry bag Lens cap VGA cable Optional accessories Note Optional accessories vary depending on model specification and...

Страница 9: ...air vents optional accessory vary depending on model specification and region No Item No Item 1 Lens Cap 8 Lamp Cover 2 IR Receiver 9 Ventilation outlet 3 Lens 10 Speaker 4 Lens Shift vertical 11 Inpu...

Страница 10: ...UT 5V connector 2 USB B mini connector Fireware upgrade 13 12V OUT connector 3 1 x HDMI and 1 x HDMI MHL Connector 14 USB Power Out 1 5A connector 4 DisplayPort connector 15 Microphone connector 5 VGA...

Страница 11: ...INTRODUCTION Keypad 5 3 4 9 11 8 10 2 6 1 7 No Item No Item 1 Enter 7 Source 2 Keystone Correction 8 Four Directional Select Keys 3 Power 9 Temp LED 4 Information 10 Lamp LED 5 Menu 11 On Standby LED...

Страница 12: ...Item No Item 1 Power on 17 Power off 2 Geometric Correction 18 PIP PBP 3 Function button F1 Assignable 19 Function button F2 Assignable 4 Mode 20 AV mute 5 Four directional select keys 21 Enter 6 Inf...

Страница 13: ...tween the projector and the rest of your equipment Table mount front Ceiling mount front Table mount rear Ceiling mount rear Projector should be placed flat on a surface and 90 degrees perpendicular t...

Страница 14: ...es Minimum 500mm 19 69 inches Minimum 100mm 3 94 inches Minimum 500mm 19 69 inches Minimum 300mm 11 81 inches Ensure that the intake vents do not recycle hot air from the exhaust vent When operating t...

Страница 15: ...t 5V Full3D HDMI 1 MHL HDMI 2 DisplayPort MOUSE SERVICE Out wer A 12 15 13 14 1 5 6 7 8 2 3 4 16 17 18 9 10 11 No Item No Item 1 RJ 45 cable 10 USB dongle USB Power Charger 2 RJ 45 cable Cat5 cable 11...

Страница 16: ...he projector 2 Rotate the adjustable foot clockwise or anticlockwise to raise or lower the projector Tilt Adjustment Feet Tilt Adjustment Ring Focus To adjust the focus turn the focus lever clockwise...

Страница 17: ...e batteries When you dispose of the batteries you must obey the law in the relative area or country Effective range Infra Red IR remote control sensor is located on the rear side of the projector Ensu...

Страница 18: ...o 5 DVI 6 BNC 7 YPbPr 8 DisplayPort 9 3D 0 Re Sync Menu Pg O n T e s t M o d e P a tt e rn M o u s e S w it c h O ff F 1 F 2 A V M u te E N T E R S o u rc e V o lu m e V K e y s to n e In fo V G A 1 1...

Страница 19: ...cap Powering on 1 Remove the lens cap 2 Securely connect the power lead and signal source cable When connected the On Standby LED will turn amber 3 Turn on the projector by pressing the either on the...

Страница 20: ...0 seconds for the cooling cycle and the On Standby LED will flash blue When the On Standby LED turns solid red the projector has entered standby mode If you wish to turn the projector back on you must...

Страница 21: ...ill automatically detect the source If multiple sources are connected push the source button on the projector keypad or remote to select the desired input F3 On Geometric Mode Correction PIP PBP Off F...

Страница 22: ...g a selection on a particular page press or Enter key to enter sub menu 3 Use keys to select the desired item in the sub menu and then press or Enter key to view further settings Adjust the settings b...

Страница 23: ...lackboard DICOM SIM User 3D Brightness 50 50 Contrast 50 50 Sharpness 1 15 Color 50 50 Tint 50 50 Advanced BrilliantColorTM 1 10 Gamma Film Graphics 1 8 2 0 2 2 2 6 Blackboard DICOM Color Temp Warm St...

Страница 24: ...Reset Exit Signal RGB Automatic On Off Phase 0 31 Frequency 10 10 H Position 5 5 V Position 5 5 Exit Signal Video White Level 0 31 Black Level 5 5 IRE 0 7 5 NTSC only Exit Exit Reset Display Format XG...

Страница 25: ...Bottom Right ICONS Reset 3D 3D Mode DLP Link VESA 3D Off 3D 2D 3D L R 3D Format Auto SBS Top and Bottom Frame Sequential 3D Sync Invert On Off Exit Setup Language English Deutsch Fran ais Italiano Esp...

Страница 26: ...Off Security Timer Month Day Hour Change Password Exit Projector ID 00 99 Audio Settings Internal Speaker On Off Mute On Off Volume Audio 0 10 Mic 0 10 Audio Input Default Audio 3 L R Audio 1 2 mini j...

Страница 27: ...Exit Control Settings Crestron On Off port 41794 Extron On Off port 2023 PJ Link On Off port 4352 AMX Device Discovery On Off port 9131 Telnet On Off port 23 HTTP On Off port 80 Exit Reset Options Inp...

Страница 28: ...For models with HDBaseT the default value is HDBaseT DP VGA2 S Video Test Pattern Zoom Info Format F2 HDMI2 Default Zoom For models with HDBaseT the default value is HDBaseT DP VGA2 S Video Test Patt...

Страница 29: ...n check box style default is unchecked Power Mode Standby Active Eco Exit Lamp Settings Lamp Hour Lamp Reminder On Default Off Off Lamp Mode Bright Eco Power Power 100 95 90 85 80 Lamp Reset Yes No Ex...

Страница 30: ...a blackboard green DICOM SIM This mode can project a monochrome medical image such as an X ray radiography MRI etc User Memorize user s settings 3D To experience the 3D effect you need to have 3D glas...

Страница 31: ...g Signal Film BrilliantColorTM This adjustable item utilizes a new color processing algorithm and enhancements to enable higher brightness while providing true more vibrant colors in picture Press the...

Страница 32: ...ecrease a chosen color gain and bias Press the to increase a chosen color gain and bias RGB Gain Bias Red Gain Green Gain Blue Gain Red Bias Green Bias Blue Bias Reset Exit Color Matching Press the in...

Страница 33: ...e this function the Phase frequency items are grayed out and if Signal is not automatic the phase frequency items will appear for user to manually tune and saved in settings after that for next time p...

Страница 34: ...n inputting Video signals Note IRE is only available with NTSC video format Press the to decrease the amount of color in the image Press the to increase the amount of color in the image Display menu F...

Страница 35: ...o allows you to watch a 2 35 1 content include Anamorphic DVD and HDTV film source that support anamorphic wide is enhanced for 16x9 Display in a wide 2 35 1 image In this case there are no black bars...

Страница 36: ...type 16x9 16 9 screen 480i p 576i p 1080i p 720p PC 4x3 Scale to 1440x1080 16x9 Scale to 1920x1080 LBX Scale to 1920x1440 then get the central 1920x1080 image to display Native mode 1 1 mapping center...

Страница 37: ...16 9 there is no 16 x 10 format in this condition When screen type is 16 10 there is no 16 x 9 format in this condition If user change to auto will auto change the display mode at same time 16 10 scr...

Страница 38: ...720 1280 720 1920 1080 1280 720 WXGA scaling table screen type 16x9 16 9 screen 480i p 576i p 1080i p 720p PC 4x3 Scale to 960x720 16x9 Scale to 1280x720 LBX Scale to 1280x960 then get the central 12...

Страница 39: ...16 9 screen 480i p 576i p 1080i p 720p PC 4x3 Scale to 1440x1080 16x9 Scale to 1920x1080 LBX Scale to 1920x1440 then get the central 1920x1080 image to display Native mode 1 1 mapping centered No scal...

Страница 40: ...ative mode No scaling will be made the resolution of the projection depends on the input source Auto If source is 4 3 the screen type will be automatically resized to 1024x768 If source is 16 9 the sc...

Страница 41: ...image position horizontally V Press the to shift the projected image position vertically Geometric Correction H Keystone Horizontal Keystone Press the to correct horizontal keystone distortion V Keyst...

Страница 42: ...t Display the right frame of 3D content 3D Format 3D Format Auto When a 3D identification signal is detected the 3D format is selected automatically SBS Display 3D signal in Side by Side format Top an...

Страница 43: ...ss into the sub menu and then use the or or or key to select your preferred language Press Enter to finalize the selection Language Exit Projection Front This is the default selection The image is pro...

Страница 44: ...nal is enabled Exit Choose Exit to exit the menu Setup Security menu Security SETUP Exit Off Security Security Timer Change Password Security On Choose On to use security verification when the turning...

Страница 45: ...ojector will automatically shut down If you have forgotten your password please contact your local office for support Note The password default value is 1234 first time REMOTE Enter Current security C...

Страница 46: ...ade they will take effect the next time the projector is powered on Default The default startup screen Neutral Logo is not displayed on startup screen User Use stored picture from Logo Capture functio...

Страница 47: ...ad only MAC Address Display the MAC address read only DHCP On Projector will obtain an IP address automatically from your network Off To assign IP Subnet Mask Gateway and DNS configuration manually No...

Страница 48: ...ault user name and password is admin The steps in this section base on Windows 7 operating system Making a direct connection from your computer to the projector 1 Turn Off the DHCP option on project 2...

Страница 49: ...more information please visit http www crestron com and www crestron com getroomview Extron Use this function to select the network function port 2023 PJ Link Use this function to select the network f...

Страница 50: ...gistered trademark of Extron Electronics Inc of the United States AMX is a registered trademark of AMX LLC of the United States PJLink applied for trademark and logo registration in Japan the United S...

Страница 51: ...EO L R AUDIO3 IN S VIDEO VGA OUT VGA1 IN YPbPr VGA2 IN YPbPr RS 232C VIDEO LAN HDBaseT USB Power Out 1 5A 12V OUT 3D SYNC Out 5V Full3D HDMI 1 MHL HDMI 2 DisplayPort MOUSE SERVICE 2 On the PC Laptop s...

Страница 52: ...e following connection parameters DHCP Off IP Address 10 10 10 10 Subnet Mask 255 255 255 255 Gateway 0 0 0 0 DNS 0 0 0 0 10 Press Enter to confirm settings 11 Open a web browser for example Microsoft...

Страница 53: ...English 53 USING THE PROJECTOR Information page Main page Tool page Contact IT helpdesk...

Страница 54: ...Address of the projector 3 If Telnet Connection ready and user can have RS232 command input then Enter key pressed the RS232 command will be workable Specification for RS232 by TELNET 1 Telnet TCP 2 T...

Страница 55: ...f The projector will search for other signals if the current input signal is lost High Altitude When On is selected the fans will spin faster This feature is useful in high altitude areas where the ai...

Страница 56: ...Color Use this function to obtain an optimized screen image according to the wall color The available options Light Yellow Light Green Light Blue Pink and Gray Select Off to turn off this function Wa...

Страница 57: ...ote For models with HDBaseT the default value of F2 is HDBaseT F3 The default value is Info F3 Info Press into the next menu and then use or to select HDMI2 DP VGA2 S Video Test Pattern Zoom Info or F...

Страница 58: ...when a signal is detected without pressing the key on the projector Control Panel or on the remote control Auto Power Off min Sets the countdown timer interval The countdown timer will start when the...

Страница 59: ...ndby Active Choose Active to return to normal standby Eco Choose Eco to save power dissipation further 0 5W Exit Choose Exit to exit the menu Note Signal Power On and Power Mode Standby options are op...

Страница 60: ...the brightness Eco Choose Eco to dim the projector lamp which will lower power consumption and extend the lamp life Power Choose this option if you want to set the projector power setting manually Not...

Страница 61: ...lter Usage Hours OPTIONS Exit Yes Optional Filter Settings Optional Filter Installed Filter Reminer Filter Reset hr Optional Filter Installed Yes Display warning message after 500 hours of use No Turn...

Страница 62: ...r to page 42 Menu Display 3D 3D Mode DLP Link Menu Display 3D 3D Mode VESA 3D For 3D via a PC or Set top box 3D will not be displayed automatically Depending on the 3D content the image will either be...

Страница 63: ...tor has been cooled down for at least 30 minutes before changing the lamp Warning If ceiling mounted please use caution when opening the lamp access panel It is recommended to wear safety glasses if c...

Страница 64: ...nscrew the one screw on the lamp module 5 9 Lift up the lamp handle 6 and remove the lamp module slowly and carefully 7 10 To replace the lamp module reverse the previous steps 11 Turn on the projecto...

Страница 65: ...the index finger and thumb of your both hands hold the dust filter cover firmly 3 Slightly move the dust filter cover to the left and to the right direction to release it from the latches on the case...

Страница 66: ...jector is used in a dusty environment Procedure 1 Switch off the power to the projector by pressing the button on the remote control or on the Keypad of the projector 2 Disconnect the power cord 3 Rem...

Страница 67: ...x480 72Hz 1280x800 60Hz 1080P 1920x1080 60Hz 1920x1080i 60Hz 640x480 75Hz 1280x1024 60Hz WUXGA 1920x1200 60Hz RB 720 1440 x480i 60Hz 800x600 56Hz 1680x1050 60Hz 1920x1080p 60Hz 800x600 60Hz 1280x720 6...

Страница 68: ...768 120Hz Display port digital compatibility B0 Established Timing B0 Standard Timing B0 Detail Timing B1 Video Mode B1 Detail Timing 720x400 70Hz XGA WXGA Native timing 640x480p 60Hz 1366x768 60Hz 64...

Страница 69: ...ection distance WUXGA Desired Image Size Projection Distance C Diagonal Width Height Wide Tele m inch m inch m inch m feet m feet 0 76 30 0 65 25 44 0 4 15 9 0 5 1 64 0 5 1 64 0 91 36 0 78 30 53 0 48...

Страница 70: ...of Projection Lens Therefore the distance 5 2 cm 2 05 inch from the Base to the Center of Projection Lens needs to be added to each Vertical Lens Shift value 1080P Desired Image Size Projection Distan...

Страница 71: ...f Projection Lens Therefore the distance 5 2 cm 2 05 inch from the Base to the Center of Projection Lens needs to be added to each Vertical Lens Shift value WXGA Desired Image Size Projection Distance...

Страница 72: ...Shift values are always calculated from the Center of Projection Lens Therefore the distance 5 2 cm 2 05 inch from the Base to the Center of Projection Lens needs to be added to each Vertical Lens Shi...

Страница 73: ...44 8 15 2 13 7 20 3 20 3 192 0 173 7 18 3 16 5 24 4 24 4 240 0 217 2 22 9 20 6 30 5 30 5 288 0 260 6 27 4 24 7 36 6 36 6 320 0 289 6 30 5 27 5 40 6 40 6 400 1 362 0 38 1 34 3 50 8 50 8 480 1 434 3 45...

Страница 74: ...H Shift until the image reaches the maximum shift range towards the left Maximum shift to the left Mark A here 3 Adjust the H Shift until the image reaches the maximum shift range to the right Maximu...

Страница 75: ...ift 2 Adjust the V Shift until the image reaches the maximum shift range towards the bottom Maximum shift to the bottom Mark A here 3 Adjust the V Shift until the image reaches the maximum shift range...

Страница 76: ...English 76 ADDITIONAL INFORMATION A B Total shift Distance between A to B Center A B...

Страница 77: ...M4 3 Minimum screw length 10mm 423 90 100 00 100 00 129 47 185 00 70 46 330 91 294 43 129 47 81 02 62 35 15 71 Unit mm Lens Note Please note that damage resulting from incorrect installation will voi...

Страница 78: ...35 0D VGA1 XX12 8 7E 30 30 31 32 20 38 0D VGA1 Component XX12 6 7E 30 30 31 32 20 36 0D VGA 2 XX12 13 7E 30 30 31 32 20 31 33 0D VGA2 Component XX12 9 7E 30 30 31 32 20 39 0D S Video XX12 10 7E 30 30...

Страница 79: ...a 2D 35 30 50 a 35 30 XX341 n 7E 30 30 33 34 31 20 a 0D Blue Gain n 50 a 2D 35 30 50 a 35 30 XX330 n 7E 30 30 33 33 30 20 a 0D Cyan Hue n 50 a 2D 35 30 50 a 35 30 XX336 n 7E 30 30 33 33 36 20 a 0D Cy...

Страница 80: ...0 35 39 20 31 33 0D Bottom Right Right XX59 14 7E 30 30 35 39 20 31 34 0D Left XX59 15 7E 30 30 35 39 20 31 35 0D Up XX59 16 7E 30 30 35 39 20 31 36 0D Down XX516 7E 30 30 35 31 36 20 0D Four corners...

Страница 81: ...7E 30 30 37 32 20 33 0D Centre XX72 4 7E 30 30 37 32 20 34 0D Bottom Left XX72 5 7E 30 30 37 32 20 35 0D Bottom Right XX77 n 7E 30 30 37 37 20 aabbcc 0D Security Security Timer Month Day Hour n mm dd...

Страница 82: ...34 38 20 31 0D Display Mode Lock On XX348 0 7E 30 30 33 34 38 20 30 0D Off 0 2 for backward compatible XX195 0 7E 30 30 31 39 35 20 30 0D Test Pattern None XX195 1 7E 30 30 31 39 35 20 31 0D Grid XX1...

Страница 83: ...33 31 33 20 30 0D Off 0 2 for backward compatible XX112 1 7E 30 30 31 31 32 20 31 0D Reset Yes XX210 n 7E 30 30 32 30 30 20 n 0D Display message on the OSD n 1 30 characters SEND to emulate Remote XX1...

Страница 84: ...1 7E 30 30 31 32 35 20 31 0D Brightness OKn XX126 1 7E 30 30 31 32 36 20 31 0D Contrast OKn XX127 1 7E 30 30 31 32 37 20 31 0D Format OKn n 1 4 3 n 2 16 9 n 3 16 10 n 5 LBX n 6 Native n 7 Auto 16 9 o...

Страница 85: ...30 33 32 31 20 31 0D Filter Usage Hours OKbbbb bbbb Filter Usage Hours XX87 1 7E 30 30 38 37 20 31 0D Network Status Okn n 0 Disconnected n 1 Connected XX87 3 7E 30 30 38 37 20 33 0D IP Address Okaaa_...

Страница 86: ...he projector Power on 32 CD 02 On Press to turn on the projector PIP PBP PIP PBP 32 CD 78 PIP PBP Press to use the PIP PBP function Geometric Correction Correction 32 CD 96 Geometric Correction Geomet...

Страница 87: ...3299 Press until Power LED is flashing then press 01 99 to set the particular remote code ALL 32 CD 32CD 1 VGA 32 CD 8E 1 VGA Press to choose VGA source Use as numeric keypad number 1 2 S Video 32 CD...

Страница 88: ...tton on the keypad to open the Information menu Information button functions only when no input source is detected S N Number F W Version Current Input Source Resolution Refresh Rate Lamp Hours Filter...

Страница 89: ...se refer to pages 69 73 The image is stretched when displaying 16 9 DVD title When you play anamorphic DVD or 16 9 DVD the projector will show the best image in 16 9 format on projector side If you pl...

Страница 90: ...ace the lamp follow the procedures in the Replacing the Lamp section on pages 63 64 Remote control problems If the remote control does not work Check the operating angle of the remote control is withi...

Страница 91: ...s Flashing 0 25 sec off 0 25 sec light Error Lamp failure Flashing Steady light Error Fan failure Flashing Flashing Error Over temp Flashing Steady light Standby State Burn in mode Flashing Burnin War...

Страница 92: ...English 92 ADDITIONAL INFORMATION Fan failed Warning FAN LOCKED The projector will switch off automatically Please contact a service center for repair Out of display range Out Of Range...

Страница 93: ...r Out 1 5A Wired LAN port 1 x RJ 45 10 100 BASE T 100 BASE TX Service port RS232C connector 3D Sync VESA Wired Remote Color reproduction 1073 4 Million color Scan rate Horizontal Scan rate 15 375 91 1...

Страница 94: ...rd Vaillant 33 1 41 46 94 35 92100 Boulogne Billancourt France savoptoma optoma fr Spain C Jos Hierro 36 Of 1C 34 91 499 06 06 28522 Rivas VaciaMadrid 34 91 670 08 32 Spain Deutschland Wiesenstrasse 2...

Страница 95: ...www optoma com...

Отзывы: