User Controls
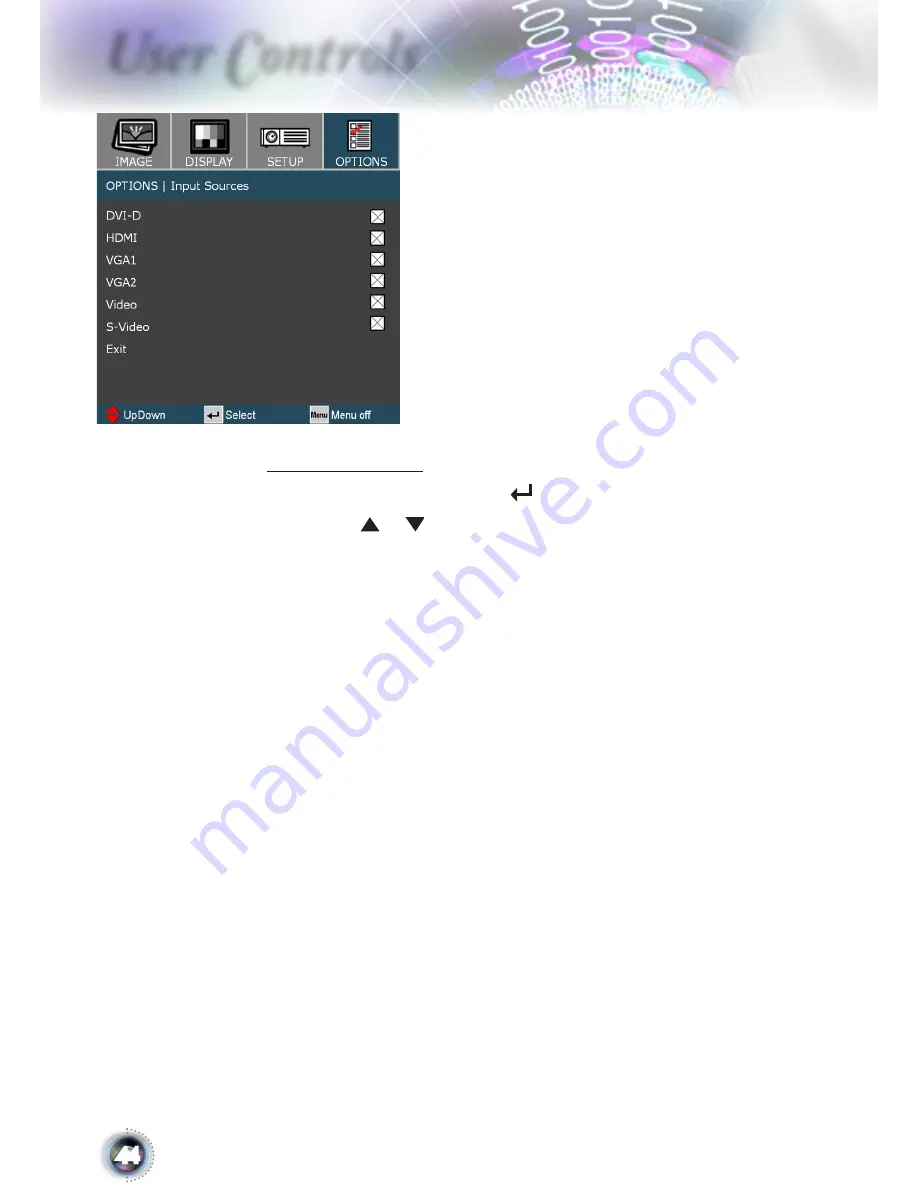
Input Sources
Enable input sources. Press
into the next menu as below and
then use or
to select. Press “Enter” to finalize the selection.
The projector will not search inputs that are de-selected.
Options | Input Source
Страница 1: ...arning Indicator 15 Adjusting the Projected Image 16 Adjusting the Projector s Height 16 Adjusting the Projector s Zoom Focus 17 Adjusting Projection Image Size 17 User Controls 18 Control Panel Remot...
Страница 2: ...t place the projector on a crowded coffee table sofa bed etc Do not put the projector in an enclosure such as a book case or a cabinet that restricts air flow 2 Do not use the projector near water or...
Страница 3: ...Warning When replacing the lamp please allow the unit to cool down Follow instructions as described on page 50 Warning This projector will detect the life of the lamp itself Please be sure to change t...
Страница 4: ...ng period of time Do not Block the slots and openings on the unit provided for ventila tion Use abrasive cleaners waxes or solvents to clean the unit Use under the following conditions In extremely ho...
Страница 5: ...the beam as much as possible A stick or laser pointer is recommended to avoid the need for the user to enter the beam When projector is used in a classroom adequately supervise students when they are...
Страница 6: ...XGA SWXGA SXGA SXGA WXGA HD XGA SVGA and VGA re sizing Macintosh compatible Full function IR remote control with laser pointer and mouse control Advanced vertical digital keystone correction and high...
Страница 7: ...spect the box contents to ensure all parts listed below are in the box If something is missing please contact Optoma customer service Documentation User s Manual Warranty Card Quick Start Card WEEE Ca...
Страница 8: ...Lever 3 Focus Ring 4 Elevator Button one on each side 5 Elevator Feet 6 Zoom Lens 7 IR Receivers 8 Connection Ports 9 Power Socket 10 Tilt Adjustment Feet 11 Air exhaust vent Main Unit Product Overvi...
Страница 9: ...ion Control Panel 1 Power and IR Receiver 2 Power Indicator LED 3 Lamp Indicator LED 4 Temp Indicator LED 5 Menu On Off 6 Keystone 7 Four Directional Select Keys 8 Source Select 9 Re Sync 10 Enter 4 3...
Страница 10: ...udio In For VGA2 7 Audio In For DVI D 8 RS232 9 12V Relay 10 USB Port 11 Composite Video 12 S Video 13 VGA 1 SCART 1 HDTV Component Video Input Connector 14 VGA 2 SCART 2 HDTV Component Video Input Co...
Страница 11: ...al Select Keys 12 Display Format 13 Source 14 VGA1 15 VGA2 16 Freeze 17 Display Mode 18 Zoom In 19 Zoom Out 20 Volume 21 Mouse Left Click 22 Menu 23 Source Lock 24 Picture In Picture 25 DVI 26 HDMI 27...
Страница 12: ...player Set top Box HDTV receiver VGA DVI DVD player Set top Box HDTV receiver Video Output S Video Output VGA DVI molex MOLEX DVD player Set top Box HDTV receiver SCE SCE Connecting the Projector 7 1...
Страница 13: ...al Accessory 3 VGA Output Cable Optional Accessory 4 Audio Output Cable Optional Accessory 5 Audio Input Cable Optional Accessory 6 RS232 Cable 7 USB Cable 8 Composite Video Cable Optional Accessory 9...
Страница 14: ...om quick menu after the startup screen display 4 Turn on your source that you want to display on the screen computer notebook video player etc The projector will detect the source automatically and wi...
Страница 15: ...he screen Press the button again to confirm the shut down If the button is not pressed the message will disappear in 5 seconds 2 The cooling fans continue to operate for about 60 seconds for cooling c...
Страница 16: ...he image 1 Press the elevator button 2 Raise the image to the desired height angle then release the button to lock the elevator feet into position 3 Use screw in feet to fine tune the display angle To...
Страница 17: ...6 9 Screen Screen Size W X H 16 9 Projection distance D Offset Hd m feet m feet wide tele wide tele wide tele wide tele m feet 27 0 60 0 34 1 97 1 11 1 11 1 33 3 64 4 37 0 12 0 40 37 0 81 0 46 2 66 1...
Страница 18: ...on pages 14 15 Source Press Source to select the input signal source Menu Press Menu to launch the on screen display OSD menu To exit OSD Press Menu again Keystone Adjust image distortion caused by ti...
Страница 19: ...ortion caused by tilting the projector Zoom In Zoom in to magnify the image Zoom Out Zoom out to reduce the image Volume Adjust to increase decrease the volume Pg Page Up Use this button to page up Pg...
Страница 20: ...ital signal source from DVI connector Video Press Video to choose Composite video source VGA 1 Press VGA1 to choose source from VGA1 In SCART connector VGA 2 Press VGA2 to choose source from VGA2 In S...
Страница 21: ...se keys to select any item in the main menu While making a selection on a particular page press or Enter key to enter sub menu 3 Use keys to select the desired item and adjust the settings by key 4 Se...
Страница 22: ...X V 3ROVNL 1HGHUODQGV 6XRPL 6YHQVND 1RUVN DQVN 0DJ DU H WLQD 9 0 QIRUPDWLRQ LGH 2Q 2II 2YHUVFDQ H VWRQH LOP 9LGHR UDSKLFV 3 5 DLQ LDV XWR 3RZHU 2II PLQ 6LJQDO 3RZHU 2Q 6OHHS 7LPHU PLQ 3URMHFWLRQ KDQJH...
Страница 23: ...User s settings Brightness Adjust the brightness of the image Press the to darken image Press the to lighten the image Contrast The contrast controls the degree of difference between the lightest and...
Страница 24: ...urated color Press the to decrease the amount of color in the image Press the to increase the amount of color in the image Tint Adjust the color balance of red and green Press the to increase the amou...
Страница 25: ...ter Video For video or TV source Graphics For image source PC For PC or computer source Noise Reduction The motion Adaptive Noise Reduction reduces the amount of vis ible noise interlaced signals The...
Страница 26: ...e or to select item Use or to select Red Green or Blue for brightness Gain and contrast Bias B W Extension Black and White Extension can stretch the black and white levels to automatically increase th...
Страница 27: ...spect ratio 4 3 This format is for 4x3 input sources 16 9 This format is for 16x9 input sources like HDTV and DVD enhanced for Widescreen TV Native This format displays the original image without any...
Страница 28: ...ontent include Anamorphic DVD and HDTV film source that support anamorphic wide is enhanced for 16x9 Display in a wide 2 35 1 image In this case there are no black bars Lamp power and verti cal resolu...
Страница 29: ...displays in the corner of the main screen PIP Location Choose the PIP screen position on the display screen PIP Source Choose the PIP source to switch PIP screen source Swap Press Enter to swap main s...
Страница 30: ...n only if the image appears to flicker vertically Tracking Synchronize the signal timing of the display with the graphics card If the image appears to be unstable or flickers use this function to corr...
Страница 31: ...Saturation Adjust a video image from black and white to fully saturated color Press the to decrease the amount of color in the image Press the to increase the amount of color in the image Hue Adjust...
Страница 32: ...is the default selection The image is projected straight on the screen Rear Desktop When selected the image will appear reversed Front Ceiling When selected the image will turn upside down Rear Ceilin...
Страница 33: ...rn mute off Volume Press the to decrease the volume Press the to increase the volume Audio Settings Treble Press the to decrease the treble volume Press the to increase the treble volume Bass Press th...
Страница 34: ...is used to select the number of hours the projector can be used month day hour When you have reached the limit you will be asked to enter the password again Change Password Select subnet mask number F...
Страница 35: ...o confirm 3 Enter new password 4 digits in length using the number buttons on the remote then press Enter to confirm 4 Enter new password again and press Enter to confirm Projector ID ID definition ca...
Страница 36: ...36 User Controls RS232 RS232 Allow RS232 control of an individual projector Network Allow network LAN via web browser Internet Ex plorer to control of projector Setup Advanced...
Страница 37: ...er automatically Off Assign an IP address manually IP Address Select an IP address Subnet Mask Select subnet mask number Gateway Select the default gateway of the network connected to the projec tor D...
Страница 38: ...en then the web page will display as below 4 Open Control Panel to control your projector For example Use Microsoft Internet Explorer IE web browser to control the projector the IP address is http 192...
Страница 39: ...ick LAN Settings Step 7 The Local Area Network LAN Setting dialog box appears In the Proxy Server area cancel the Use a proxy server for your LAN check box then click OK button twice Step 8 Open your...
Страница 40: ...the searching message Keypad Lock When the keypad lock function is at On the control panel will be locked however the projector can be operated by the remote con trol By selecting Off you will be abl...
Страница 41: ...ss OK to immediately capture a picture what on the display screen High Altitude When On is selected the fans will spin faster This feature is use ful in high altitude areas where the air is thin Signa...
Страница 42: ...r gets activated when no signal is being sent to the projec tor The projector will automatically shut off after the countdown has finished Sleep Timer min When activated the sleep timer will continue...
Страница 43: ...ours before the end of suggested replacement lamp hour Brightness Mode STD Choose STD to dim the projector lamp which will lower power consumption and extend the lamp life by up to 130 Bright Choose B...
Страница 44: ...ls Input Sources Enable input sources Press into the next menu as below and then use or to select Press Enter to finalize the selection The projector will not search inputs that are de selected Option...
Страница 45: ...ntrol panel If you are using a PC For Windows 95 98 2000 XP 1 From the My Computer icon open the Control Panel folder and double click the Display icon 2 Select the Settings tab 3 Verify that your dis...
Страница 46: ...ng the projector The screen of the Notebook or PowerBook computer is not displaying your presentation If you are using a Notebook PC Some Notebook PCs may deactivate their own screens when a second di...
Страница 47: ...projector OSD If the image is still stretched you will also need to adjust the aspect ratio by referring to the following Please setup the display format as 16 9 wide aspect ratio type on your DVD pl...
Страница 48: ...le has been replaced To replace the lamp follow the procedures in the Replacing the Lamp section on page 50 Projector Status Indication LED states Message Power LED Red Power LED Blue Temp LED Red Lam...
Страница 49: ...rol does not work Check the operating angle for the remote control is approximately 22 5 Make sure there are not any obstructions between the remote con trol and the projector Move to within 6 m 20 ft...
Страница 50: ...al injury do not drop the lamp module or touch the lamp bulb The bulb may shatter and cause injury if it is dropped 2 4 Lamp Replacing Procedure 1 Switch off the power to the projector by pressing the...
Страница 51: ...SA XGA 1024 x 768 60 1024 x 768 70 1024 x 768 75 1024 x 768 85 HD 1280 x 720 60 VESA WXGA 1280 x 768 60 1280 x 768 70 1280 x 768 85 1280 x 800 60 VESA SXGA 1152 x 864 60 1152 x 864 70 1152 x 864 75 11...
Страница 52: ...Appendices RS232 Commands and Protocol Function List Pin no Name I O From Projector Side 1 NC __ 2 RXD IN 3 TXD OUT 4 NC __ 5 NC __ 6 NC __ 7 RS232 __ 8 RS232 __ 9 NC __ RS232 Pin Assignments 3 1 5 6...
Страница 53: ...2 DVI D 5 VGA 1 6 VGA 2 7 VGA 1 SCART 8 VGA 1 Component 9 S Video 10 Video 12 VGA 2 SCART 13 VGA 2 Component XX20 n 7E 30 30 32 30 20 a 0D Display Mode n 1 Presentation a 31 32 33 34 35 36 2 Bright 3...
Страница 54: ...aa 30 30 31 aa 33 31 hh 00 aa 30 30 24 aa 32 34 XX78 n 7E 30 30 37 38 20 a 0D Security Settings n 1 Security On a 31 32 2 Security Off XX79 n 7E 30 30 37 39 20 a 0D Projector ID n 00 a 30 30 99 a 39 3...
Страница 55: ...ctor Return Description XX121 1 7E 30 30 31 32 31 20 31 0D Input Source Commands OKaa aa 01 02 04 05 06 07 08 HDMI DVI VGA1 VGA2 Video S Video XX122 1 7E 30 30 31 32 32 20 31 0D Software Version OKaaa...
Страница 56: ...cations Screw type M4 Maximum screw length 10mm Minimum screw length 8mm Warning 1 If you buy ceiling mount from other company please be sure to use the cor rect screw size Screw size will be differen...
Страница 57: ...ervice Tel 44 0 1923 691865 Service service tsc europe com France B timent E Tel 33 1 41 46 12 20 81 83 avenue Edouard Vaillant Fax 33 1 41 46 94 35 92100 Boulogne Billancourt France Service savoptoma...
Страница 58: ...Hong Street Cheung Sha Wan Kowloon Hong Kong Tel 852 2396 8968 Fax 852 2370 1222 www optoma com hk China 1205 5 86 21 62947376 200052 86 21 62947375 www optoma com cn Japan 3 25 18 0120 46 5040 E Mai...
Страница 59: ...this device does cause harmful interference to radio or television reception which can be deter mined by turning the device off and on the user is encouraged to try to correct the interference by one...
Страница 60: ...igital apparatus complies with Canadian ICES 003 Remarque l intention des utilisateurs cana diens Cet appareil numerique de la classe B est conforme a la norme NMB 003 du Canada Declaration of Conform...